
5 Hidden Home Bar Ideas for a Discreet Setup
There is something undeniably sophisticated about a well-stocked home bar. However, not every homeowner wants their living room to look like a lounge or a pub 24/7. Visual clutter is a real concern in modern interior design, especially in multi-functional spaces where kids might play during the day or where you need a calm atmosphere for remote work.
In my design practice, I often work with clients who love to entertain but prefer a minimalist or “quiet luxury” aesthetic when the guests leave. The solution is the hidden bar. It allows you to maintain the architectural integrity and calmness of a room while keeping a fully functional party station just an arm’s length away.
These setups range from complex millwork solutions to clever furniture hacks. If you want to jump straight to visual inspiration, you can view the complete Picture Gallery at the end of this blog post.
1. The Pocket-Door Millwork Wall
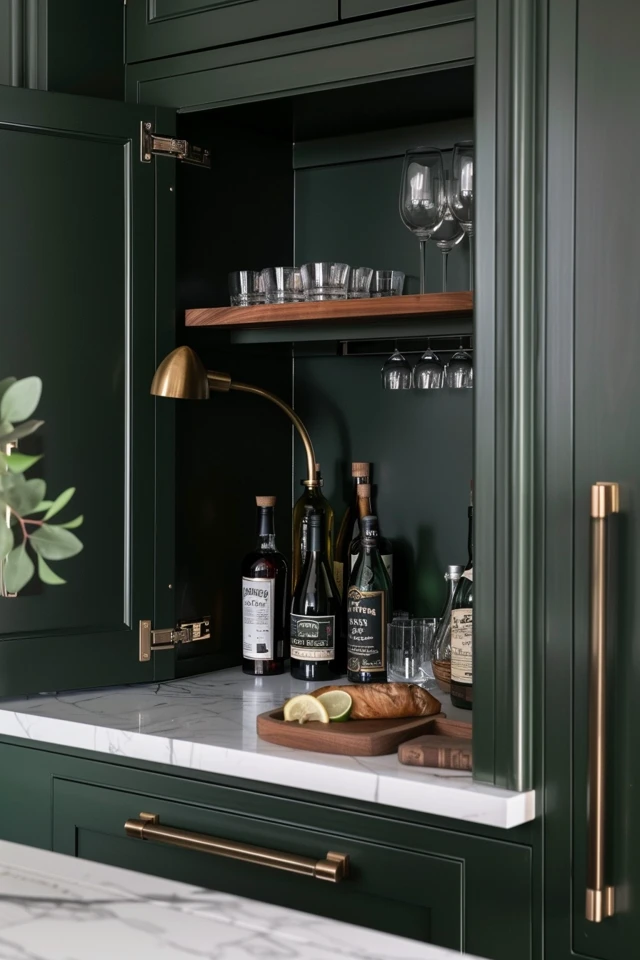
The “appliance garage” concept isn’t just for kitchens anymore. One of the most seamless ways to hide a bar is to integrate it into a larger wall of built-in cabinetry using pocket doors (often called flipper doors). When closed, the wall looks like a uniform storage unit or library. When open, the doors slide back into the cabinet carcass, revealing a lit, mirrored bar interior.
Why this works for designers:
This is the cleanest look possible. It solves the issue of standard cabinet doors swinging out and blocking traffic flow, which is a major pain point in smaller living rooms or dining areas. Because the doors tuck away, the bar can stay “open” for the duration of a party without the hardware getting in the way.
Technical specifications and measurements:
To execute this correctly, depth is your most critical dimension. A standard bookshelf is often only 12 inches deep, which is insufficient for a working bar.
- Minimum Depth: You need at least 18 inches of internal depth to mix drinks comfortably. If you plan to include a wine fridge or beverage cooler, push this to 24 or 25 inches to accommodate the unit and the plug behind it.
- Door Hardware: Use high-quality pocket door slides (like Accuride or Blum). Cheap slides will wobble and eventually scratch the door face.
- Counter Height: Set your internal counter at 36 inches from the floor, matching standard kitchen counter height.
Designer’s Note: The Ventilation Trap
The most common failure I see in these setups is a burnt-out mini-fridge. If you place a beverage cooler inside a cabinet with doors, you must provide ventilation. Even “built-in” ready fridges need air intake. I usually recommend installing a discreet mesh grille in the toe-kick (the bottom recessed part of the cabinet) and ensuring there is an air channel behind the cabinetry. Without this, the heat builds up, the compressor works overtime, and the unit dies within two years.
Common mistakes + fixes:
- Mistake: No electrical planning.
- Fix: Install a quad outlet inside the cabinet before the millwork goes in. You will need power for the fridge, LED strip lighting, and potentially a blender or ice maker.
- Mistake: Using wood shelves for mixing.
- Fix: Use a stone or quartz remnant for the internal countertop. Citric acid (lemons/limes) and red wine will ruin a wood veneer surface instantly.
2. The “Murphy” Bar (Fold-Down Secretary Desk)
If you are renting or dealing with a very tight footprint, custom floor-to-ceiling millwork might not be an option. Enter the fold-down bar, inspired by the mechanics of a Murphy bed or a vintage secretary desk. This is essentially a shallow, wall-mounted cabinet where the front panel folds down 90 degrees to become your serving surface.
Why this works for small spaces:
This utilizes vertical wall space without eating up floor area. When closed, the unit might only protrude 6 to 10 inches from the wall. It keeps liquor bottles out of reach of children and creates an instant focal point only when you want it.
Hardware and structural integrity:
The hinge mechanism is the hero here. You cannot rely on standard piano hinges alone if you plan to lean on the surface or place heavy ice buckets on it.
- Support Chains/Stays: You must use heavy-duty lid stays or drop-front support hinges. Look for hardware rated for at least 50-75 lbs of dynamic load.
- Anchoring: This unit must be screwed into wall studs. Drywall anchors are not sufficient. The leverage created when the door is open and loaded with bottles can rip the cabinet right off the wall.
Styling the interior:
Because the depth is limited (usually barely deep enough for a bottle), you have to be smart about layout.
- Mirrored Back: Always install an antique or smoked mirror on the back panel. It doubles the visual depth and reflects the light from the room, making the small cabinet feel grand.
- Glass Racks: Install T-molding racks on the underside of the top shelf to hang stemware. This frees up the flat shelf space for bottles.
What I’d do in a real project:
I would source a vintage mid-century modern secretary desk and retrofit it rather than building from scratch. Look for pieces made of teak or walnut. The bottom drawers can store extra stock and napkins, while the drop-down desk becomes the active bar. I would line the “desk” surface with a piece of custom-cut leather or a heavy-duty vinyl tray to protect the wood from spills.
3. The Antique Armoire Transformation
For a look that adds character and warmth, converting a freestanding antique armoire or wardrobe is a favorite designer trick. This works particularly well in traditional, transitional, or farmhouse-style homes. It effectively hides modern appliances and clutter inside a piece of furniture that looks like a family heirloom.
The scale advantage:
Armoires are generally large. This gives you enough volume to create a “bar within a room.” You can fit a wine rack, shelving for spirits, and drawers for tools, all behind solid wood doors.
Structural reinforcements needed:
Furniture meant for hanging clothes is rarely built to hold 50 bottles of bourbon. Liquor is incredibly heavy.
- Shelf Bracing: You will likely need to replace thin plywood shelves with 3/4-inch solid wood or plywood with a solid wood edge banding.
- Center Supports: If the armoire is wide, add a vertical center support to prevent shelves from bowing over time.
- Floor Leveling: Old furniture is often wonky. Use shims to ensure the piece is perfectly level; otherwise, your bottles will rattle, and the doors won’t stay closed.
Designer’s Note: Lighting is non-negotiable
An armoire is a dark cave. If you don’t light it, it won’t look appealing. Since you might not want to drill into an antique to hardwire it, use rechargeable, motion-sensor LED light bars. Mount them on the underside of the shelves near the front lip, facing backward. This illuminates the labels of your bottles without shining in your eyes.
Common mistakes + fixes:
- Mistake: Ignoring the “tipping” hazard.
- Fix: When you open both heavy doors of an armoire, the center of gravity shifts forward. You must use an anti-tip kit to anchor the top of the furniture to the wall behind it, especially if you have children or pets.
- Mistake: Storing wine improperly.
- Fix: The upper portion of an armoire can get warm. Only store spirits (whiskey, vodka) up top. Keep wine in a cooler or on a rack in the lower section where temperatures are more stable.
4. The Under-Stair Secret Compartment
The triangular space beneath a staircase is often dead space or a repository for dust bunnies. Transforming this area into a hidden dry bar is a high-impact renovation that adds significant value to a home.
Layout options:
There are two main ways to approach this:
1. The Pull-Out: Deep drawers that slide out on heavy-duty tracks. The “door” is actually the front of a vertical drawer unit. This is great for accessing bottles stored deep in the recess.
2. The Hidden Door: A panel that matches the wall trim or wainscoting but pushes open to reveal a small walk-in or reach-in nook.
Maximizing the awkward geometry:
Stair angles are tricky.
- Custom Shelving: You will need custom-cut floating shelves that graduate in depth. Use the deepest, lowest area for your wine fridge or heavy cases of beer. Use the higher, narrower triangle space for glassware display.
- Material Continuity: To keep it discreet, paint the interior shelves the same color as the surrounding walls, or go for a moody contrast (like charcoal or navy) so the bar feels like a destination when opened.
What I’d do in a real project:
I would line the back wall of the under-stair nook with a metallic wallpaper or a bronze mirror. Since this space is often low to the ground and shadowed, the reflective surface helps bounce light around. I would also insist on installing a prep surface—even just a small 12-inch pull-out shelf—so you have a place to set a glass while pouring.
5. The Bookshelf Camouflage
If you don’t have the budget for custom millwork or the space for an armoire, you can hide a bar in plain sight within a standard bookcase. The goal here is integration rather than total concealment. We want the bar elements to read as “decor” until you start mixing a drink.
The “Tray” technique:
The key to avoiding a cluttered look is containment. Do not line bottles up in a row like they are at a liquor store.
- Grouping: Place 3-4 beautiful bottles on a lacquer or leather tray. The tray acts as a frame, turning the bottles into a curated vignette.
- Decanting: If you have unsightly branded bottles, decant the liquor into matching crystal or glass decanters. This removes the “commercial” look of labels and makes the setup look like an art installation.
Layering for depth:
Treat the bar shelf exactly like a styled bookshelf.
- Placement: Place the bar setup on a shelf that is waist-high (roughly 30-36 inches off the floor).
- Accessories: Flank the liquor tray with books stacked horizontally or sculptural objects. This dilutes the “bar” vibe and blends it with the rest of the room.
- Closed Storage below: If possible, use a bookshelf that has cabinet doors on the bottom. Keep the ugly stuff (mixers, napkins, plastic tools) down there, and only display the premium crystal and spirits up top.
Designer’s Note: The revolving door option
For high-end projects, we sometimes install a “sibilant” bookshelf section. This is a section of the bookcase mounted on a central pivot hinge. On one side, it holds books. When you rotate it 180 degrees, it reveals the bar shelving on the reverse side. This requires precise carpentry but is the ultimate “hidden” feature.
Final Checklist for Your Hidden Bar
Before you commit to a design, run through this quick checklist to ensure your hidden bar is actually functional.
- Check Electrical: Is there power nearby for a fridge or lighting?
- Measure Bottle Heights: Standard vodka/whiskey bottles are taller than you think (often 12-13 inches). Ensure your shelf spacing accommodates this, including the height needed to lift the bottle out.
- Assess Flooring: If using a heavy armoire or loaded cabinet, is the floor level?
- Plan for Trash: Where will the bottle caps and lime rinds go? A small, hidden waste bin is often forgotten but essential.
- Surface Durability: Have you protected the wood surfaces from alcohol and citrus acid?
- Child Safety: If the bar is hidden, can it be locked? Magnetic tot-locks are great for keeping these areas secure without visible hardware.
Frequently Asked Questions
Do I need a sink in a hidden home bar?
In most “dry bar” setups, no. A sink (wet bar) complicates plumbing significantly and increases costs. Unless you are near a kitchen or bathroom wall where you can tie into existing lines, stick to a dry bar. You can manage just fine by bringing fresh ice from the kitchen.
How deep should a shelf be for liquor bottles?
A standard liquor bottle is about 3 to 3.5 inches in diameter. However, for a single row of bottles, I recommend a shelf depth of at least 6 inches to prevent accidental knock-overs. If you want to layer bottles (front to back), aim for 10-12 inches.
Can I put a wine fridge inside a closed cabinet?
Only if you buy a unit specifically designed for “built-in” or “undercounter” use. These units vent from the front (the toe kick). Freestanding units vent from the back. If you put a freestanding unit in a closed cabinet, it will overheat. Even with a built-in unit, you must ensure the cabinet door is open when the fridge is working hard, or install ventilation grilles in your millwork.
What is the best lighting temperature for a home bar?
Stick to warm white, typically 2700K to 3000K. Anything higher (4000K+) will look like a dentist’s office or a convenience store fridge. You want moody, warm ambient light.
Conclusion
Creating a hidden home bar is about balancing functionality with discretion. It allows you to embrace the ritual of cocktail hour without letting it dominate your home’s aesthetic. Whether you choose to retro-fit a vintage armoire, install sleek pocket doors, or utilize the space under your stairs, the key lies in the details: proper lighting, durable surfaces, and sturdy hardware.
By following these guidelines and respecting the measurements provided, you can build a setup that surprises your guests and serves you well for years to come.
Picture Gallery


