
5 Home Bar and Games Room Ideas for Ultimate Fun
Designing a space dedicated to leisure is one of the most rewarding projects you can undertake in a home. It is the one room where strict functionality takes a backseat to pure enjoyment, allowing for bolder design choices and more personality. However, the most successful game rooms are not just large spaces filled with toys; they are carefully zoned areas that account for flow, acoustics, and durability.
I have seen many homeowners struggle because they purchase a pool table or a large sectional without measuring the clearance required to actually play the game or walk around the furniture. If you are just looking for visual inspiration, you can scroll down to the Picture Gallery at the end of this blog post.
For everyone else ready to plan a renovation, this guide breaks down five distinct approaches to the home bar and game room. We will cover the technical layouts, the necessary measurements, and the design details that elevate a room from a storage space for games to a cohesive entertaining hub.
1. The Classic “Speakeasy” Lounge
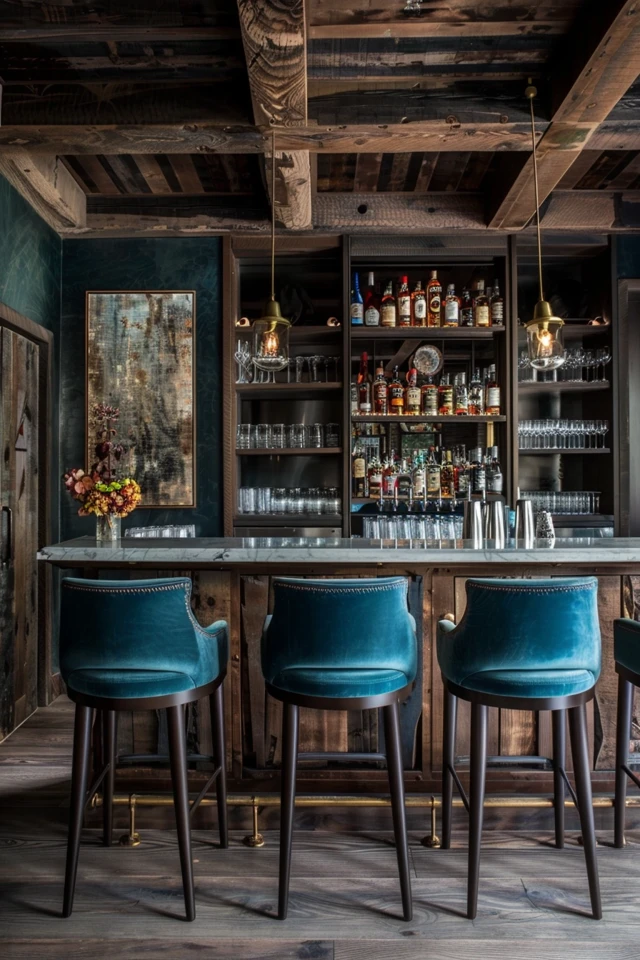
This concept is perfect for basements or enclosed rooms without much natural light. Instead of fighting the darkness, we embrace it to create a moody, intimate atmosphere reminiscent of a high-end jazz club or a 1920s speakeasy. This design leans heavily on rich textures, dark paint colors, and strategic lighting.
The focal point here is a substantial wet or dry bar. If plumbing allows, a wet bar with a prep sink increases functionality immensely. If you are restricted to a dry bar, focus on beautiful cabinetry and a beverage fridge. The goal is to create a space that feels separated from the daily grind of the rest of the house.
To achieve this look, avoid recessed “can” lights as your primary source of illumination. They tend to flatten a room and kill the mood. Instead, rely on sconces, picture lights over artwork, and low-hanging pendants over the bar to create pockets of warm light.
Technical Layout & Measurements
- Standard Bar Height: A standard bar counter sits at 42 inches high. You will need barstools with a seat height of 30 inches.
- Bar Overhang: For comfortable knee clearance, ensure the countertop overhangs the base cabinets by at least 10 to 12 inches.
- Back Bar Spacing: If you have a back bar for storage behind the main serving bar, leave a walkway width of 36 to 42 inches. This allows the “bartender” to move freely without feeling cramped.
Designer’s Note: The Material Mix
In a real project, I always prioritize durability on the bar top. While marble looks stunning, it is porous and reacts poorly to acids like lemon or lime juice (etching). For a home bar where citrus and red wine are present, I recommend a dark quartz or a sealed quartzite. These natural stone alternatives give you the luxury look without the panic every time a guest spills a drink.
Common Mistakes + Fixes
- Mistake: Using bright white light bulbs that make the room feel like a cafeteria.
- Fix: Stick to 2700K (warm white) LED bulbs. Install dimmer switches on every single circuit. Being able to drop the light level to 30% is the secret to that “lounge” vibe.
What I’d Do in a Real Project
- Paint the ceiling the same dark color as the walls (color drenching) to blur the boundaries of the room.
- Use velvet or leather upholstery for sound absorption.
- Install a mirror behind the bar shelves to reflect the bottle collection and add depth to the room.
2. The High-Energy Basement Arcade
If your goal is family fun involving ping pong, billiards, or arcade cabinets, you need a layout that prioritizes movement. An arcade room is loud and active. The design challenge here is managing acoustics and ensuring there is enough “swing room” so players aren’t hitting the walls with cues or paddles.
Hard surfaces like concrete or tile floors will cause sound to bounce, creating an unpleasant echo chamber. In these spaces, flooring choice is critical. I often recommend commercial-grade carpet tiles. They offer sound dampening, are easy to replace individually if stained, and come in fun geometric patterns that suit the high-energy vibe.
Zoning is also essential. You don’t want the person throwing darts to be in the traffic path of someone walking to the bathroom. Create distinct zones: an active zone for standing games and a passive zone with comfortable seating for spectators.
Technical Layout & Measurements
- Pool Table Clearance: This is the non-negotiable rule. You need 5 feet of clear space on all sides of the playing surface. A standard cue stick is 57 to 58 inches long. If you have a column or wall closer than 5 feet, playing becomes frustrating.
- Pinball and Arcade Machines: Allow 24 inches of width per machine, but verify specific dimensions. Leave at least 36 inches of standing room in front of the machine for the player.
- Dart Board: The center of the bullseye should be 5 feet 8 inches from the floor. The “oche” (throw line) should be 7 feet 9.25 inches from the face of the board.
Designer’s Note: Electrical Planning
In a real project, we map out the electrical plan before the drywall goes up. Arcade machines, neon signs, and mini-fridges consume power and require outlets in specific spots. Nothing ruins a professional look faster than extension cords snaking across the floor. If you are renovating, install floor outlets under where the pool table or air hockey table will go, especially if those tables have electronic scoring or lighting.
Common Mistakes + Fixes
- Mistake: Buying a pool table that is too big for the room.
- Fix: Use painter’s tape to mark the table outline on the floor. Then, physically walk around it with a tape measure extended to 5 feet to simulate a cue stick. If you hit a wall, size down the table or choose a different game.
What I’d Do in a Real Project
- Install acoustic panels wrapped in fabric on the walls to dampen shouting and game noise.
- Use heavy blackout curtains if there are basement windows to prevent glare on screens.
- Create a drink rail along the perimeter walls (approx. 6–8 inches deep) so players have a safe place to set drinks away from the game tables.
3. The Compact Multi-Purpose Corner
Not everyone has a dedicated 1,000-square-foot basement. You can create an incredible game and bar experience in a corner of your living room or dining room. The key here is scale and multi-functionality. The furniture must look like high-end residential pieces when not in use, rather than obvious “game room” furniture.
A game table can double as a dining table or a library table. Look for a round table with a 36-inch to 42-inch diameter. This size is intimate enough for cards or board games but small enough to fit in a nook. Pair this with comfortable dining chairs that have a slightly lower profile.
For the bar element, verticality is your friend. A tall bar cabinet (armoire style) hides all the clutter of bottles and glasses behind closed doors. When you have guests, you open the doors, pull out the sliding shelf, and the party begins.
Technical Layout & Measurements
- Rug Sizing: Ensure the rug is large enough that when chairs are pulled out for playing, the back legs stay on the rug. Usually, this means the rug should extend 24 to 30 inches beyond the table edge.
- Walkways: Maintain a minimum 30-inch path between the back of the game chairs and any other furniture in the room to allow traffic flow.
Designer’s Note: Lighting the Table
Overhead lighting is crucial for board games and cards. A pendant light should hang approximately 30 to 36 inches above the tabletop. If you are renting or don’t have a junction box in the right spot, use a large arc floor lamp. It adds a sculptural element and delivers light exactly where you need it without hiring an electrician.
Common Mistakes + Fixes
- Mistake: Using deep, slouchy lounge chairs for a game table.
- Fix: Select upright chairs with firm support. Seat height should be roughly 18 inches. If the seat is too low or too soft, players will feel like they are sinking away from the table, which ruins the engagement.
What I’d Do in a Real Project
- Source a vintage game table with drawers to store decks of cards and scorepads.
- Use a bar cart on casters if a cabinet doesn’t fit; it can be rolled to the center of the action or tucked away.
- Stick to a monochromatic color palette to keep the corner from looking cluttered.
4. The Industrial Garage Conversion
The garage is often the most underutilized square footage in a home. converting a garage into a “sports bar” or game room is a fantastic way to gain space without an addition. The aesthetic here naturally leans industrial—exposed beams, concrete floors, and metal accents.
Since garages are usually on a concrete slab, insulation and climate control are the primary hurdles. Before buying a single piece of furniture, address the temperature. A mini-split HVAC system is usually the most efficient way to heat and cool a single-room conversion.
For flooring, I highly recommend Luxury Vinyl Plank (LVP) or an epoxy coating. LVP is waterproof, warmer underfoot than concrete, and can mimic wood convincingly. Epoxy is incredibly durable and fits the “car lover” vibe if you want to keep the industrial edge.
Technical Layout & Measurements
- TV Viewing Distance: If this is a sports-watching zone, the distance from the sofa to the TV is important. A good rule of thumb is 1.5 to 2.5 times the screen diagonal. For an 85-inch TV, the seating should be roughly 10.5 to 17 feet away.
- Bar Rail Height: If you build a viewing bar behind a sofa (stadium seating style), the counter should be 42 inches high so people sitting there can see over the heads of people on the sofa.
Designer’s Note: Softening the Box
Garages are boxy and cold. To make it feel like an interior room, you need texture. I often use wood slats or shiplap on one focal wall to add warmth. Rugs are mandatory here to anchor the seating areas and prevent the space from feeling like… well, a garage.
Common Mistakes + Fixes
- Mistake: Ignoring the garage door rails.
- Fix: If you are keeping the functioning garage door (for indoor-outdoor flow), paint the rails and hardware matte black to make them look like intentional industrial design elements rather than utility hardware.
What I’d Do in a Real Project
- Install a retractable screen door behind the main garage door so you can open the big door for fresh air without letting bugs in.
- Use durable outdoor-rated fabrics (like Sunbrella or Krypton) on indoor sofas, as garage zones tend to track in more dirt.
- Add dimmable track lighting on the ceiling beams to highlight dartboards or memorabilia.
5. The Indoor-Outdoor Connector
This concept blurs the line between the interior game room and the backyard patio. It creates a massive entertaining footprint by utilizing a large opening, such as bifold doors, stacking sliders, or a garage-style glass door.
The ultimate feature here is the “pass-through” bar. This is a window that opens fully, with a countertop extending from the inside to the outside. It allows you to prep drinks inside and hand them to guests on the patio.
Material continuity is the design secret here. Using the same flooring material inside and outside (or materials that look very similar) tricks the eye into seeing one continuous space. For example, a porcelain tile that mimics slate can be used in both zones, provided the outdoor version has a slip-resistant finish.
Technical Layout & Measurements
- Pass-Through Counter Depth: The exterior shelf should be at least 12 to 14 inches deep to accommodate plates and drinks comfortably.
- Window Height: The bottom of the pass-through window usually sits at counter height (36 inches) or bar height (42 inches). Ensure the window hardware (tracks/sills) is flush or low-profile to avoid obstructing the service area.
Designer’s Note: Weatherproofing
In a real project, the countertop material for a pass-through bar needs to withstand UV rays and temperature shifts. Natural granite is excellent for this. Quartz can discolor (yellow) under direct sunlight over time. If you use quartz, ensure it is a specific UV-rated outdoor product.
Common Mistakes + Fixes
- Mistake: Not having an overhang on the exterior side.
- Fix: You must have a roof overhang, pergola, or awning above the exterior bar seating. This protects guests from the sun and prevents rain from driving directly into the window tracks.
What I’d Do in a Real Project
- Install outdoor heaters in the ceiling of the overhang to extend the usable season of the outdoor bar.
- Use heavy, wind-resistant barstools for the exterior side so they don’t blow over in a storm.
- Coordinate the hardware finishes (faucets, door handles) inside and out for a seamless look.
Final Checklist for Your Project
Before you purchase your first piece of lumber or furniture, run through this quick checklist to ensure your game room is viable.
- Measure the entry path: Can that massive pool table slate or arcade cabinet actually fit down your basement stairs or through the hallway?
- Check the electrical load: Do you have enough amps on your circuit breaker to run a beverage fridge, large TV, and gaming consoles simultaneously?
- Test the acoustics: Clap your hands in the room. If it rings sharply, you need to budget for rugs, curtains, and soft furnishings.
- Verify floor level: Pool tables require a perfectly level floor. If your basement floor slopes toward a drain, you will need to account for significant shimming or leveling.
- Plan for trash: It is the most forgotten item. Plan a dedicated spot for a trash and recycling bin, preferably hidden inside cabinetry.
FAQs
What is the minimum size room for a pool table?
For a standard 8-foot pool table (which has a playing surface of 44″ x 88″), the minimum room size is approximately 13′ 4″ x 17′. This accounts for the table size plus the necessary 5-foot clearance on all sides for cue action.
How do I soundproof a game room cheaply?
True soundproofing requires construction (insulation, resilient channels), but you can do sound absorption easily. Add heavy velvet curtains, thick rug pads, canvas art (with acoustic foam tucked behind the frame), and upholstered furniture. These materials absorb sound waves rather than reflecting them.
Can I put a pool table on a rug?
Yes, but with caveats. The rug must be large enough that all four legs sit on it with plenty of room to spare. Do not install the table so that two legs are on the rug and two are off; the table will never be level. Once the table is leveled on the rug, you cannot move the rug without releveling the table.
What is the best lighting for a home bar?
Layered lighting is best. You need task lighting (under-cabinet lights) to see while making drinks, and ambient lighting (dimmable pendants or sconces) for atmosphere. Avoid cool white bulbs; stick to 2700K or 3000K temperatures for a welcoming glow.
Conclusion
Creating a home bar or game room is about more than just fitting equipment into a room; it is about creating an experience. Whether you opt for the moody atmosphere of a speakeasy lounge or the high-energy vibe of a garage arcade, the success of the project lies in the planning.
Remember to respect the measurements. A smaller room that flows well and allows for comfortable movement is infinitely better than a large room stuffed with too much furniture. Focus on durable materials, flexible lighting, and smart zoning. When these elements come together, you get a space that isn’t just fun to look at, but effortlessly fun to use.
Picture Gallery


