
5 Home Bar Cabinet Ideas to Maximize Storage
Every host knows that the difference between a chaotic party and a seamless evening often comes down to organization. I remember one of my first client projects involved a couple who loved entertaining but kept their liquor in a high kitchen cabinet above the refrigerator. Every time they wanted to make a cocktail, they had to drag out a step stool, which killed the mood instantly.
A dedicated home bar cabinet solves this flow problem while anchoring the room’s design. It provides a designated “zone” for hospitality, keeping guests out of your primary work triangle in the kitchen. If you are looking for visual examples of these setups, please check the Picture Gallery at the end of the blog post for high-resolution inspiration.
However, the challenge usually isn’t just about having a cabinet; it is about maximizing every square inch of that cabinet for specific shapes and sizes. Liquor bottles, fragile stemware, and tiny accessories like muddlers and strainers all require different storage geometries. Below, I’m sharing five specific cabinetry strategies I use to get the most out of home bar storage, ranging from custom built-ins to flexible freestanding pieces.
1. The Floor-to-Ceiling Vertical Built-In
When floor space is at a premium, you have to look up. In many urban apartments or smaller dens, dedicating a wide footprint to a credenza isn’t feasible. The vertical built-in utilizes the full height of the room, often turning an awkward niche or alcove into a high-functioning feature.
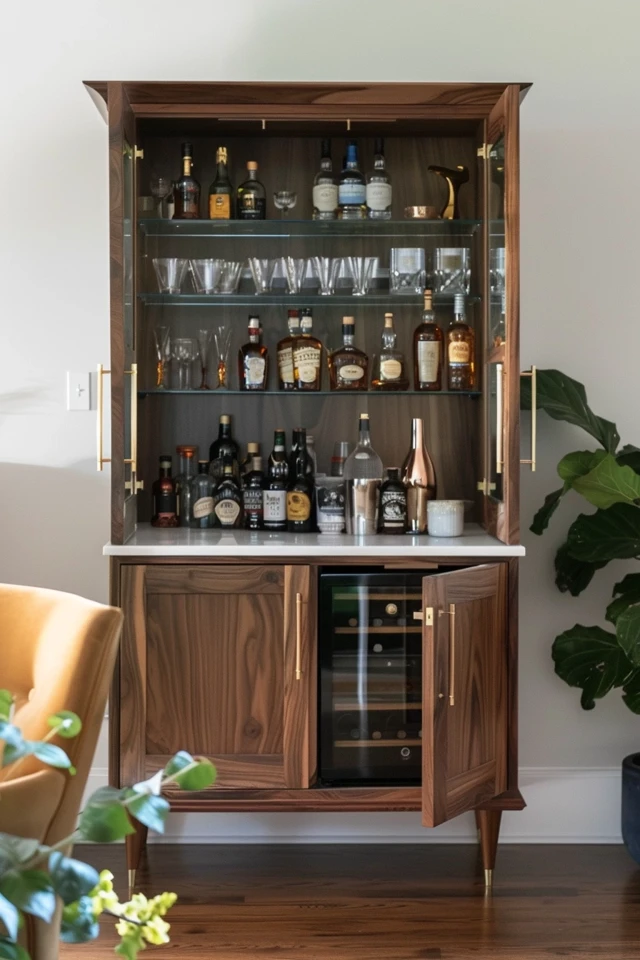
The key to this design is graduating the depth and height of the shelves. I typically design the bottom third of the cabinet to be deeper (around 18 to 24 inches) with solid doors. This is where you store heavy cases of wine, backup mixers, and unsightly trash bins.
The upper section should be shallower (12 to 14 inches) with glass doors or open shelving. This creates a visual lightness so the unit doesn’t feel like a heavy monolith looming over the room. It also puts your premium bottles at eye level, acting as decor.
Key Measurements and Specs
- Base Cabinet Height: Standard counter height is 36 inches. If you are tall, bumping this to 38 inches makes pouring drinks more comfortable.
- Upper Shelf Depth: Aim for 12 inches minimum. Most liquor bottles are 3 to 4 inches in diameter, so this allows for rows of three deep.
- Bottle Clearance: Allow 14 inches of vertical space between shelves. Tall bottles like Grey Goose or certain scotches will not fit on standard 12-inch book shelving.
Designer’s Note: The “Reach” Factor
A common mistake I see is placing the mixing surface too high or the stemware too low. In a vertical setup, I always install a pull-out shelf (like a cutting board) immediately above the base cabinets.
This provides a temporary workspace for slicing limes or pouring drinks without requiring a permanent deep countertop. It slides away when the party is over, keeping the walkway clear.
Common Mistakes + Fixes
- Mistake: Installing fixed shelving throughout the upper cabinet.
- Fix: Use adjustable shelf pins. Bottle collections change. You might switch from beer (short) to wine (tall). Adjustable shelves future-proof the unit.
- Mistake: Poor lighting at the top.
- Fix: Route channels for LED tape lights into the underside of each shelf. Use a 2700K warmth to mimic candlelight.
2. The Repurposed Antique Armoire
For clients who want character and “hidden” storage, repurposing an antique armoire or wardrobe is a brilliant move. This is particularly effective in traditional or transitional living rooms where built-in joinery might look too modern or clinical.
An armoire offers massive internal volume. Because these pieces were originally designed to hang clothes or store heavy linens, they are usually deep enough (20 to 24 inches) to house a wine fridge or a dedicated beverage cooler inside, provided you cut ventilation holes in the back panel.
The beauty of this option is the “surprise” element. When the doors are closed, it is a stately piece of furniture. When opened, it reveals a glowing, mirrored bar interior.
Retrofitting for Function
- Stemware Racks: Mount wire or wood glass racks to the underside of the upper shelves. This utilizes “dead” air space and frees up the shelf surface for bottles.
- Mirror Backing: I almost always install an antiqued mirror on the back interior panel. It reflects the bottles, making the collection look larger, and bounces light into the dark cavity of the cabinet.
- Surface Protection: Antique wood does not like water or alcohol. You must protect the mixing surface. I recommend having a piece of tempered glass or a remnant of stone cut to sit on the main shelf.
Real-World Project Checklist
- Check the Hinges: Antique doors are heavy. Ensure the hinges allow the doors to swing open 180 degrees. If they only open 90 degrees, they will block the view and the flow of traffic.
- Weight Capacity: Liquor is heavy. Reinforce existing shelves with a center support or thicker wood cleats. A sagging shelf is a disaster waiting to happen.
- Ventilation: If you put a fridge inside, you must drill holes in the back and ensure there is clearance on the sides. Without airflow, the fridge motor will burn out in a year.
3. The Floating Credenza with Internal Organizers
In modern and contemporary spaces, we want to see the floor. Seeing the floor running underneath furniture makes a room feel wider and more open. A floating credenza anchored to the wall provides excellent storage without the visual weight of a standard buffet.
This approach requires careful structural planning, but the payoff is a sleek, high-end look. Since space is limited to the cabinet box, internal organization is paramount. You do not have the luxury of vertical height here, so everything must be accessible from the top or front.
I prefer units with a mix of drawers and doors. Drawers are superior for small tools (corkscrews, stoppers, cocktail napkins) which tend to get lost in deep cupboards.
Installation and Safety
- Blocking is Mandatory: You cannot hang a bar cabinet on drywall anchors. A fully loaded bar cabinet can weigh hundreds of pounds. You must open the wall and install 2×6 blocking between the studs before hanging the unit.
- Mounting Height: Hang the cabinet so the top surface is at 36 to 42 inches. 36 inches is standard kitchen height; 42 inches is standard bar height.
Material Selection
- Top Surface: Avoid marble if you use real citrus. Lemon juice will etch marble instantly. Go for a honed quartz or a dark granite that can withstand the acid.
- Drawer Insiders: Use felt or cork liners. This stops tools from sliding around and clanking every time you open the drawer.
What I’d Do in a Real Project
If I were designing a floating bar for a client, I would choose a dark walnut veneer with a black quartz top. Inside, I would install a pull-out wire basket for bottles. Pull-outs allow you to see the label of the bottle at the back without knocking over the bottles in the front.
4. The “Wet” Bar in a Butler’s Pantry
If you have a pass-through space between the kitchen and dining room, or a large closet near the living area, you have the potential for a “wet” bar. This maximizes storage by offloading the plumbing and cleaning functions from the main kitchen.
A wet bar cabinet differs because it must accommodate a sink. This reduces your storage space immediately under the sink, so we have to regain that storage elsewhere.
I recommend using an “appliance garage” design for this setup. This is a section of counter-height cabinetry with a roll-up or pocket door that hides blenders, coffee makers, and juicers. It keeps the counter clear for actual drink preparation.
Plumbing and Electrical Logic
- Sink Size: You do not need a full kitchen sink. A 15-inch square bar sink is sufficient for dumping ice and rinsing glasses.
- Faucet Height: Choose a high-arc faucet. You need clearance to fill tall pitchers or carafes.
- Outlets: Install outlets inside the appliance garage and backsplash. You will inevitably need to plug in a blender or an electric wine opener.
Storage Logic for Wet Bars
- Upper Cabinets: Take them to the ceiling. Use the highest shelves for seasonal glassware (like Christmas mugs or margarita glasses you only use in summer).
- Drawers vs. Doors: Under the counter, prioritize drawers. A deep drawer with peg dividers is the safest way to store heavy plates and platters.
Designer’s Note: The Counter Depth
Standard kitchen counters are 24 inches deep. In a butler’s pantry or hallway, you might only have space for 18 or 21 inches. This is fine for a bar, but you must select an under-counter wine fridge carefully. Standard units are 24 inches deep. You will need to source “shallow depth” appliances to ensure they don’t stick out past the cabinetry.
5. The Compact Cabinet with Dual Functionality
For renters or those in smaller homes, a dedicated permanent bar isn’t always an option. The solution is a high-quality freestanding cabinet that serves a dual purpose. It might be a side table by day and a bar by night.
To maximize storage in these smaller units, look for doors that have storage built into them (similar to a refrigerator door). These shallow racks are perfect for bitters, syrups, and smaller tumblers.
When floor space is tight, the top of the cabinet becomes prime real estate. However, it shouldn’t look like a liquor store. The key is “contained styling.”
Styling Rules for Open Storage
- Use a Tray: Corral the bottles you use most frequently on a decorative tray. This creates a boundary and makes the clutter look intentional.
- The Rule of Three: Group items in odd numbers. A bottle, a shaker, and a bowl of limes look better than just two items.
- Vertical Variance: Vary the heights. Put a tall decanter next to a short stack of coasters.
Renters and Mobility
- Legs vs. Casters: If you have hard floors, look for a cabinet on casters (wheels). Being able to roll the bar to the dining table for dinner and then back to the corner is a huge functional win.
- Lockable Casters: Ensure at least two of the wheels lock. You do not want the bar rolling away while someone is mixing a martini.
Common Mistakes + Fixes
- Mistake: Overloading the top surface.
- Fix: Rotate your stock. Keep only the 3-5 bottles you are currently drinking on display. Store the rest inside or in a pantry.
- Mistake: Ignoring spill protection on wood floors.
- Fix: Place a small, durable rug or runner under the cabinet. This defines the zone and protects your security deposit from red wine splashes.
Final Checklist: Before You Buy or Build
Before you commit to a bar cabinet design, run through this quick checklist to ensure it will function in the real world.
- Measure Your Tallest Bottle: Do you drink Riesling or grey goose? Measure it. Add 2 inches for clearance. That is your minimum shelf height.
- Check Door Swing: Use blue painter’s tape to mark the floor where the cabinet doors will swing open. Ensure they don’t hit a sofa, a rug edge, or a walkway.
- Count Your Glasses: Do an inventory. If you have 24 red wine glasses, ensure your rack storage can actually hold 24. Most people underestimate their collection.
- Lighting Plan: If the cabinet is dark wood, you need internal lighting. It is impossible to read labels in a dark cabinet during a dim evening party.
- Traffic Flow: Ensure the bartender (you) can stand at the cabinet without blocking the path to the bathroom or kitchen.
Frequently Asked Questions
Should I store wine bottles horizontally or vertically?
For long-term storage (more than a month), store wine with natural corks horizontally. This keeps the cork moist and prevents air from entering the bottle, which spoils the wine. Screw-top wines or liquor bottles should always stand vertically. High-proof alcohol can degrade the cork if it stays in contact with it for too long.
What is the ideal depth for a home bar cabinet?
For a built-in, 24 inches is standard and allows for appliances. For a freestanding unit, 18 to 20 inches is the “sweet spot.” It is deep enough to hold a tray and bottles but shallow enough not to dominate the room. Anything under 15 inches will be difficult to use as a mixing station.
How do I childproof a bar cabinet without it looking ugly?
Avoid plastic external latches. If you are doing custom cabinetry, install magnetic locks that are invisible from the outside and open with a magnetic “key.” For freestanding furniture, look for cabinets that come with traditional key locks on the doors. It adds a vintage aesthetic while securing the contents.
Can I put a wine fridge inside a wooden cabinet?
Only if the fridge is designed for “built-in” or “zero-clearance” use. These units vent from the front (the toe kick). Freestanding mini-fridges vent from the back. If you put a back-venting fridge inside a closed cabinet, it will overheat. Always check the manufacturer’s ventilation requirements.
Conclusion
Creating the perfect home bar cabinet is about balancing the romance of entertaining with the logistics of storage. Whether you opt for a dramatic floor-to-ceiling built-in or a charming vintage armoire, the goal is to make hospitality easier.
When you have a designated place for every glass, bottle, and tool, you stop stressing about the mess and start enjoying your guests. Remember to measure twice, account for the height of your bottles, and choose materials that can handle a spill or two.
Picture Gallery


