
5 Home Bar Counter Design Tips for Small Spaces
Designing a dedicated home bar in a compact footprint is one of the most rewarding challenges in interior design. It transforms a utilitarian corner into a sophisticated hub for entertaining, relaxation, and personal expression. Many of my clients initially believe they lack the square footage for a proper bar setup, assuming they need a sprawling basement or a dedicated room to make it work.
The truth is, some of the most charming and functional home bars I have designed were tucked into apartment alcoves, under staircases, or along transition walls. The key lies in prioritizing vertical storage, selecting the right scale of furniture, and mastering the subtle art of lighting to define the zone. For visual inspiration on how these layouts come together, check out the Picture Gallery at the end of the blog post.
In this guide, I will walk you through the specific measurements, material choices, and layout strategies required to build a bar counter that feels substantial without crowding your living space. We will move beyond general advice and look at the actual numbers and rules of thumb professional designers use to ensure functionality and flow.
1. Utilize Verticality with Floating Elements
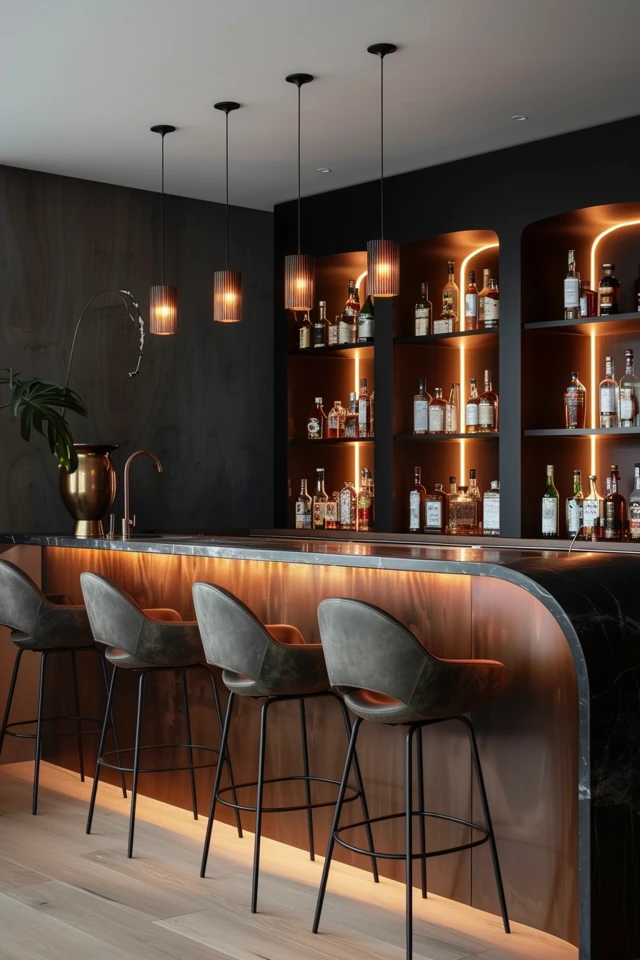
In small spaces, floor area is your most expensive commodity. Traditional bar cabinets or heavy buffets often have a footprint that protrudes too far into the room, choking the traffic flow. The solution is to lift the eye upward and utilize the walls.
A floating bar counter is an excellent way to maintain an open feel. By attaching the counter directly to the wall using heavy-duty brackets, you eliminate the visual bulk of cabinetry legs or bases. This allows the flooring to extend all the way to the wall, which psychologically tricks the brain into thinking the room is larger than it is.
When installing a floating counter for pouring drinks or casual seating, depth is critical. I recommend a depth of at least 15 to 18 inches. This provides enough surface area for a standard placemat, a drink, and a small snack plate without feeling precarious. If you plan to tuck stools underneath, ensure the brackets are spaced widely enough to avoid knee knocking.
Above the counter, avoid deep, closed upper cabinets. Instead, opt for open shelving with a depth of 10 to 12 inches. This is the perfect dimension for standard liquor bottles and glassware. Staggering the shelves allows for taller bottles on the bottom and shorter glassware on top.
Designer’s Note
One lesson I learned early in my career involved failing to account for the weight of liquid. A single bottle of whiskey weighs roughly three pounds. If you have a shelf holding 20 bottles, plus glassware, that is significant weight. Always anchor floating shelves into wall studs, not just drywall. Use brackets rated for at least 50 pounds more than your estimated load to be safe.
Common Mistakes + Fixes
- Mistake: Installing shelves too close together vertically.
- Fix: Allow at least 15 to 18 inches of clearance between the counter and the first shelf to accommodate tall appliances like blenders or tall spirit bottles.
- Mistake: Using shelves that are too deep.
- Fix: Keep upper shelves under 12 inches deep. Anything deeper creates a shadow over your workspace and makes the room feel top-heavy.
2. Master the Math of Seating and Clearance
If your home bar design includes seating, the relationship between the stool and the counter is the single most important factor for comfort. Nothing ruins the vibe faster than a guest having their legs crushed against the underside of a counter or sitting too low to comfortably reach their drink.
There are two standard height categories you must distinguish between: “Counter Height” and “Bar Height.” A standard kitchen counter height is 36 inches off the floor. For this, you need stools with a seat height of 24 to 26 inches. A traditional bar height is 42 inches. For this, you need stools with a seat height of 30 inches.
In small spaces, I almost always recommend sticking to the 36-inch counter height. It feels less imposing in a room and can double as a workspace or buffet server when you aren’t entertaining. It also keeps sightlines open, whereas a 42-inch high barrier can chop up a small living room visually.
Regarding width, you need to budget 24 to 30 inches of linear counter space per stool. If your counter is only 48 inches wide, do not try to squeeze in three stools. Two stools will look intentional and luxurious; three will look cluttered and desperate.
Don’t forget the “walk-behind” clearance. You need at least 36 inches of open space behind a seated guest for someone else to walk past. In a tight apartment, this might mean choosing backless stools that can tuck fully under the overhang when not in use.
What I’d Do in a Real Project
- Stool Selection: For small spaces, I choose backless stools with a slim metal profile or acrylic “ghost” stools. They disappear visually.
- Overhang: I insist on a countertop overhang of at least 10 to 12 inches for leg comfort. Anything less forces the user to sit sideways.
- Footrests: If I am building a custom floating counter, I install a foot rail on the wall or select stools with integrated footrests. Dangling legs lead to discomfort within 15 minutes.
3. Define the Zone with Lighting and Texture
A home bar tucked into a living room corner risks looking like an afterthought if it isn’t “zoned” correctly. Since you likely cannot use walls to define the space, you must use light and texture to create a boundary. This signals to guests that they are entering a distinct area with a specific function.
Lighting is paramount here. Relying on the room’s central ceiling fixture will leave your bar area flat and uninviting. You want pockets of light that create intimacy. I prefer warm light sources, ideally between 2700K and 3000K color temperature, which mimics the glow of candlelight.
If you are renting or cannot hardwire new sconces, use rechargeable, battery-operated LED picture lights above your shelving. Another excellent trick is using LED tape light channels routed into the underside of your floating shelves. This washes light down onto your bottles and glassware, making them sparkle and acting as a focal point.
Texture plays a similar role. Consider applying a peel-and-stick wallpaper with a bold pattern or a textured grasscloth behind the bar shelves. This visual anchor draws the eye and makes the shelving unit feel like a cohesive piece of furniture rather than random planks on a wall.
Common Mistakes + Fixes
- Mistake: Using cool, daylight-toned bulbs (4000K+).
- Fix: Swap all bulbs in the immediate area to warm white (2700K). It makes amber liquids look richer and guests look better.
- Mistake: Ignoring the floor.
- Fix: If space permits, a small runner rug in front of the bar area can help acoustically and visually separate the “bar” from the “lounge.”
4. Select Durable Materials with Reflective Qualities
In a small home bar, every surface is touched and seen up close. The materials you choose need to be durable enough to withstand citrus acids, red wine spills, and alcohol, while also helping to expand the visual space.
Mirror is the oldest trick in the designer’s handbook for a reason. Installing an antique or smoked mirror backsplash behind your shelves doubles the perceived depth of the shelves and reflects light back into the room. It adds instant glamour and makes a tight corner feel airy. I prefer smoked mirror for bars because it feels moodier and requires less constant cleaning than standard silver mirror.
For the countertop itself, avoid porous stones like marble if you want low maintenance. Alcohol and citrus etch marble almost instantly. Instead, look for quartz remnants. Since home bars usually have small surface areas, you can often find high-end “offcuts” or remnants at stone yards for a fraction of the price of a full slab.
Glass is another material to lean on heavily. Glass shelves allow light to pass through from top to bottom, preventing the “cave effect” that solid wood shelves can create in a dark corner. Combine glass shelving with brass or chrome hardware to add a jewelry-like touch to the space.
Designer’s Note
If you love the look of natural stone but fear the maintenance, look into quartzite (not to be confused with engineered quartz). Quartzite is a natural stone that is significantly harder and more resistant to etching than marble, but it offers that organic, veined look that elevates a small space.
5. Optimizing Flow with “Tuck-Away” Designs
Sometimes, the best bar design for a small space is one that can disappear when not in use. If your walkway is extremely narrow—less than 36 inches wide—a permanent counter might not be feasible. In these instances, we look at drop-leaf or pull-out mechanisms.
A secretary desk or a drop-front cabinet is a fantastic vintage solution that works in modern interiors. When closed, it is a slim cabinet that hides clutter. When open, the front panel becomes a sturdy mixing surface. This is particularly good for families with children or pets, as it keeps fragile glassware and expensive bottles completely enclosed and out of reach.
Another option is the “bar cart console.” Unlike the traditional small cart, this is a longer, shallow console table on casters. It can be pushed against a wall or behind a sofa most of the time. When you are entertaining, it can be wheeled into the center of the room to serve as an island.
When planning flow, consider the “bartender’s triangle.” Even in a tiny bar, you need a zone for bottles, a zone for glassware, and a zone for prep (cutting limes, mixing). Ensure these three are within arm’s reach of each other so you aren’t crossing the room to fetch a glass while holding a shaker.
What I’d Do in a Real Project
- The Niche Strategy: If there is a closet nearby that isn’t fully utilized, I often remove the door and build the bar inside the closet frame. This creates a “wet bar” feel without eating up living room floor space.
- Tray Tables: I use folding butler trays for parties. They provide temporary extra surface area for used glasses or ice buckets and can be folded and stored under a sofa the next morning.
Final Checklist: Designing Your Small Space Bar
Before you purchase materials or start drilling holes, run through this final checklist to ensure your design is viable.
- Check Clearances: Do you have 36 inches of walking space behind where the stools will be?
- Weight Bearing: Have you located the studs for your floating shelves?
- Electrical: Is there an outlet nearby for a mini-fridge, blender, or lamp? If not, have you sourced battery-operated alternatives?
- Height Verification: Have you matched your stool height (24″-26″ vs. 30″) to your counter height (36″ vs. 42″)?
- Surface Durability: Is your countertop material resistant to acid (lemon/lime) and alcohol?
- Legroom: Does your counter overhang by at least 10 inches to allow for comfortable seating?
- Visual Weight: Have you incorporated glass, mirrors, or raised legs to keep the floor visible?
FAQs
Can I put a mini-fridge in a cabinet?
Yes, but with caution. Standard mini-fridges require ventilation to displace heat. If you place a freestanding fridge inside a tight cabinet, it will overheat and fail. You must either buy a “zero-clearance” or “built-in” rated unit (which vents from the front) or cut ventilation grates into the back and sides of your cabinetry to allow airflow.
What is the minimum depth for a useful bar counter?
For a surface where you simply pour drinks, 12 inches is the absolute minimum. However, if you plan to sit at it or eat appetizers, you really need 15 to 18 inches. Anything shallower than 12 inches feels like a picture ledge and risks bottles tipping over.
How do I protect my walls from splashes?
Mixing drinks can get messy. I always recommend using a wipeable paint finish, such as eggshell, satin, or semi-gloss, in the bar area. Flat or matte paint absorbs liquids and is impossible to clean. Alternatively, installing a glass or tile backsplash up to the first shelf provides the best protection.
Is a wet bar possible in an apartment?
Adding a sink (wet bar) requires tapping into existing plumbing and drainage. In a condo or apartment, this is often cost-prohibitive or forbidden unless the bar shares a “wet wall” with a kitchen or bathroom. For most small spaces, I recommend a “dry bar” layout and using a stylish ice bucket to manage cooling needs.
Conclusion
Creating a home bar in a small space is less about square footage and more about intentional design. By respecting the rules of scale, utilizing vertical storage, and selecting materials that handle wear and tear, you can carve out a dedicated entertaining zone in even the tightest quarters.
Remember that the goal is not just to store bottles, but to create an atmosphere. Whether you opt for a floating shelf system, a mobile cart, or a converted closet, the success of the project relies on the details—the warmth of the lighting, the comfort of the seating, and the flow of the room. Start with your measurements, buy quality hardware, and design a space that invites you to slow down and enjoy a drink at the end of the day.
Picture Gallery


