
5 Home Bar Counter Ideas for a Polished Look
Designing a home bar is one of the most fun requests I get from clients. It is a space dedicated entirely to leisure, hosting, and relaxation. Unlike a kitchen, which has to be utilitarian above all else, a home bar allows for a bit more drama, personality, and specialized styling. However, a great home bar requires the same attention to ergonomics and scale as any other work zone in your house.
I vividly remember a project in a downtown loft where the client assumed a “bar” just meant a high table and some shelves. Once we started talking about clearance for cabinet doors, the depth of a wine fridge, and the reflective quality of the backsplash, they realized that the difference between a college setup and a polished adult space lies entirely in the details. It is about balancing the visual “wow” factor with the mechanics of mixing a drink.
In this guide, I will walk you through five distinct design approaches to achieve that high-end, polished aesthetic. If you are looking for visual inspiration, you can skip straight to the Picture Gallery at the end of this blog post. Otherwise, let’s dive into the layouts, measurements, and materials that make these spaces work.
1. The Classic Built-In “Wet Bar” Nook
The “wet bar” is the gold standard for a polished home entertaining space. By definition, a wet bar includes a sink, which drastically changes the functionality of the area. This setup is usually tucked into a recessed niche in a living room, dining room, or basement. The goal here is to make it look like a piece of custom furniture rather than a misplaced kitchen cabinet.
To achieve a polished look in a niche, symmetry is your best friend. I usually center the sink and flank it with symmetrical upper cabinetry or open shelving. This creates a focal point that feels intentional. For the cabinetry, I recommend going with a full-overlay door style or an inset cabinet. These styles hide the frame of the cabinet box, providing a sleek, seamless appearance that feels much more expensive than standard overlay doors.
When selecting materials for a wet bar, remember that alcohol and citrus are acidic. Natural marble is stunning, but it will etch the moment a lime wedge touches it. If you want the look of marble without the patina anxiety, opt for a high-quality quartz or a dense natural stone like quartzite. For a darker, moodier vibe, Soapstone is an incredible choice; it is non-porous and chemically inert, meaning lemon juice won’t hurt it.
Designer’s Note: The Plumbing Reality
The biggest hurdle here is getting water to the location. If your nook shares a wall with a bathroom or kitchen, you are in luck. If not, trenching a slab or opening walls can eat up your budget fast. Before buying a single tile, have a plumber verify the feasibility of the drain line, which requires a specific slope (¼ inch per foot) to function correctly.
Common Mistakes + Fixes
- Mistake: Installing a standard kitchen-sized sink.
- Fix: Use a dedicated bar sink. A standard kitchen sink is 30 to 33 inches wide, which creates a massive “hole” in your counter space. A bar sink should be between 15 and 18 inches wide. This leaves you enough counter space for cutting boards and glassware.
2. The Floating Console & Shelf Combo
Not every home has a recessed niche or the budget for custom cabinetry. For renters or those with smaller footprints, a floating console combined with wall-mounted shelves is a fantastic, flexible solution. This approach feels airy and modern. It prevents the room from feeling heavy, which is critical in apartments or multipurpose rooms.
To make this look “polished” rather than temporary, scale is everything. The console or sideboard you choose must be substantial. A flimsy, narrow table will look cheap. Look for a sideboard that is at least 18 to 20 inches deep. This gives you enough surface area to arrange a tray of bottles, a lamp, and still have room to pour a drink without knocking things over.
Above the console, install heavy-duty floating shelves. I prefer thick wood shelves (at least 2 inches thick) to give visual weight. When styling these shelves, do not clutter them with every beer koozie you own. Curate the display with your best glassware, a few high-end liquor bottles, and perhaps a small trailing plant to soften the hard edges.
What I’d Do in a Real Project
If I am designing this for a client using retail furniture, I often “hack” the piece to make it look custom. I might buy a sturdy wood credenza and then have a local stone fabricator cut a piece of honed black granite to sit on top. Adding a stone top instantly elevates the piece, protects the wood from water rings, and ties it into the architecture of the home.
Key Measurements
- Console Height: Standard dining buffets are around 30 to 32 inches high. This is lower than a kitchen counter (36 inches). It is fine for pouring, but don’t try to pull a stool up to it.
- Shelf Spacing: Hang the first shelf roughly 18 to 20 inches above the console top. This allows height for tall bottles or a statement lamp.
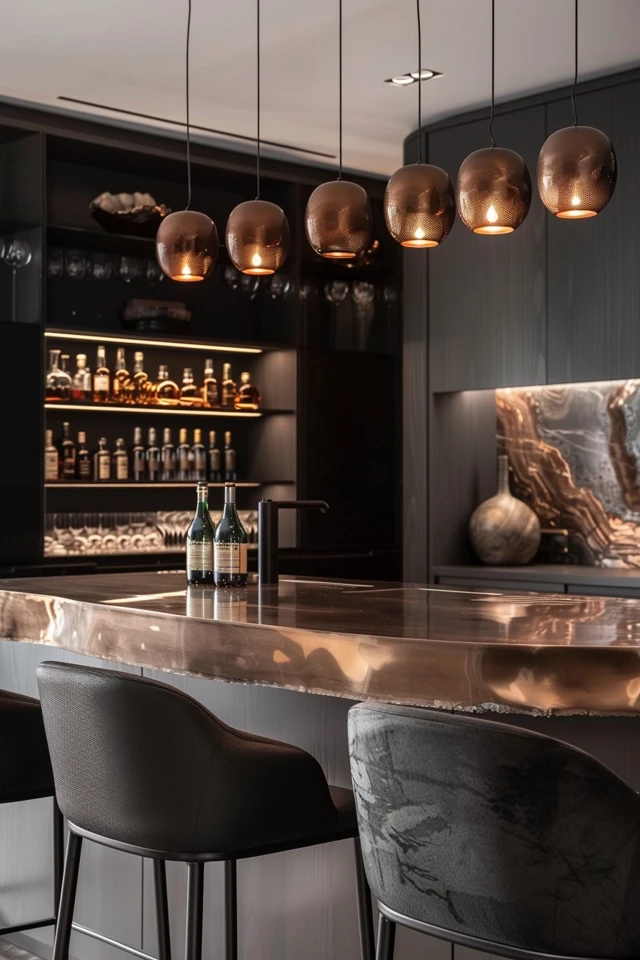
3. The Moody “Speakeasy” Corner
This design concept is less about the layout and more about the atmosphere. The “Speakeasy” look relies on dark, saturated colors, rich textures, and dramatic lighting. This is perfect for a corner of a den or a basement game room. The goal is to create a destination that feels distinct from the rest of the bright, airy house.
Paint is your most cost-effective tool here. I love color-drenching the bar area. This means painting the base cabinets, the wall, the shelves, and even the ceiling in the same dark hue—think navy, charcoal, forest green, or deep aubergine. Use a satin or semi-gloss finish for the cabinetry to highlight the millwork, and a matte finish for the walls to absorb light and create depth.
Lighting is absolutely critical in a dark space. You cannot rely on a single overhead can light, or you will create harsh shadows that ruin the vibe. You need layers. I always specify under-cabinet LED tape lighting for the shelves to make the bottles glow. Pair this with a small, dimmable table lamp or wall sconces with metal shades to direct light downward.
Designer’s Note: The 2700K Rule
Never, ever use “Daylight” (5000K) bulbs in a bar area. It will look like a hospital. Always check your bulb packaging for “Warm White” or “Soft White,” specifically 2700K or 3000K. This warmer color temperature complements wood tones and makes skin tones look better, which is exactly what you want when hosting.
Common Mistakes + Fixes
- Mistake: Ignoring texture, resulting in a “flat” dark wall.
- Fix: Incorporate mixed metals and reflective surfaces. If you have navy cabinets, use unlacquered brass hardware. Add an antiqued mirror backsplash. The reflection helps bounce the low light around and makes the small corner feel larger and more glamorous.
4. The Kitchen Extension Peninsula
Many modern homes have open floor plans where the bar needs to integrate with the main kitchen. A dedicated “beverage center” at the end of a kitchen run or on the backside of an island is a very functional approach. This keeps guests out of the main cooking triangle (the path between stove, sink, and fridge) while keeping them close to the action.
To give this area a polished look, use “zoning” techniques. Even if the cabinets match the rest of the kitchen, change one element to signal that this is the bar. Glass-front upper cabinets are a classic way to do this. You can display your stemware here, breaking up the wall of solid wood doors found in the rest of the kitchen.
Another way to define this zone is through the countertop overhang. If this is a peninsula where people will sit, you need to manage the transition from “working counter” to “serving bar.” A waterfall edge, where the countertop material cascades down the side of the cabinet to the floor, is a stunning modern detail that screams luxury.
Key Measurements for Seating
- Knee Clearance: If you want people to sit at the counter, you need an overhang of at least 12 to 15 inches. Anything less and your guests will be knocking their knees against the cabinetry.
- Elbow Room: Plan for 24 inches of width per stool. If you cram too many stools in, the space looks cluttered and amateur.
- Stool Height: This is the most common purchasing error. For a standard 36-inch kitchen counter, you need “Counter Height” stools (seat height 24-26 inches). Do not buy “Bar Height” stools (seat height 30 inches); those are for elevated 42-inch tops.
5. The High-Gloss Butler’s Pantry
The butler’s pantry is the ultimate luxury transition space, usually located between the dining room and the kitchen. Historically, this was for staging food, but modern design has repurposed it as the primary home bar. Because it is a pass-through space, you can take design risks that might feel overwhelming in a larger room.
For a truly polished look, I love using a high-gloss lacquer finish on the cabinetry in this space. It reflects light and feels incredibly sophisticated. Pair this with a full-height stone backsplash. Instead of stopping the stone 18 inches up the wall, take it all the way to the ceiling or the bottom of the crown molding. This creates a vertical sweep that draws the eye up.
This is also the place to invest in specialized appliances. A paneled wine fridge (where the door matches the cabinetry) helps maintain the seamless look. If you are a serious collector, consider a dual-zone fridge to keep reds and whites at their respective perfect temperatures.
What I’d Do in a Real Project
I would install a wire mesh insert in the upper cabinet doors. An antiqued brass or nickel wire mesh allows you to see the silhouette of the glassware inside without requiring the contents to be perfectly organized at all times. It adds texture and an old-world charm that contrasts beautifully with modern appliances.
Designer’s Note: Hardware Selection
In a small, jewelry-box space like a butler’s pantry, the hardware is the jewelry. Don’t use the standard bulk-pack knobs here. Splurge on heavier, solid brass knobs or pulls. You only need a few, so the cost impact is low, but the tactile difference when opening a drawer is significant.
Final Checklist: Planning Your Project
Before you call a contractor or buy a single piece of lumber, run through this checklist. These are the steps I take for every client project to ensure we don’t hit unexpected roadblocks.
- Define the Purpose: Is this for wine storage, cocktail mixing, or just coffee? This dictates your appliance needs.
- Check the Electrical: Do you have outlets for a fridge, blender, or ice maker? New codes often require dedicated circuits for refrigeration.
- Measure the Depth: Standard base cabinets are 24 inches deep. If you are tight on space, look for “vanity depth” cabinets which are 18 to 21 inches deep.
- Select Durability: If you have kids or throw wild parties, skip the marble and porous woods. Go for quartz and pre-finished wood.
- Plan the Trash: Where does the empty lemon peel go? Include a small pull-out trash bin in your cabinet plan so you aren’t walking to the kitchen with garbage.
FAQs
What is the difference between bar height and counter height?
This is critical for comfort. “Counter height” is 36 inches off the floor (standard kitchen height) and requires stools with a seat height of 24 to 26 inches. “Bar height” is 42 inches off the floor (often a raised ledge) and requires stools with a seat height of 30 inches. Mixing these up is the number one reason seating feels awkward.
Do I need a sink in my home bar?
You do not need one, but it changes the function. Without a sink, it is a “dry bar.” You will have to fetch water and rinse shakers in the kitchen. If you are more than a few steps from the kitchen sink, I highly recommend installing a small bar sink for convenience.
What is the best lighting for a home bar?
Layered lighting is best. You want ambient light (general glow), task light (focused on the counter for slicing limes), and accent light (highlighting bottles). Avoid cool, blue-toned LEDs. Stick to 2700K or 3000K temperatures for a warm, inviting atmosphere.
Can I use a rug in a bar area?
Yes, but proceed with caution. A runner rug can add warmth and texture, especially in a hallway butler’s pantry. However, make sure it is a low-pile, durable material (like wool or a high-quality performance synthetic) that is easy to spot-clean when red wine inevitably spills.
Conclusion
Creating a polished home bar is about more than just buying a nice cart and some crystal decanters. It is about defining the zone, respecting the architecture of your home, and paying attention to the functional details like lighting, clearance, and durability.
Whether you are remodeling a dedicated room or just styling a console table in your rental, the principles remain the same. Start with a clear plan for how you will use the space, measure twice, and invest in materials that feel good to the touch. A well-designed bar not only elevates your hosting game but creates a daily ritual of relaxation in your own home.
Picture Gallery


