
5 Home Bar Design Ideas for a Chic Look
There is something undeniably magnetic about a well-designed home bar. It is rarely just about the drinks; it is about the ritual of hospitality and the feeling of transitioning from the workday to the evening. In my years of designing residential interiors, I have seen home bars evolve from afterthought liquor carts tucked in a corner to dedicated architectural features that anchor a room.
I recall a specific project in a crowded urban townhouse where we turned a useless, shallow closet into a jewel-box wet bar. The clients initially thought they didn’t have the space, but by utilizing vertical height and clever lighting, it became the most talked-about feature of the home. It proved that you do not need a sprawling basement to create a sophisticated destination for entertaining.
Whether you are renovating a permanent residence or styling a rental, the goal is to blend functionality with high-impact aesthetics. If you need visual inspiration before diving into the details, you can find a curated Picture Gallery at the end of this blog post.
1. The Moody Built-In Wet Bar
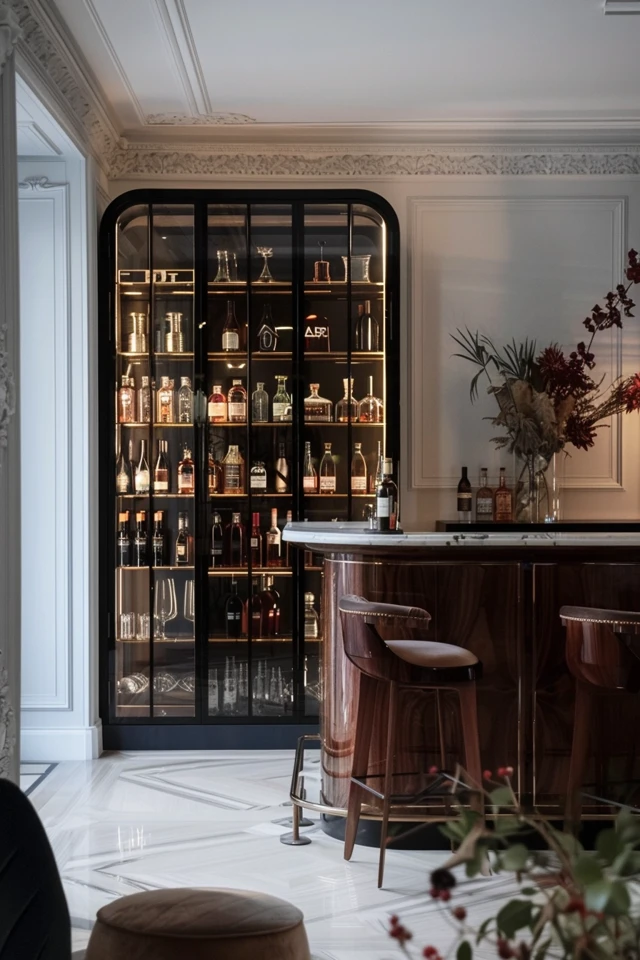
If you have a recessed niche or an alcove in your dining or living room, a built-in wet bar is the ultimate luxury upgrade. This approach treats the bar as a piece of permanent architecture, often utilizing dark colors and rich textures to distinguish it from the rest of the room.
The key to a successful built-in is the “jewel box” effect. Since the square footage is usually small, you can afford to splurge on higher-end materials that might be cost-prohibitive in a full kitchen. Think high-gloss lacquer paint, a slab of exotic stone, or unlacquered brass hardware that patinas over time.
For a truly chic look, take your cabinetry all the way to the ceiling. This draws the eye up and maximizes storage for glassware that you do not use every day.
Designer’s Note: The Importance of the Backsplash
In a wet bar, the backsplash is your focal point. I often steer clients away from standard subway tile here. Instead, consider an antique mirror finish. It reflects light, making a small nook feel double the size, and adds a moody, speakeasy vibe that clear mirrors lack.
Technical Specs & Measurements
- Counter Depth: Standard kitchen counters are 24 inches deep, but for a bar, you can often get away with 18 to 21 inches if you use a bar-sized sink.
- Upper Cabinet Clearance: Leave 18 inches between the countertop and the bottom of upper cabinets. If you are tall or use tall blenders, bump this to 20 inches.
- Sink Size: A 15-inch square prep sink is usually sufficient. Anything larger eats up valuable prep space.
Common Mistakes + Fixes
Mistake: Installing standard kitchen lighting.
Fix: Bar lighting should be atmospheric. Use dimmable LED tape lights inside glass-front cabinets and under-shelf lighting. Aim for a color temperature of 2700K (warm white) rather than the cooler 3000K or 4000K used in task kitchens.
2. The Hidden “Armoire” Bar
Not everyone wants their liquor collection on display 24/7. For multi-purpose rooms, such as a family room that doubles as an entertaining space, the hidden bar is a sophisticated solution. This design utilizes tall, furniture-style cabinetry—often resembling a standalone armoire—to house the entire bar setup.
The magic of this design lies in the hardware. We typically use pocket doors or retractable flipper doors that slide back into the cabinet carcass. This allows the bar to remain wide open during a party without doors blocking traffic flow, and then completely disappear when the night is over.
Inside, you treat it like a mini-room. You can line the back with wallpaper, install a stone countertop, and even include a small beverage fridge if the cabinet is properly ventilated.
What I’d Do in a Real Project
- Ventilation is non-negotiable: If you are hiding a fridge inside a cabinet, you must cut a vent into the toe kick and the back panel to allow heat to escape. Without this, the fridge will burn out quickly.
- Electrical planning: I always install a quad outlet inside the cabinet for the fridge, a coffee maker, and a rechargeable wine opener.
- Drawer logic: Include at least one shallow drawer for tools (corkscrews, muddlers, napkins). A drawer depth of 4 inches is plenty for these items.
Material Selection
Since this piece looks like furniture, I recommend using a wood veneer with a strong grain, such as walnut or white oak. If you prefer a painted finish, go with a high-gloss sheen. It is more durable against spills and looks significantly more expensive than matte or eggshell finishes.
3. The Floating Shelf & Console Combo
This is the most versatile and renter-friendly option on the list. It creates a dedicated bar zone without requiring construction, plumbing, or electrical work. The concept pairs a substantial sideboard or console table (for storage and surface area) with floating shelves above (for display).
The success of this design relies entirely on scale and composition. The console needs to be heavy enough visually to anchor the wall, while the shelves keep the look airy.
This setup allows you to display your most beautiful bottles and glassware on the shelves while hiding the “ugly” items—like backstock mixers, paper napkins, and mismatched tools—inside the console drawers.
Designer’s Note: The Rule of Thirds
When hanging floating shelves above a console, do not match the width exactly. The shelves should be slightly shorter than the console to create a balanced pyramid shape. If your console is 60 inches wide, aim for shelves that are roughly 42 to 48 inches wide.
Styling the Surface
- The Tray Trick: Use a large tray (leather or metal) to corral bottles on the console surface. This prevents the “cluttered countertop” look and protects the wood from drips.
- Lighting: Since you likely won’t have hardwired sconces, place a small, rechargeable table lamp on the console. It adds that necessary glow without messy cords.
- Art placement: Lean a piece of art behind the tray or hang it slightly off-center between the shelves for a modern, asymmetrical look.
Common Mistakes + Fixes
Mistake: Using a console that is too low.
Fix: Standard dining buffets are 36 inches high, which is perfect for pouring drinks. Avoid low media consoles (usually 18–24 inches high), as they will force you to stoop over to mix a cocktail.
4. The Butler’s Pantry Pass-Through
If you are renovating or building, the transitional space between the kitchen and dining room is prime real estate for a bar. This area, traditionally called a butler’s pantry, creates a natural flow for entertaining. Guests can grab a drink here without crowding the kitchen where the food prep is happening.
Because this is a high-traffic zone, durability is the priority. I recommend using quartzite or sintered stone countertops rather than porous marble, which etches instantly upon contact with lemon or lime juice.
This design usually features upper cabinetry with glass fronts. To keep it chic, consider reeded glass or antique glass rather than clear glass. It obscures the contents slightly, meaning your glassware doesn’t have to be perfectly organized to look good.
What I’d Do in a Real Project
- Create a landing zone: Ensure there is at least 24 inches of clear counter space next to the sink or fridge for setting down glasses.
- Wine storage: Instead of a massive wine fridge, I prefer a 24-inch under-counter beverage center for white wine and beer, paired with “X” insert carpentry for storing red wine at room temperature.
- Hardware selection: Treat the hardware like jewelry. Polished nickel or unlacquered brass pops beautifully against dark cabinetry often used in these transitional spaces.
Traffic Flow Considerations
Ensure you have enough clearance. If the pantry is a hallway, you need a minimum of 36 inches of walking path. If you have cabinet doors opening on both sides, 42 to 48 inches is safer to prevent collisions.
5. The Under-Stair Nook
The space beneath a staircase is often dead square footage, typically drywall-ed over or used as a chaotic storage closet. Transforming this into a home bar is one of the most clever uses of space in interior design.
The challenge here is the slope. Custom millwork is usually required to maximize the triangular space. I like to install a base cabinet that runs the full length of the straight wall, and then use stepped shelving to follow the angle of the stairs.
This is a great spot for a wine cellar aesthetic. You can install custom racking that follows the slope, turning the storage of the bottles into a visual art piece behind a glass enclosure.
Designer’s Note: Lighting the Cave
Under-stair spaces are naturally dark. You must be aggressive with lighting. I recommend recessed puck lights in the ceiling of the nook and LED channels routed into the shelves. If you have a glass enclosure, position a spotlight to graze the front of the wine labels.
Common Mistakes + Fixes
Mistake: Ignoring the depth.
Fix: Under-stair spaces are often deep (36 inches or more). Standard cabinets are only 24 inches deep. Build a false wall at the back to bring the cabinets forward, or use the deep recesses for appliance venting and electrical mechanics.
Mistake: Poor ergonomics.
Fix: Be careful not to place the main work surface under the lowest part of the slope. You do not want to hit your head while pouring wine. Keep the “active” zone where the ceiling height is at least 7 feet.
Final Checklist: The Essentials
Before you call a contractor or buy a cabinet, run through this checklist to ensure your bar is actually functional.
- Surface Durability: If you choose marble, are you prepared for patina? If not, choose Quartzite or Granite.
- Electrical Plan: Do you have outlets for a blender, ice maker, wine fridge, and decorative lamp?
- Height Check: Is the work surface at 36 inches (counter height)?
- Lighting: Do you have ambient light (dimmable) and task light (for mixing)?
- Storage Height: Did you measure your tallest liquor bottle? (Grey Goose and St. Germain bottles are notoriously tall).
- Flooring: If the bar is in a carpeted room, consider a rug or a tiled inset area to handle spills.
FAQs
What is the best depth for a home bar shelf?
For liquor bottles, a shelf depth of 10 to 12 inches is ideal. This allows for one row of bottles without them getting hidden behind one another. For glassware, 10 inches is usually sufficient.
Do I need a sink in my home bar?
It is a luxury, not a necessity. A “dry bar” functions perfectly well for mixing simple drinks. However, if you have the budget and plumbing access, a small bar sink (wet bar) significantly helps with cleanup and disposing of ice.
How do I style a bar if I don’t drink alcohol?
A home bar is really a “beverage station.” You can style it as a sophisticated coffee bar, a tea salon, or a sparkling water station. The design principles—lighting, storage, and glass display—remain exactly the same. Replace liquor bottles with syrups, premium olive oils, or beautiful ceramic canisters.
What is the correct height for bar stools?
This is the most common purchasing error.
- If your counter is 36 inches high (standard kitchen height), you need counter stools with a seat height of 24 to 26 inches.
- If your counter is 42 inches high (raised bar height), you need bar stools with a seat height of 28 to 30 inches.
Conclusion
Designing a home bar is an opportunity to be bolder than you might be in other rooms. Because it is a smaller, distinct zone, you can experiment with darker paint colors, dramatic lighting, and luxurious materials that might feel overwhelming in a large living room.
Start by assessing your space and your realistic hosting habits. Whether you opt for the moody built-in wet bar or a flexible console arrangement, the goal is to create a space that invites you to pause and enjoy the moment. Good design is not just about how it looks, but how it facilitates connection.
Picture Gallery


