
5 Home Bar Floor Plan Ideas for Efficient Use
Designing a home bar is about much more than just picking out a pretty countertop or stocking expensive scotch. It is about flow, ergonomics, and how the space makes you feel when you are mixing a drink for a friend. Over the years, I have seen clients struggle with bars that look stunning but are frustrated to use because the layout fights against them.
I once worked with a client who insisted on a massive island bar in a narrow basement room. Once we taped out the dimensions on the floor, they realized they wouldn’t be able to open the refrigerator door without hitting the barstools. We pivoted to a galley layout, and it saved the entire project.
Whether you are remodeling a basement, converting a spare closet, or building an addition, the floor plan dictates the success of the space. To spark your imagination, I have curated a Picture Gallery at the end of this blog post to show you these concepts in real homes.
1. The “Pocket” Bar (Closet Conversion Layout)
This is one of the most efficient ways to add a bar without increasing your home’s footprint. It involves repurposing an existing reach-in closet or a recessed alcove in a living or dining room. The floor plan here is linear and compact, utilizing vertical space to minimize floor clutter.
The Layout Strategy
The base cabinet typically runs the full width of the closet, usually between 4 and 6 feet. Because space is tight, we generally skip the sink in this layout unless there is easy access to plumbing from a bathroom directly behind the wall. This is known as a “dry bar.”
To make this efficient, you need to maximize the “backsplash” area. We install shallow shelving (about 8 to 10 inches deep) above the counter for glassware and liquor bottles. This keeps the 24-inch deep countertop free for cutting limes and pouring drinks.
Lighting and Electrical
Lighting is critical in a pocket bar because closets are naturally dark. I always specify recessed LED puck lights in the ceiling of the niche. Alternatively, LED strip lighting routed into the underside of the shelves creates a moody, high-end glow.
You must plan for power outlets at countertop height for blenders or coffee makers. If you plan to install a beverage cooler in the base cabinet, ensure you have a dedicated outlet behind it.
Designer’s Note: Ventilation is Key
A common mistake I see is installing a beverage fridge in a closet niche without proper ventilation. Standard mini-fridges vent heat out the back. If the niche is tight, that heat gets trapped, shortening the appliance’s life. Always buy a “front-venting” or “built-in” specific unit for this layout.
Common Mistakes + Fixes
Mistake: Using standard swing doors that block the room when open.
Fix: Install pocket doors or “flipper” doors that slide back into the cabinetry. Or, remove the doors entirely and treat it as an open built-in feature.
2. The Galley Passage (Walk-Through Layout)
The galley layout is fantastic for basements or transition spaces between a kitchen and a dining room. It features two parallel runs: a “back bar” against the wall and a “front bar” or island parallel to it. This mimics a professional bartender’s setup.
The Layout Strategy
Efficiency here is determined by the aisle width. The distance between the back counter and the front island is crucial. I recommend a minimum of 36 inches for a one-person bar.
If you anticipate two people working back-to-back, aim for 42 to 48 inches. Anything wider than 48 inches becomes inefficient because you have to take too many steps to turn from the sink to the service counter.
Zoning the Workflow
In a galley layout, I use the “triangle” rule similar to a kitchen.
1. The Wet Zone: Place a small prep sink (roughly 15×15 inches) on the back wall.
2. The Cold Zone: Place the ice maker and beverage fridge under the back counter, flanking the sink.
3. The Serve Zone: The front island is strictly for serving guests. Keep this surface clear of appliances.
Material Selections
Since this is a high-traffic zone, durability is paramount. I often suggest quartz for the countertops because it resists citrus acid and red wine stains better than marble. If you love the look of natural stone, consider a honed granite or soapstone, which hides etching better than polished marble.
What I’d Do in a Real Project
I would ensure the front bar has an overhang of at least 12 to 15 inches for seating. I would also add a footrail in brass or matte black. It protects the cabinetry from scuff marks and makes sitting on a barstool much more comfortable for long periods.
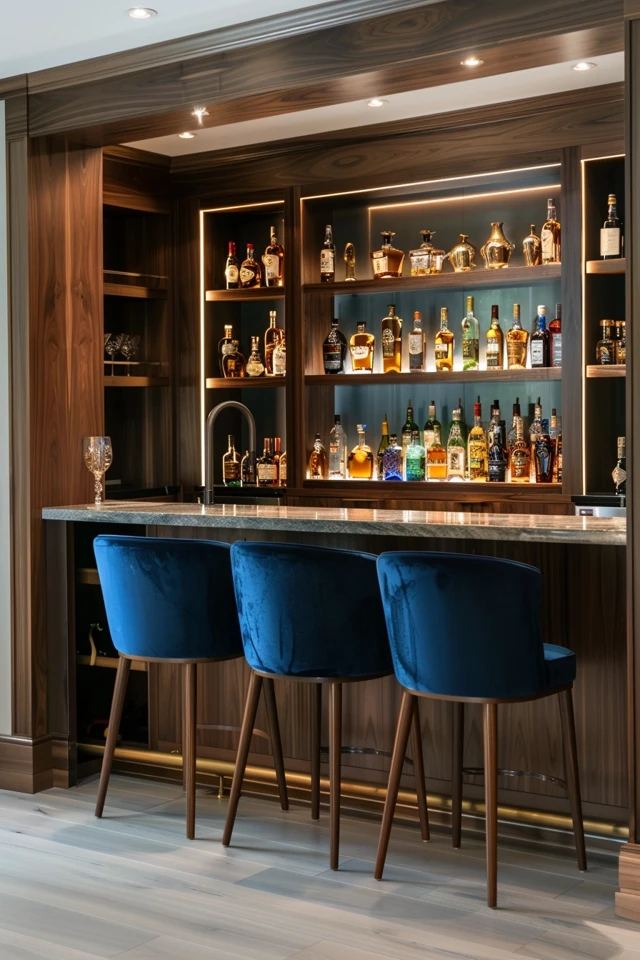
3. The L-Shaped Corner (Social Anchor Layout)
The L-shape is the most popular layout for open-concept basements or game rooms. It utilizes a corner of the room to anchor the space, creating a “room within a room.” It provides excellent storage and plenty of seating space for guests to converse.
The Layout Strategy
One leg of the “L” is usually against a wall (the back bar), and the other leg extends out into the room (the peninsula). The wall side houses the tall storage, sink, and TV if desired. The peninsula side is for guest interaction.
Measurements that Matter
For the peninsula section, you need to calculate linear footage based on seating. Allow 24 inches of width for every barstool. If you want four stools, that peninsula needs to be 8 feet long, not including the corner turn.
Handling the Corner
The inside corner of the cabinetry is often wasted space. In a kitchen, we use Lazy Susans, but those aren’t great for liquor bottles.
My fix: Access the “dead corner” from the outside (the guest side) of the bar. Use a push-latch door panel. This is the perfect secret spot for storing seasonal items, paper goods, or backup cases of wine that you don’t need to access daily.
Lighting the L-Shape
This layout demands pendant lighting. Install 2 or 3 pendants over the peninsula leg to visually define the bar area. The bottom of the pendant light should be approximately 30 to 36 inches above the countertop surface. This provides task lighting without blocking the view across the room.
Common Mistakes + Fixes
Mistake: Making the bar height too high for standard ceilings.
Fix: Standard bar height is 42 inches. However, in basements with low ceilings (under 8 feet), a 42-inch bar can feel imposing. Consider doing a “flat” bar at 36 inches (counter height). It opens up the sightlines and makes the room feel larger.
4. The One-Wall Wet Bar (The Buffet Layout)
This floor plan places all functions along a single straight wall. It is less intrusive than an L-shape or Galley and works beautifully in multi-purpose rooms like a home office or a formal living room. It often resembles a built-in buffet or credenza.
The Layout Strategy
Symmetry is your friend here. I like to center the sink and place the cabinetry symmetrically on either side. Upper cabinets can sometimes feel too “kitchen-y” for a living area.
Instead, I prefer floating shelves made of walnut or white oak, or glass-front cabinetry with interior lighting. This turns your glassware and liquor collection into art.
Plumbing Constraints
Since this is a single wall, getting plumbing to the site is usually easier than with an island. If you are on a slab foundation, locating this bar on a wall shared with a bathroom or laundry room will save you thousands of dollars in trenching costs.
Sink Selection
For a one-wall layout, scale is everything. Do not install a standard kitchen sink. It will look enormous and out of place. Choose a bar sink that is 12 to 15 inches wide. Undermount sinks provide a cleaner look and make it easier to wipe crumbs and spills directly into the basin.
Designer’s Note: The Ice Maker Decision
If you plan to include a clear ice maker (the kind that makes the nice square cubes), be aware that they require a gravity drain or a pump. They are also noisy.
My advice: If this bar is in a quiet room like a study or near a bedroom, skip the built-in ice maker. Use a high-quality ice bucket or a silent freezer drawer instead. The constant hum and clatter of dropping ice can drive you crazy in a quiet zone.
5. The Furniture “Dry” Bar (Renter-Friendly Layout)
Not every home bar requires a contractor. The furniture layout utilizes a freestanding piece—like a vintage armoire, a mid-centurycredenza, or a dedicated bar cart—to create a designated drink station. This is ideal for renters or those who aren’t ready to commit to a permanent renovation.
The Layout Strategy
The key to making this feel like a “floor plan” and not just a piece of furniture is zoning. Place the furniture piece on a designated wall, but anchor it with accessories.
I often use a large piece of art or a mirror directly above the cart to draw the eye up. Flank the furniture with a floor plant or a floor lamp to increase the visual footprint of the area.
Organization is Crucial
Since you don’t have a sink, you need a system for dirty glasses. I recommend keeping a discreet, stylish tray on the bottom shelf specifically for “bus” duty (collecting used glasses).
Use trays on the top surface to corral bottles. This isn’t just aesthetic; it protects the wood finish of your furniture from condensation rings and citrus spills.
Lighting without Hardwiring
You likely won’t have hardwired wall sconces here. Use a pair of rechargeable, battery-operated table lamps on the buffet, or install a plug-in picture light above the artwork. Good lighting elevates a simple table into a deliberate design feature.
What I’d Do in a Real Project
I would source a vintage cabinet and line the back interior with peel-and-stick wallpaper or a mirror. It adds a custom pop of personality when you open the doors. I also advise clients to use a rug in front of the unit. A 2×3 or 3×5 rug defines the zone and protects the main flooring from spills.
Final Checklist for Your Bar Plan
Before you finalize your layout, run through this quick checklist to ensure you haven’t missed a functional detail.
Electrical Load: Do you have enough amps? A fridge, wine cooler, ice maker, and blender running at once can trip a standard 15-amp circuit.
Water Line: Did you run a water line for the ice maker?
Flooring: Is the flooring behind the bar waterproof? Wood is risky; tile or luxury vinyl plank is safer for the “bartender’s aisle.”
Trash: Where does the trash go? A pull-out trash bin cabinet (15 inches wide) is a lifesaver.
Height Check: Have you decided between 36-inch counter height (casual, open) or 42-inch bar height (hides the mess)?
Frequently Asked Questions
What is the ideal overhang for a bar top?
For a standard bar stool, you need a minimum of 12 inches of knee space. If you have the room, 15 inches is luxurious and much more comfortable for taller guests. Anything less than 10 inches will force guests to sit sideways or lean forward awkwardly.
Do I really need a sink in my home bar?
If the bar is far from the kitchen (like in a basement or upstairs bonus room), a sink is mandatory. You will not want to carry sticky glasses up and down stairs. If the bar is in the dining room adjacent to the kitchen, you can easily skip the sink to save money and counter space.
What is the best flooring for behind the bar?
I always recommend a non-slip tile or a durable LVP (Luxury Vinyl Plank). You will spill ice, wine, and mixers. Hardwood can warp over time with constant moisture exposure. If you must keep the wood floor continuous, place a high-quality rubber-backed runner mat behind the bar.
How much space do I need for a beverage fridge?
Most standard beverage centers are 24 inches wide. However, you need to leave a roughly 24.25 to 24.5-inch opening to slide it in easily. Always check the “cutout specifications” sheet of the specific appliance before ordering cabinetry.
Conclusion
Creating a home bar is one of the most fun renovation projects because it is purely dedicated to leisure and hospitality. Whether you have a sprawling basement ready for a galley layout or a small dining room niche begging for a pocket bar, the principles remain the same.
Prioritize your workflow, measure your clearances twice, and choose materials that can handle a splash of lime juice. A well-planned bar doesn’t just look good; it acts as a magnet for friends and family, making your home the favorite gathering spot.
Picture Gallery


