
5 Home Bar Ideas for a Small Corner Space
Introduction
We often overlook the corners of our rooms. In interior design, these spaces are frequently referred to as “dead zones” because they are difficult to furnish without making the room feel cluttered. However, transforming an unused corner into a home bar is one of the most effective ways to add luxury and utility to a small footprint.
Whether you entertain guests weekly or simply enjoy a quiet nightcap, a dedicated drink station anchors the room. For plenty of visual inspiration to help you visualize these layouts, check out our full Picture Gallery located at the very end of this blog post. You do not need a sprawling basement to create a sophisticated bar experience; you just need the right layout strategy.
I once worked with a client in a 700-square-foot apartment who was convinced she didn’t have room for a bar. By utilizing a structural nook near her balcony door, we created a stunning vertical dry bar that actually made her living room feel larger by drawing the eye upward. Below, I will walk you through five specific design concepts, complete with the measurements and rules of thumb I use in my own projects.
1. The Vertical Floating Shelf System
If you have zero floor space, you must build up. A floating shelf bar is the ultimate solution for tight corners because it keeps the floor visual open, which tricks the eye into thinking the room is spacious. This method relies on wall-mounted shelving to hold bottles and glassware, with a shallow floating cabinet or shelf below for prep.
Start by selecting shelves that are at least 10 to 12 inches deep. Standard liquor bottles are roughly 3 to 4 inches in diameter, but you need clearance for movement and styling. I recommend installing the lowest shelf at standard counter height, which is 36 inches from the floor.
Space your upper shelves carefully. You will need 15 to 18 inches of clearance between shelves to accommodate taller bottles like Grey Goose or wine decanters. If you are only storing rocks glasses and tumblers, 10 inches of height is sufficient.
Designer’s Note: Structural Integrity
In my experience, the biggest failure point here is sagging shelves. Liquor bottles are incredibly heavy; a single liter of liquid weighs over 2 pounds, plus the glass weight. Do not rely on drywall anchors. You must drill into the studs or use heavy-duty toggle bolts rated for at least 50 lbs per bracket.
Common Mistakes + Fixes
- Mistake: Overcrowding the display. Putting every bottle you own on the shelf looks messy.
- Fix: Curate your collection. Display premium bottles and unique glassware. Store the handle of cheap vodka in the pantry.
- Mistake: Poor lighting. Shelves cast shadows, making the bar look dark.
- Fix: Install rechargeable, motion-sensor LED puck lights under each shelf if you cannot hardwire electricity.
What I’d Do in a Real Project
- Use walnut or white oak wood for warmth.
- Install a brass rail on the front of the shelves to prevent bottles from sliding off during vibrations (like door slamming).
- Place a small, round ottoman tucked under the lowest shelf for seating when the bar isn’t in use.
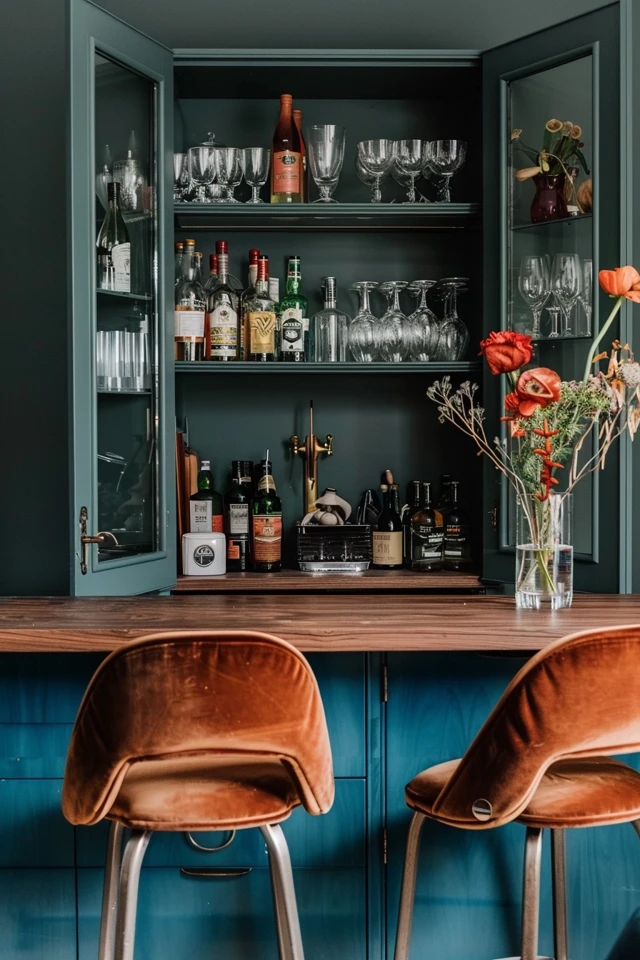
2. The Repurposed Vintage Armoire
This is a fantastic option for renters or those who prefer a “hidden” look. A corner cabinet, tall secretary desk, or vintage armoire allows you to close the doors on the clutter. When the doors are open, it is party time; when closed, it is a beautiful piece of furniture.
The key here is internal modification. Most vintage cabinets have deep shelves meant for linens, which are impractical for a bar. You will likely need to remove a shelf or cut it back to allow for taller items. I often line the back of these cabinets with an antique mirror. This reflects light and doubles the visual depth of the bottles, making the collection look more substantial.
Pay attention to scale. In a corner, you need to ensure the doors can swing open fully without hitting a sofa or a window treatment. Measure the “swing radius” of the doors before buying the piece. If the swing is tight, look for a piece with sliding glass doors or a tambour door (roll-top style).
Designer’s Note: The Interior Finish
A trick I use to make these pieces pop is painting the interior a contrasting color. If the exterior is a neutral wood or white, paint the inside a deep navy, emerald green, or charcoal. When you open the cabinet, that pop of color signals a change in function and mood.
Common Mistakes + Fixes
- Mistake: Dark interiors. It is hard to mix a drink if you cannot see the labels.
- Fix: Use battery-operated LED strips along the inner door frame facing inward to illuminate the contents without glare.
- Mistake: weak hinges. The doors of old cabinets can sag.
- Fix: Tighten all hardware and apply a little clear silicone lubricant to hinges so they don’t squeak during service.
What I’d Do in a Real Project
- Source a mid-century modern corner cabinet specifically designed for corners (triangular back).
- Line the shelves with a wipeable vinyl or leather mat to protect the wood from spills.
- Group spirits on the bottom shelf and glassware on the top to keep the center of gravity low.
3. The “Bistro Style” Console Table
If your corner has a little more width, a small console table or a demi-lune (half-moon) table is an elegant choice. This setup mimics the feel of a boutique hotel lobby bar. It is less about storage density and more about aesthetic presentation.
For this layout, you need a table that is roughly 30 to 32 inches high. Symmetry is your best friend here. Place a table lamp on one side of the console and a tall plant or sculpture on the floor on the other side to balance the visual weight.
Use a large tray to corral your bottles. In design, we call this “zoning.” A cluster of bottles sitting directly on a table looks like clutter. A cluster of bottles sitting on a leather, marble, or woven tray looks like a deliberate design choice. The tray also protects the tabletop from citrus acids and red wine rings.
Designer’s Note: Managing Wall Space
Since the table is low, you will have a lot of empty wall space above it. Do not leave it blank. Hang a large piece of art or a round mirror about 8 to 10 inches above the tallest item on the table. This connects the furniture to the architecture.
Common Mistakes + Fixes
- Mistake: Table is too deep. A standard console is 12-16 inches deep. Anything deeper than 18 inches in a corner will intrude into the room’s traffic flow.
- Fix: Use painter’s tape to mark the footprint on the floor before buying to ensure you can walk past it comfortably.
- Mistake: No surface area for pouring. The table is full of decor.
- Fix: Leave at least a 10×10 inch clear zone specifically for resting a glass while pouring.
What I’d Do in a Real Project
- Select a table with a stone top (marble or quartz) for durability against moisture.
- Place a small wine rack on the floor underneath the table to maximize utility.
- Style with a “rule of three”: A bottle group, a lamp, and a stack of cocktail napkins.
4. The Custom Built-In Wet Bar
This is the high-end, permanent solution. If you own your home and have the budget, a built-in corner wet bar adds significant property value. This involves installing base cabinetry, a countertop, and potentially a small sink.
For a corner built-in, you usually deal with a 45-degree angle or an L-shape. I prefer the L-shape as it provides more accessible counter space. The standard depth for base cabinets is 24 inches, but in a small corner, you can order custom “shallow depth” cabinets at 18 inches to save floor space.
If you plan to include a sink (making it a “wet” bar), you need to account for plumbing. A bar sink is typically smaller than a kitchen sink, usually 15 inches wide. You will need a cabinet base wide enough to house the plumbing trap.
Designer’s Note: Lighting Temperature
Lighting makes or breaks a built-in. Use 2700K to 3000K LED tape lights under the upper shelves or cabinets. This temperature provides a warm, inviting glow. Anything higher (4000K+) will look like a hospital or a pharmacy, which kills the mood.
Common Mistakes + Fixes
- Mistake: Forgetting the backsplash. Splashes happen.
- Fix: Install a mirror, tile, or stone backsplash up to the bottom of the first shelf. Antique mirror is excellent for hiding streaks.
- Mistake: Ignoring electrical outlets. You might want a blender or an ice maker later.
- Fix: Install outlets inside the lower cabinet or pop-up outlets in the counter to keep the backsplash clean.
What I’d Do in a Real Project
- Install a beverage cooler in the base cabinet. Ensure it is “front-venting” so it doesn’t overheat in the tight space.
- Use a quartz countertop that mimics marble. Real marble etches instantly with lemon or lime juice; quartz is indestructible.
- Paint the cabinetry a distinct color from the rest of the kitchen to define the zone.
5. The Rolling Bar Cart Nook
The rolling cart is the most versatile option, perfect for renters or those who like to reconfigure their space. However, simply shoving a cart in a corner isn’t “design.” You have to style the corner around the cart to make it look intentional.
Choose a cart with wheels that lock. This is a safety non-negotiable. For scale, the cart should not overwhelm the corner. Leave at least 4 to 6 inches of “breathing room” on either side of the cart between the walls.
Since carts are open, cable management is impossible. Therefore, rely on battery-operated lamps or nearby floor lamps rather than trying to plug in items on the cart itself.
Designer’s Note: Vertical Zoning
Because carts are low, the corner can feel bottom-heavy. I always hang two pieces of art vertically stacked on the wall behind the cart. This draws the eye up and balances the composition. Alternatively, a tall floor plant tucked behind the cart fills the negative space beautifully.
Common Mistakes + Fixes
- Mistake: Top-heavy styling. Putting all the heavy bottles on the top shelf makes the cart unstable and visually precarious.
- Fix: Store wine bottles and heavy spirits on the bottom shelf. Use the top shelf for lightweight glassware, garnishes, and the active mixing area.
- Mistake: Dust accumulation. Open carts collect dust on glassware quickly.
- Fix: Store glasses upside down or rinse them before use. Ideally, rotate your glassware so you are using it often enough that dust doesn’t settle.
What I’d Do in a Real Project
- Choose a cart with a gallery rail (a small fence around the shelf edges) to prevent items from sliding off.
- Use a round cart in a square corner to soften the sharp architectural lines.
- Place a small sheepskin or woven rug underneath the cart to anchor it visually.
Final Checklist: Planning Your Corner Bar
Before you buy a single bottle or shelf, run through this checklist to ensure your project runs smoothly.
- Measure the Footprint: Use blue painter’s tape to outline the proposed furniture or shelves on the floor and wall. Live with it for 24 hours to see if it feels tight.
- Check for Studs: If doing wall-mounted shelves, use a stud finder. Mark the stud locations with a pencil.
- Audit Your Inventory: Count your bottles and glasses. Do you need storage for 5 bottles or 50? This dictates whether you need a cart or a cabinet.
- Lighting Plan: Determine where your light source will come from. If there is no outlet nearby, buy rechargeable LED options.
- Surface Selection: If you use real wood, buy coasters immediately. If you want low maintenance, choose glass, metal, or stone surfaces.
- Safety Check: If you have toddlers or active pets, avoid open carts with glass on lower shelves. Opt for a locking cabinet instead.
FAQs
How much space do I need behind a bar cart?
You generally want a few inches of clearance from the wall to prevent the handle or wheels from scuffing the paint. If you are actually standing behind the bar to serve (which is rare in small corners), you need 30 to 36 inches of clearance for movement. For a corner display bar, 3 to 5 inches of gap from the wall is standard.
What is the best height for a home bar shelf?
The “working” shelf or surface should be at standard counter height, which is 36 inches. If you want a “bar height” feel for leaning, go for 42 inches. Shelves above the counter should start at least 18 inches above the work surface to allow for tall bottles and easy pouring.
Can I put a fridge in a corner cabinet?
Yes, but you must be careful. Standard mini-fridges require ventilation on the back and sides to disperse heat. If you put one inside a closed cabinet, it will overheat and fail. You must buy a “zero-clearance” or “front-venting” built-in beverage center designed to sit flush within cabinetry.
Is plumbing expensive to add to a corner?
It depends on location. If your corner shares a wall with a bathroom or kitchen, it is relatively affordable because the drain and supply lines are right there. If the corner is on an opposite wall or a concrete slab, the cost can skyrocket into the thousands. Always get a quote from a licensed plumber before buying a sink.
Conclusion
Transforming a small corner into a home bar is a high-impact project that blends functionality with personal style. Whether you opt for the architectural look of floating shelves, the charm of a vintage cabinet, or the flexibility of a rolling cart, the success lies in the details.
Remember the rules of scale: keep it proportional to the room. Remember the rules of lighting: warm light creates ambiance. And most importantly, keep it curated. A home bar should be a collection of things you love and use, not a storage unit for clutter. By following the measurements and guidelines above, you can turn that dead zone into the most popular spot in your home.
Picture Gallery


