
Title: 5 Home Bar Ideas Inspired by Kendall Jenner
Introduction
Celebrity home tours often leave us feeling a mix of awe and alienation. The spaces are usually too vast or too opulent to translate into a typical residential footprint. However, Kendall Jenner’s Los Angeles home is a rare exception that balances high-end luxury with a genuinely cozy, lived-in atmosphere. Her home bar, specifically, is a masterclass in mood, texture, and organic warmth.
As an interior designer, I often reference this specific space when clients ask for a bar that feels like a retreat rather than a nightclub. It avoids the cliché “man cave” aesthetics and shiny surfaces in favor of stone, wood, and purposeful lighting. It is a space designed for conversation and relaxation, not just for pouring drinks.
If you are looking to replicate this vibe, you do not need a multi-million dollar budget or a James Turrell light installation to get there. You simply need to understand the fundamental design principles that make her space work. If you want to jump straight to visual inspiration, you can find the Picture Gallery at the end of the blog post.
1. Master the Art of Atmospheric Lighting
The defining feature of Kendall Jenner’s bar is undoubtedly the glowing light art piece by James Turrell. While most of us cannot install a museum-grade light sculpture, we can replicate the effect it creates. The goal is to treat light as a material, not just a utility.
In a home bar, lighting should never be an afterthought. You want to avoid the “supermarket effect” of bright, overhead recessed cans. Instead, focus on diffused, indirect lighting that softens the edges of the room. This creates the moody, intimate atmosphere that makes a home bar inviting.
Designer’s Note: The “Runway” Mistake
One of the most common issues I see in DIY bar projects is the improper use of LED strip lights. People often stick them under every shelf, resulting in a look that resembles an airport runway or a gaming PC setup. To avoid this, use a diffuser channel for your LED strips. This blurs the individual dots of light into a seamless glow.
Practical Implementation:
- Kelvin Temperature: Stick to 2700K (warm white) or lower. Anything above 3000K will look too clinical and blue for a bar setting.
- Layering: Use at least three sources of light. For example, install under-cabinet lighting for tasks, a small table lamp for ambiance, and dimmable sconces for general illumination.
- Dimmers are non-negotiable: Every light source in a bar area must be on a dimmer. This allows you to transition the space from a functional drink-prep area to a moody lounge instantly.
2. Embrace Organic, Textured Materials
Kendall’s home is a departure from the high-gloss, mirrored finishes often associated with the Kardashian-Jenner aesthetic. Her bar leans heavily into “Quiet Luxury” through the use of natural, tactile materials. We see stone, heavy timber, and unlacquered metals.
When selecting materials for your own bar, think about how they feel to the touch. A bar is a high-touch zone; you are leaning on the counter, handling the hardware, and touching the glassware. The tactile experience is just as important as the visual one.
Material Recommendations:
- Countertops: Instead of pristine white quartz, look at Soapstone or honed granite. Soapstone is impervious to acids (like lime juice), making it an excellent choice for a wet bar. It develops a beautiful patina over time.
- Hardware: Swap out chrome for unlacquered brass or oil-rubbed bronze. These “living finishes” change color and texture as they age, adding character to the space.
- Cabinetry: Avoid high-gloss lacquer. Opt for stained wood like walnut or white oak, or painted cabinets with a matte finish. The lack of shine absorbs light rather than reflecting it, contributing to that cozy vibe.
Common Mistakes + Fixes:
- Mistake: Using porous marble like Carrara without understanding the maintenance.
- Fix: Real marble etches immediately when it touches lemon juice or wine. If you are a perfectionist, use a honed quartzite or a high-quality porcelain slab that mimics stone. If you love the lived-in look, embrace the etching as part of the bar’s story.
3. Prioritize Function: The “Wet” Bar Layout
Kendall Jenner is famously fond of her specialized ice maker. While that is a luxury appliance, it highlights a crucial design rule: a bar must function seamlessly. If you have to walk to the kitchen to rinse a glass or get ice, you will eventually stop using the bar altogether.
When planning your layout, you need to consider the “work triangle” just like you would in a kitchen. The flow between the storage, the prep area, and the sink needs to be unobstructed.
Critical Measurements and Clearances:
- Bar Height vs. Counter Height: Standard counter height is 36 inches. Bar height is 42 inches. For a home setup similar to Kendall’s, I prefer a single-level 36-inch counter. It feels more like furniture and less like a commercial pub.
- Walkway Width: If your bar is a galley style or behind an island, you need a minimum of 36 inches of clearance for one person to move comfortably. If you expect two people to be bartending, aim for 42 to 48 inches.
- The Overhang: If you plan to have stools, you need an overhang of at least 10 to 12 inches for knee space. Anything less is uncomfortable for adults.
What I’d do in a real project:
If space allows, I always advocate for a small prep sink (a bar sink). Even a tiny 12-inch round sink changes the utility of the space entirely. Combine this with an under-counter beverage center. Ensure you measure the depth of your fridge—standard cabinetry is 24 inches deep, and many beverage centers require 24 inches plus handle clearance.
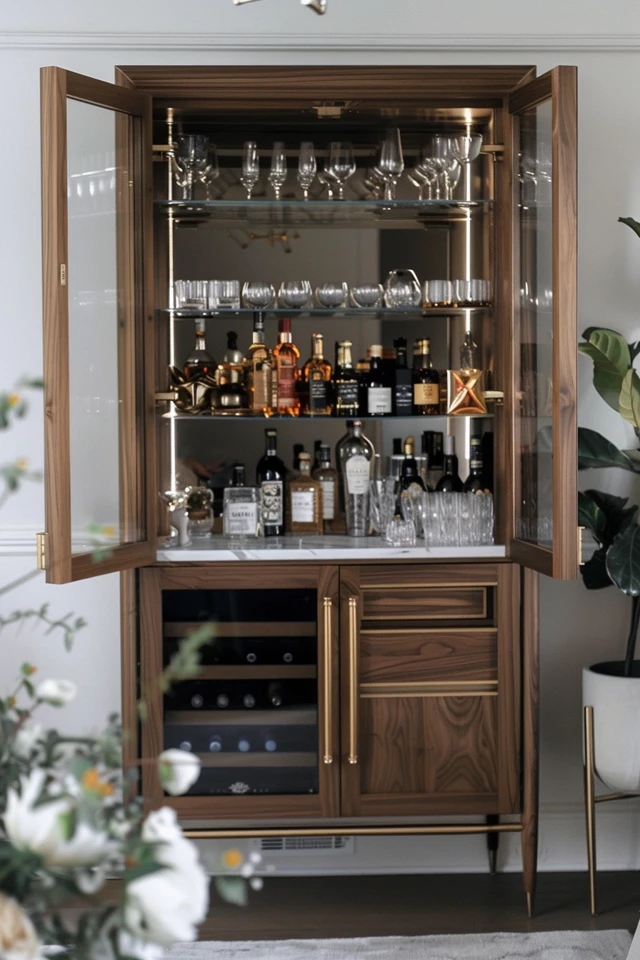
4. Curate, Don’t Clutter: Vertical Display
The shelves in Kendall’s home are styled, not stuffed. There is a distinct difference between storage and display. In a home bar, you want to display your beautiful glassware and premium bottles, while hiding the half-empty mixers and plastic tools in the lower cabinets.
Open shelving adds depth and personality to the room, but it requires discipline. The goal is to create vignettes that draw the eye, rather than just lining up bottles like a liquor store.
Styling Rules of Thumb:
- The Triangle Rule: Group objects in odd numbers (3 or 5) and vary the heights to create a visual triangle. For example, a tall bottle, a medium stack of coasters, and a low bowl of limes.
- Shelf Spacing: A standard wine bottle is about 12 inches tall, but many liquor bottles are taller. I recommend spacing shelves 14 to 16 inches apart to accommodate taller spirits like vodka or tequila bottles without them looking cramped.
- Negative Space: Leave empty space on the shelves. It allows the eye to rest and makes the objects you do display feel more significant.
Designer’s Note: Seismic Safety
If you live in an earthquake-prone area (like California) or have active pets, use “museum wax” to secure precious glassware or rare bottles to the shelf. It is invisible and prevents items from walking off the edge due to vibration.
5. Establish a Moody Color Palette
Kendall’s home utilizes earthy, grounded tones. To replicate this, you should step away from stark whites and bright grays. A home bar is an evening space; it should feel enveloping and warm.
Darker colors blur the boundaries of a room, making small spaces feel larger and more infinite. Do not be afraid of forest greens, deep charcoals, navies, or warm terracottas.
Paint and Finish Techniques:
- Color Drenching: This is a technique where you paint the walls, the trim, and even the ceiling the same color. This wraps the room in a single tone and looks incredibly chic. It creates a seamless backdrop that makes your brass hardware and crystal glassware pop.
- Matte vs. Eggshell: For dark walls, I prefer a matte or flat finish. It hides imperfections in the drywall and absorbs light, creating a velvety texture. However, use a scrubbable matte paint if you are in a high-traffic area.
Real-World Lesson:
I once had a client who insisted on a bright white bar in a basement with no windows. It ended up looking sterile and clinical, like a hospital room. We repainted it a deep olive green, and suddenly the lack of natural light became an asset, turning the room into a cozy speakeasy.
Final Checklist: Planning Your Project
Before you buy a single bottle of wine or order a slab of stone, run through this checklist to ensure your project stays on track.
The Logistics:
- Plumbing Access: Is there an existing water line? Moving plumbing is the most expensive part of a bar renovation. If you can’t run water, can you settle for a dry bar?
- Electrical Load: Do you have enough outlets for a fridge, ice maker, wine cooler, and lighting? Appliance cords should not be visible.
- Flooring: Is the flooring water-resistant? Wood is beautiful, but if your ice maker leaks, it can warp. Tile or sealed stone is safer for the immediate wet area.
The Budget Allocation:
- Splurge: Cabinetry hardware and the countertop material. These are the things you touch and see the most.
- Save: Glassware. You do not need $100 crystal glasses for a casual Tuesday night. High-quality machine-blown glass is durable and looks great.
FAQs
Q: Can I build a Kendall-inspired bar in a rental?
A: Absolutely. Focus on a freestanding bar cabinet or a credenza in a dark wood finish. Use battery-operated puck lights to mimic the hardwired shelf lighting. Style the top with a heavy tray, a nice lamp, and your best bottles. You can achieve 80% of the vibe with styling alone.
Q: What is the best countertop material for a bar on a budget?
A: Butcher block is a great budget-friendly option that adds warmth. If you stain it dark and seal it properly with Waterlox or a food-safe polyurethane, it mimics the look of an expensive aged wood bar.
Q: How do I hide the “ugly” stuff like blenders and mixers?
A: Appliance garages. If you are doing custom cabinetry, include a cabinet that sits on the countertop with a lift-up or pocket door. If you are using standard cabinets, dedicate a deep drawer to tools so the countertop remains clear.
Q: Do I really need a dedicated ice maker?
A: It is a luxury, not a necessity. However, clear ice makes a huge difference in the quality of cocktails. If a built-in machine is out of budget, consider using clear ice molds in your standard freezer. It elevates the drink experience significantly for a fraction of the cost.
Conclusion
Drawing inspiration from Kendall Jenner’s home bar is not about copying her budget; it is about adopting her philosophy. She prioritizes mood, texture, and genuine comfort over showiness. By focusing on atmospheric lighting, choosing materials that age gracefully, and planning a functional layout, you can create a space that feels just as luxurious.
Remember that a home bar is personal. It should reflect what you like to drink and how you like to host. Whether you have a dedicated room or just a carefully styled corner of your living room, the principles of warmth and utility remain the same. Start with the lighting, clear the clutter, and pour yourself a drink to celebrate the start of your design journey.
Picture Gallery


