
Title: 5 Home Bar Lighting Ideas for Ambiance
Introduction
Designing a home bar is often one of the most fun parts of a renovation project because it is a space dedicated entirely to leisure and hosting. However, I have seen beautiful custom joinery and expensive marble countertops fall completely flat because the lighting plan was an afterthought. The difference between a sterile service station and a moody, high-end cocktail lounge almost always comes down to illumination.
In my design practice, I treat bar lighting as a system of layers rather than a single overhead source. You need task lighting to pour drinks safely, but you also need ambient light to set the mood once the cocktails are served. For plenty of visual inspiration to help you visualize these concepts, be sure to check out the Picture Gallery included at the end of this blog post.
Whether you are retrofitting a small bar cart nook in a rental apartment or building a full wet bar in a basement renovation, the principles remain the same. The goal is to create warmth, highlight your glassware or bottle collection, and ensure your guests look good while they sip their drinks.
1. The Architectural Glow: Under-Shelf LED Channels
One of the most effective ways to elevate a home bar is to integrate lighting directly into the shelving. This technique creates a wash of light that highlights the bottles and glassware without shining directly into anyone’s eyes. It provides a clean, modern look that emphasizes the horizontal lines of your cabinetry.
When installing under-shelf lighting, the biggest mistake I see DIYers make is sticking a bare LED tape strip directly to the wood. This results in a “dotted” reflection on your bottles and countertops, which looks unfinished. You must use an aluminum channel with a frosted diffuser lens.
The diffuser blends the individual LED diodes into a seamless, neon-like bar of light. If you have stone or quartz countertops, this is non-negotiable, as polished surfaces act like mirrors and will reveal the underside of your shelves.
Designer’s Note: The Kelvin Scale
For a home bar, color temperature is critical. I strictly use 2700K (Kelvin) or 3000K warm white LEDs. Anything higher, like 4000K or 5000K, will look blue and clinical, resembling a convenience store fridge rather than a sophisticated lounge.
Common Mistakes + Fixes
Mistake: Leaving wires exposed or trailing down the back of the shelf.
Fix: If you are building custom, rout a channel into the side or back of the cabinet to hide the low-voltage wire. If you are retrofitting, run the wire along the shelf bracket or use paintable cord covers that blend into the wall color.
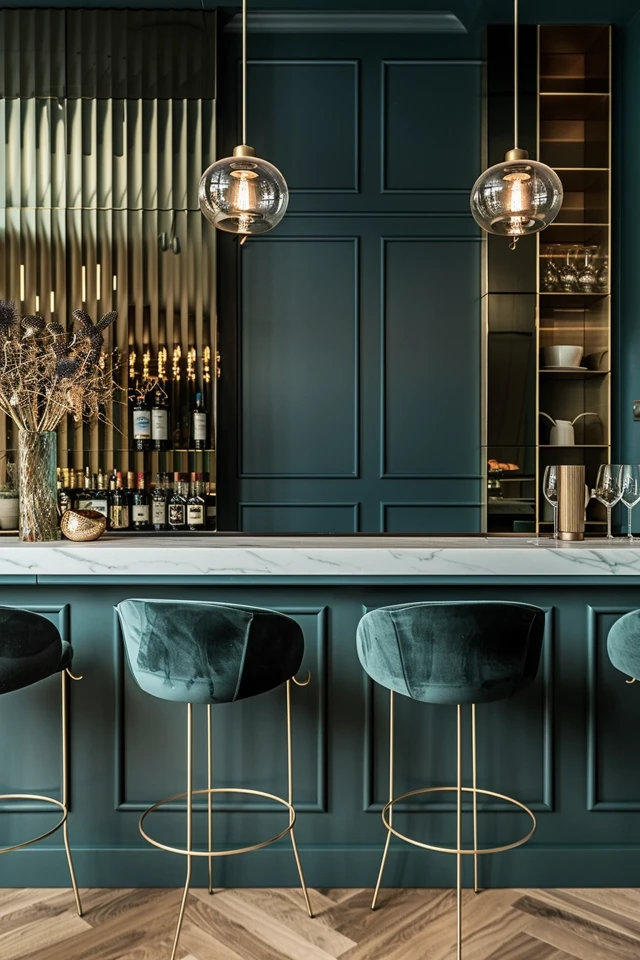
2. The Jewelry: Statement Pendants
Pendants are the jewelry of the room. In a kitchen, we often prioritize output and task lighting, but in a bar, pendants are primarily for atmosphere and scale. They draw the eye upward and define the vertical space, which is especially helpful if your bar is part of a larger open-concept living area.
When selecting pendants for a bar, scale is everything. Since bar counters are usually smaller than kitchen islands, you generally want smaller fixtures. A “mini-pendant” with a diameter of 4 to 8 inches is usually the sweet spot. If you choose something too large, it will visually overwhelm the prep area and make the space feel cramped.
Spacing and Measurements
There are specific rules of thumb for hanging these fixtures to ensure they don’t block conversation.
- Height: The bottom of the pendant should sit 30 to 36 inches above the countertop surface. If you are tall, lean toward 36 inches so you aren’t staring directly into the fixture while pouring.
- Spacing: If you are hanging two pendants, find the center of the bar and measure out 12 to 15 inches to the left and right. If hanging three, center one and space the others 24 to 30 inches apart, depending on the length of the counter.
- Edge Distance: Ensure the pendant is at least 6 to 10 inches away from the edge of the counter to prevent head bumps.
What I’d Do in a Real Project
If the bar is a “peninsula” style (attached to a wall on one side), I typically avoid using three pendants as it can look cluttered. Instead, I use two pendants paired with a recessed can light over the wall side. For smaller wet bars tucked into a niche, I skip pendants entirely to keep the sightlines clear.
3. The Mood Setter: Picture Lights and Wall Sconces
If you do not have upper cabinets or floating shelves, you likely have a backsplash or a wall finish that deserves attention. Wall-mounted fixtures like sconces or picture lights add a layer of sophistication that feels more like a library or a study than a kitchen.
Picture lights are my secret weapon for home bars. Originally designed to illuminate art, they direct light downward against the wall. This highlights the texture of your backsplash—whether it is antique mirror, zellige tile, or wallpaper—and bounces a soft, indirect glow back into the room.
Renter-Friendly Options
If you are renting or cannot open up the drywall to run new electrical wires, this look is still achievable.
- Plug-in Sconces: Look for fixtures with attractive fabric cords. You can mount the light and let the cord hang straight down to an outlet.
- Rechargeable “Puck” Bulbs: Many designers now use battery-operated LED bulbs that screw into standard sconces. This allows you to mount a hardwired fixture without actually connecting it to electricity. While the light output is lower, it is often sufficient for a mood-lit bar.
Designer’s Note: Finish Coordination
Do not feel pressured to match your faucet finish exactly to your light fixture. If you have a polished nickel faucet, an unlacquered brass sconce adds warmth and prevents the space from feeling too “matchy-matchy.” I usually recommend mixing two metals in a bar space to give it a curated, collected feel.
4. The Display Case: In-Cabinet Puck Lighting
If your home bar features glass-front cabinetry, lighting the interior is essential. Without internal light, glass cabinets can look like dark voids, especially at night. Illuminating the interior turns your cabinetry into a display case for your best crystal and spirit bottles.
For this application, recessed “puck” lights mounted in the top of the cabinet are the standard solution. However, there is a caveat regarding shelving materials.
Glass vs. Wood Shelves
If you have glass shelves, a single puck light at the very top of the cabinet will push light all the way through to the bottom shelf. The light travels through the clear glass, illuminating everything in its path.
If you have wood shelves, a light at the top will only illuminate the top shelf. The shelves below will remain in shadow. In this scenario, you have two options:
1. Install a flush-mount LED puck or strip on the underside of every shelf (labor-intensive and requires complex wiring).
2. Install vertical LED tape light channels tucked behind the face frame of the cabinet, shining backward toward the rear wall.
Common Mistakes + Fixes
Mistake: Using high-output, cool white lights inside cabinets.
Fix: Use low-lumen (dim) lights. The goal is a faint glow, not a spotlight. If the light is too bright, it will create harsh glares on the glass doors and make the contents look cluttered.
5. The Flexible Layer: Portable Cordless Lamps
Sometimes the best lighting solution requires no electrician at all. We are currently seeing a massive surge in the popularity of portable, rechargeable table lamps. These are perfect for bar carts, small sideboards, or even placing directly on a wet bar counter.
These small lamps add a localized pool of light that feels intimate and cozy. Because they are cordless, you can move them around depending on how you are using the space. If you are mixing drinks, move it to the side. If you are setting out a cheese board, bring it closer to the center.
Material Selection
Since these lamps sit at eye level and within reach, the material finish is very noticeable. I prefer materials that diffuse light softly or add texture.
- Alabaster or Marble: The stone glows from within when the light is on, creating a beautiful organic texture.
- Brass or Bronze: Adds a classic, speakeasy vibe.
- Pleated Linen Shades: Softens the light and adds a traditional, tactile element to the hard surfaces of bottles and glass.
What I’d Do in a Real Project
I often use a small portable lamp on a bar cart to act as a nightlight during a party. It signals to guests where the drinks are without having to turn on harsh overhead lights. Look for lamps with a “warm dim” feature, which gets warmer in color temperature as you dim the brightness.
Final Checklist: Creating the Perfect Ambiance
Before you finalize your lighting purchases or call the electrician, run through this checklist to ensure your plan is solid.
1. Check the CRI (Color Rendering Index)
For a bar, you want a high CRI (90+). This ensures that the deep reds of a cabernet or the amber of a bourbon look rich and true to life, rather than dull or gray.
2. Install Dimmers Everywhere
There is no exception to this rule. Every light source in a bar—pendants, under-cabinet strips, and sconces—must be on a dimmer switch. You need full brightness for cleaning and prepping, but you will want to dim them to 20% or 30% when entertaining.
3. Layer the Heights
Ensure you have light coming from different levels.
- High: Pendants or recessed cans.
- Medium: Sconces or under-cabinet lights.
- Low: Portable lamps or toe-kick lighting.
4. Verify Switch Placement
Think about where you will be standing when you want to turn the lights on. The switch should be accessible from the entry of the room, not buried behind the bar where you have to walk in the dark to find it.
FAQs
What is the best light bulb color for a home bar?
I recommend 2700K (warm white). This color temperature mimics the glow of candlelight and incandescent bulbs, which creates a relaxing, flattering atmosphere. Avoid 3000K or higher unless your bar is in a very modern, stark white space, as it can feel too energetic for a lounge area.
How high should I hang wall sconces in a bar area?
Ideally, the center of the light source should be roughly 60 to 66 inches from the finished floor. This places the light at eye level for most people, which is most flattering. If the sconces are located above a backsplash, ensure they clear the height of any bottles you plan to display on the counter.
Can I mix different types of lighting fixtures?
Absolutely. In fact, mixing fixtures is preferred. A common combination is linear LED tape under the shelves, a pair of decorative sconces on the wall, and a portable lamp on the counter. This variety adds depth and interest. Just ensure all bulbs share the same color temperature so the light looks cohesive.
Do I need recessed “can” lights if I have pendants?
Usually, yes. Pendants provide ambient glow, but they rarely cast enough light for cleaning or intricate cocktail preparation. I typically place recessed lights on a separate switch to provide “work lighting” when needed, which can then be turned off when guests arrive.
Conclusion
Lighting a home bar is about balancing utility with atmosphere. You are creating a stage for hospitality, where the drinks look enticing and the environment feels welcoming. By layering different types of light—from the architectural glow of LED strips to the decorative sparkle of pendants—you can transform a simple cabinetry unit into a destination within your home.
Remember that flexibility is key. The ability to dim your lights and adjust the mood is what separates a professional-looking design from a basic DIY project. Start with the permanent hardwired fixtures, but don’t underestimate the power of a simple portable lamp to add that final touch of warmth.
Picture Gallery


