
Title: 5 Living Room Home Bar Layout Tips
Introduction
Designing a home bar is often the highlight of a living room renovation because it represents relaxation and hospitality. However, fitting a functional drink station into your main living area requires more than just buying a bar cart and stocking some vodka. If you are looking for visual inspiration, we have curated a comprehensive Picture Gallery at the end of the blog post.
I have seen many clients struggle with scale and placement, often resulting in a bar that feels cluttered or impedes traffic flow. A well-designed bar should feel like an integrated architectural element, not an afterthought pushed into a corner. It needs to serve the host while allowing guests to mingle comfortably without blocking the television or the exit.
In this guide, we will move beyond basic styling and look at the hard layout rules I use in professional projects. We will cover the ergonomics of pouring drinks, the necessary clearances for seating, and how to mix materials for durability. Whether you are a renter with a small footprint or a homeowner planning a built-in wet bar, these layout tips will help you execute the design correctly.
1. Establishing Traffic Flow and Social Zones
The first rule of laying out a home bar is understanding where people naturally move. You never want your bar to create a bottleneck. If the bar is placed too close to the main entryway of the room, guests will congregate there and block the flow for everyone else.
I always recommend placing the bar on the periphery of the “social triangle”—the space between the sofa, the armchairs, and the focal point (usually a TV or fireplace). The host should be able to mix a drink while still facing the guests. If you have to turn your back completely to the room for five minutes to slice limes, you are removed from the conversation.
Clearance Rules of Thumb
- Pass-through zones: If your bar is along a walkway, you need a minimum of 36 inches of clearance between the front of the bar (or the person standing there) and the nearest piece of furniture.
- Working space: If you are standing behind a bar counter, you need at least 36 to 42 inches of width to move comfortably, especially if there are cabinets opening behind you.
- Guest spacing: If you have people standing around the bar, calculate a “standing footprint” of about 24 inches per person.
Designer’s Note: The “Corner Trap”
One specific lesson I learned early in my career involved placing a bar cart in a tight corner next to a swing door. Every time the door opened, the host had to step aside, halting the drink-making process.
Always check the swing radius of nearby doors and the drawer depth of nearby credenzas. Ensure that when your bar cabinet doors are fully open, they do not hit the coffee table or the arm of a sofa.
Common Mistakes + Fixes
- Mistake: Placing the bar in a “dead zone” far from the seating area.
- Fix: Bring the bar closer to the action. If space is tight, use a console table behind the sofa as your bar surface to bridge the gap between the kitchen and living room.
2. Determining the Vertical Layout and Storage Scale
Once you have the floor location, you must address the vertical layout. A common error is ignoring the height requirements for different types of liquor bottles and glassware. Standard shelves often do not accommodate top-shelf liquor bottles, which can range from 12 to 14 inches in height.
If you are building a permanent unit, I recommend varying your storage heights. You need open counter space for preparation, upper cabinets or shelves for display, and lower cabinets for ugly items like backup mixers and trash bins.
Standard Measurements for Built-ins
- Counter height: Standard bar height is 42 inches, while standard counter height is 36 inches. For a living room, I usually prefer 36 inches as it feels more like furniture and less like a kitchen.
- Upper shelf depth: Keep upper shelves shallower than the base cabinets. If your base is 24 inches deep, make uppers 12 to 14 inches deep so you don’t hit your head while pouring.
- Backsplash height: Allow at least 18 inches between the counter and the bottom of the first shelf or cabinet to accommodate tall blenders or ice buckets.
What I’d Do in a Real Project
If I am designing a built-in bar for a client, I always include a specific “appliance garage” or a designated tall cabinet. Many wine fridges are 15 or 24 inches wide. Even if you aren’t buying one now, frame the opening for a standard 24-inch under-counter fridge and fill it with removable shelving. This future-proofs your cabinetry investment.
For renters or those using freestanding furniture, look for pieces with adjustable shelving. Measure your tallest bottle before you buy the cabinet. There is nothing worse than having to lay a bottle of expensive scotch on its side because it won’t stand up in the cabinet.
3. Selecting Durable Materials for “Wet” Zones
Even if you don’t have a sink (a “dry bar”), you are still dealing with liquids. Red wine, citrus acids, and ice condensation are the enemies of standard living room furniture finishes. A common layout failure is choosing a surface that requires constant babying.
If you are repurposing a vintage wooden sideboard, you must protect the top. I often commission a piece of custom glass or stone to sit on top of the wood. This preserves the aesthetic while providing a waterproof work surface.
Material Hierarchy for Bar Tops
- Quartz: The most durable option. It resists staining from citrus and wine and doesn’t require sealing.
- Natural Stone (Marble/Soapstone): Beautiful but high maintenance. Acids (like lemon juice) will etch marble instantly. If you choose this, commit to the “patina” look or get it professionally sealed often.
- Wood: Requires a marine-grade varnish or immediate cleanup of spills. Use coasters religiously.
Designer’s Note: The “Landing Strip”
Every bar needs a “landing strip”—a designated waterproof area where the actual pouring happens. If you have a wood surface, use a large metal, lucite, or lacquer tray.
This tray acts as your containment zone. If a spill happens, it stays in the tray. I style these with a lip of at least two inches. It defines the zone visually and protects your investment functionally.
Common Mistakes + Fixes
- Mistake: Using a mirror as a countertop. It scratches immediately and is impossible to keep clean.
- Fix: Use mirrored glass for the backsplash instead. It adds depth and reflects light without taking the abuse of bottles sliding around.
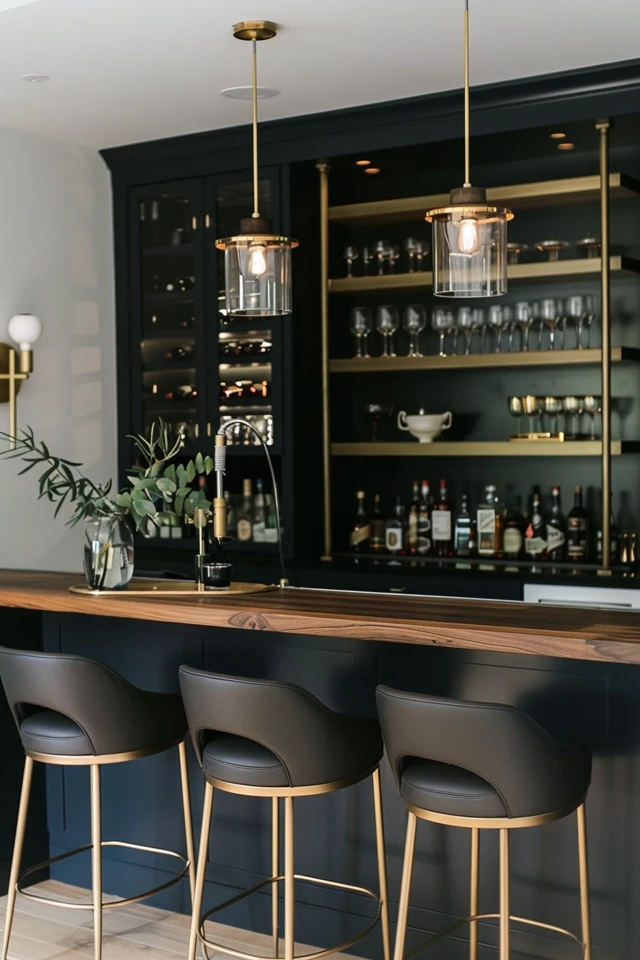
4. Lighting Strategy and Electrical Planning
Lighting is what separates a cabinet full of bottles from a true home bar. In a living room, the lighting needs to be moody and atmospheric, not bright and clinical like a kitchen. The goal is to highlight the glassware and the bottles, creating a jewel-box effect.
Layout planning must include electrical access. If you are building in, you need outlets for a wine fridge, an ice maker, or a blender. Hiding these outlets is an art form. I prefer placing them inside the cabinets or using pop-up outlets on the countertop.
Lighting Layers Checklist
- Ambient light: Pendants or sconces to light the general area.
- Task light: Under-cabinet LED strips so you can see how much you are pouring.
- Accent light: Puck lights inside glass-front cabinets to make crystal glassware sparkle.
Renovation Reality Check
If you cannot run new wires behind the walls, use rechargeable LED picture lights or battery-operated puck lights. They have come a long way in quality. Look for lights with a warm color temperature (2700K to 3000K). Anything higher will look blue and sterile, killing the vibe of your living room.
What I’d Do in a Real Project
I always install a dimmer switch specifically for the bar zone. During a party, you want the bar to glow, not shine. I also recommend using glass shelves for the upper display if you are using top-down lighting. The light travels through the glass shelves to illuminate the entire vertical display, rather than stopping at the top wood shelf.
5. Seating Logistics and Overhangs
If your layout includes bar seating, the math becomes very specific. A bar stool requires significant floor space, and people often underestimate how much room legs take up. If you cram stools into a narrow walkway, no one will sit in them, and they will just become obstacles.
You must decide if this is a “standing bar” or a “sitting bar.” A standing bar takes up less depth. A sitting bar requires an overhang on the countertop so guests can pull their knees in.
The Golden Rules of Bar Seating
- Knee clearance: You need at least 10 to 12 inches of countertop overhang for comfortable seating. If you have less, people will sit sideways or bang their knees.
- Linear width: Allow 24 inches of width per stool. If your bar is 48 inches wide, you can fit two stools, not three.
- Stool height: Measure your counter before buying stools.
- For a 36-inch counter, buy 24 to 26-inch stools (Counter Height).
- For a 42-inch counter, buy 28 to 30-inch stools (Bar Height).
Designer’s Note: Fabric Selection
For living room bar stools, durability is key. I usually spec performance velvets or faux leathers. They look sophisticated but wipe down easily. Avoid linen or loose-weave cottons on bar stools; one drop of red wine will ruin them.
Common Mistakes + Fixes
- Mistake: Buying stools with arms for a tight space.
- Fix: Choose backless or armless stools if space is premium. They can tuck completely under the overhang when not in use, keeping the visual lines of the living room clean.
Final Checklist: Designing Your Home Bar
Before you finalize your layout or purchase furniture, run through this checklist to ensure you haven’t missed any critical functional details.
- Clearance Check: Is there a 36-inch walkway past the bar even when someone is standing there mixing a drink?
- Door Swing: Do nearby doors or cabinet drawers open without hitting the bar cart or stools?
- Outlet Access: Is there a power source nearby for a lamp, blender, or wine fridge?
- Surface Protection: Is the countertop material resistant to acids and alcohol, or do you have a large tray?
- Bottle Height: Have you measured your tallest spirit bottle to ensure it fits on the shelf?
- Lighting: Do you have a low-light option (dimmer or low-wattage lamp) for evening ambiance?
- Weight Limit: If using floating shelves, are they anchored into studs? Liquor bottles are incredibly heavy.
- Glassware Storage: Do you have a dust-free zone (cabinet) for glasses you don’t use daily?
FAQs
What is the difference between a wet bar and a dry bar?
A wet bar includes a plumbed sink and running water, while a dry bar does not. A wet bar is significantly more expensive to install due to plumbing requirements but is much more functional for washing glasses and dumping ice. A dry bar is easier to integrate into an existing living room layout.
Can I put a home bar in a small apartment living room?
Absolutely. For small spaces, I recommend using a vertical bar cabinet (tall and narrow) rather than a wide horizontal credenza. Alternatively, use a “tray bar” on top of an existing bookshelf or media console to define the space without buying new furniture.
How much does it cost to add a built-in bar?
Costs vary wildly based on finishes and labor. A DIY dry bar using semi-custom cabinetry might cost $1,500 to $3,000. A fully custom wet bar with stone counters, a wine fridge, and plumbing work can easily range from $8,000 to $15,000 or more.
Do I need a wine fridge?
If you drink red wine primarily, a wine fridge is optional but helpful for long-term storage. If you drink white wine, beer, or soda, a beverage center is highly recommended to free up space in your main kitchen refrigerator and keep drinks accessible to guests.
Conclusion
Creating a successful home bar layout in your living room is about balancing the fantasy of the perfect cocktail hour with the reality of square footage and durability. It requires looking at the room not just as a static picture, but as a dynamic space where people move, sit, and interact.
By adhering to standard clearances, respecting the “wet” nature of the zone, and lighting it for atmosphere, you can create a feature that adds value to your home and elevates your hosting game. Start with the floor plan, protect your surfaces, and always measure your tallest bottle before you commit to shelf heights.
Picture Gallery


