
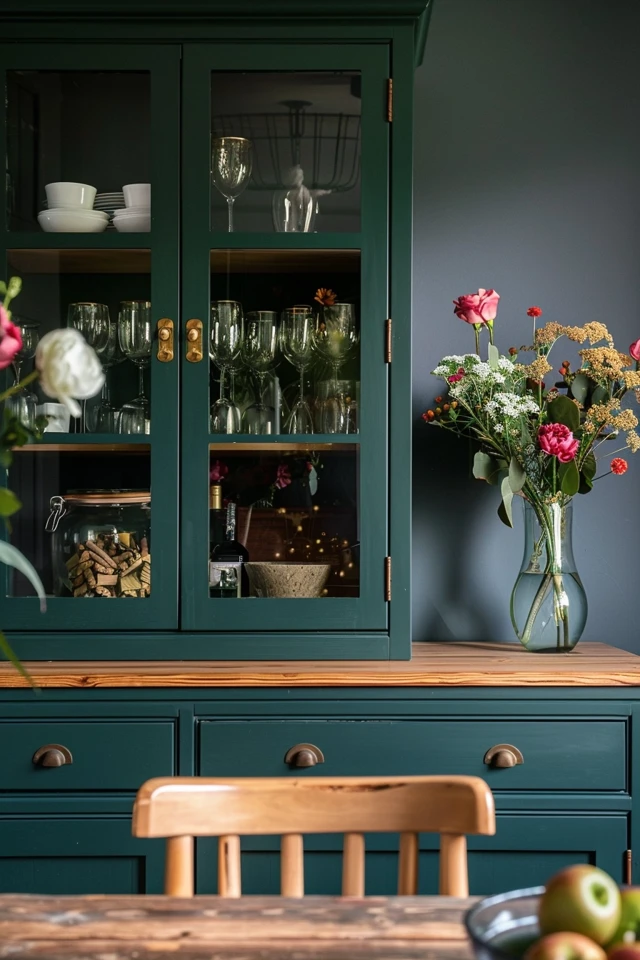
5 Tips for a Dining Room Hutch Makeover
A dining room hutch often sits at the intersection of sentimental value and aesthetic frustration. Maybe you inherited a heavy, dark cherry piece from a grandmother, or perhaps you scored a solid oak cabinet at an estate sale that feels just a little too dated for your modern home. These pieces are usually incredibly well-made, offering storage capacity that modern furniture simply cannot match, yet they can dominate a room with their visual weight.
The good news is that a hutch is one of the most high-impact furniture makeovers you can tackle. I have saved countless vintage hutches from the landfill by applying the right finish, updating the lighting, and rethinking how they are styled. It does not require a contractor, but it does require a plan to ensure the finish holds up to dishware traffic.
Check out the Picture Gallery at the end of this article for visual inspiration before you start your project.
1. Master the Prep and Paint Process
The difference between a professional-looking makeover and a DIY disaster usually happens before a drop of paint touches the surface. Dining room hutches are high-traffic furniture pieces. You will be opening doors, sliding heavy platters across shelves, and bumping drawers with silverware. Durability is your primary goal here.
If your hutch has a glossy original finish, paint will not stick to it without mechanical adhesion. You cannot simply wipe it down and start painting, or the finish will scratch off with a fingernail within a week. You need to de-gloss the entire piece to create a “tooth” for the new primer to grab onto.
Designer’s Note: Dealing with “Bleed-Through”
In my years of refinishing, the most common heartbreak happens with vintage mahogany or cherry wood. These woods contain tannins that will bleed through light paint, turning your crisp white hutch pink or yellow after a few days. Standard water-based primers will not stop this. If you are painting a dark wood hutch a light color, you must use a shellac-based primer. It smells strong and dries fast, but it is the only thing that seals the tannins permanently.
The Step-by-Step Prep Workflow
- Clean thoroughly: Use a degreaser or TSP (Trisodium Phosphate) substitute. Decades of furniture polish and kitchen grease settle on these pieces, and they repel paint.
- Scuff sand: Use 120-grit sandpaper on the flat surfaces and a sanding sponge for the detailed trim. You do not need to strip it to bare wood, but you must remove the shine.
- Fill grain (optional): If you have an oak hutch with deep wood grain and want a sleek modern look, use a wood grain filler before priming. Otherwise, the texture will show through the paint.
- Prime correctly: Apply two coats of primer, sanding lightly with 220-grit paper between coats for a glass-smooth base.
- Paint selection: Use a high-quality cabinet or trim enamel. Avoid standard wall latex, which stays too soft. A waterborne alkyd enamel offers the hardness of oil with the cleanup of water.
Common Mistakes + Fixes
Mistake: Painting the drawer sides.
Fix: Tape off the sides of the drawers. Paint adds thickness, and vintage drawers usually have tight tolerances. If you paint the sides, the drawers will likely stick and ruin your new finish. Apply a little beeswax to the unpainted wood tracks for smooth operation.
2. Brighten the Interior with Modern Lighting
Old hutches are notorious for being dark caverns where beautiful china goes to disappear. The original lighting in vintage units is often a single, hot incandescent bulb at the very top that barely reaches the bottom shelf. Updating the lighting is the single most effective way to make a hutch feel high-end and intentional.
When we design custom millwork for clients, lighting is never an afterthought. For a retrofit, you want light sources that are invisible until they are turned on. The goal is to wash the back wall and the objects with light, not to blind the person sitting at the dining table.
Choosing the Right Temperature
The color of the light (Kelvin rating) makes or breaks the look.
- 2700K (Warm White): Best for traditional rooms or if you kept the wood tone of the hutch. It mimics candlelight.
- 3000K (Soft White): This is the designer standard. It is crisp and clean but not blue. It makes white china look white and works well with gray or blue paint colors.
- 4000K+ (Daylight): Avoid this. It looks like a hospital fridge and will make your dining room feel sterile.
What I’d Do in a Real Project
If this were a client project, I would route channels for hardwired LED tape lights up the inside face frame of the cabinet. This directs light backward onto the objects, reducing glare.
However, for a DIY makeover, wireless or plug-in options are fantastic. I recommend ultra-thin LED puck lights or tape lights that can be plugged into a standard outlet behind the hutch. If you do not have an outlet nearby, look for rechargeable motion-sensor bar lights. You can adhere them to the underside of each shelf. Just ensure you place them behind the face frame so the fixture itself is hidden.
3. Create Depth with a Contrasting Back Panel
A hutch painted one solid color can sometimes look flat, especially if it is large. Treating the back panel—the wall behind the shelves—as a separate design element adds incredible depth and sophistication. This is where you can take a design risk without committing to the entire piece.
There are three main ways to treat the back panel, ranging from subtle to bold. Each method changes the perceived scale of the items you display.
Option A: The Subtle Contrast
Paint the back panel two shades darker or lighter than the exterior. If the hutch is a soft sage green, paint the interior back a deep forest green. This monochrome layering creates a shadow box effect that makes white dishes pop.
Option B: Texture and Pattern
Wallpaper is a fantastic choice here. A small-scale geometric print or a grasscloth texture adds richness. Since the back panel is broken up by shelves and covered by dishes, you can get away with busier patterns that might be overwhelming on a full wall. Peel-and-stick wallpaper is ideal here because it is easy to remove if you tire of the pattern.
Option C: Architectural Detail
If the back of your hutch is cheap plywood or stapled cardboard, cover it. I often use beadboard sheets for a farmhouse or coastal look. You can cut these to size and glue them right over the existing back. Run the lines vertically to draw the eye up and make the piece feel taller.
Real-World Constraints: Renters
If you are renting or just hesitant to make permanent changes to an antique, wrap a piece of foam core board in fabric or wallpaper. Cut the board to fit snugly against the back of each shelf section. Press it into place. It requires no glue or nails, and you can swap it out whenever you want a new look.
4. Update the Hardware and Glass
Think of hardware as the jewelry of the piece. The original hardware on 1980s and 1990s hutches is often bulky, stamped brass that dates the furniture immediately. Swapping this out is a quick win, but it comes with technical challenges regarding measurements.
You must measure the “center-to-center” distance of the screw holes on your existing pulls. This is the distance from the center of one screw hole to the center of the other. Common vintage sizes are 2.5 inches or 3 inches, but some are non-standard.
Dealing with Holes that Don’t Match
If you find modern hardware you love but the holes don’t align with the old ones, you have two choices:
- Fill and Drill: Fill the old holes with wood filler (Bondo is best for durability), sand smooth, paint, and drill new holes. This is the cleanest look but requires the most work.
- Use Backplates: This is a designer secret. Buy knobs or pulls that come with a decorative backplate wide enough to cover the old holes. This adds a substantial, custom feel to the piece and saves you from filling and sanding.
The Glass Situation
Many vintage hutches feature glass doors with dated grids or leaded designs. If the grids are wood strips sitting on top of the glass, they can often be popped off carefully with a chisel. This instantly modernizes the hutch, giving it a clean, display-case aesthetic.
If the glass itself is etched or amber-colored and you hate it, consider replacing it with chicken wire for a rustic look, or mirrored glass to reflect light into the room. A local glass shop can cut replacement panes for a surprisingly low cost.
5. Strategic Styling and Shelf Arrangement
You have painted, lit, and updated the hardware. Now you have to put things back inside. The way you style the hutch determines if it looks like a curated display or a storage locker. The goal is balance, not volume.
In design school, we learn about “negative space”—the empty space around objects. Your hutch needs breathing room. A good rule of thumb is to aim for 20% empty space on your shelves. If you pack it 100% full, the eye has nowhere to rest.
The Triangle Rule
Arrange items in visual triangles. For example, place a large serving bowl in the center of the middle shelf. On the shelf above it, place two medium items to the left and right. On the shelf below, place items that align with the top ones. When you step back, your eye should bounce between these points in a zig-zag or triangular motion.
Grouping by Function and Visual Weight
- Anchor the bottom: Place your heaviest items visually—soup tureens, stacks of heavy dinner plates, or large casseroles—on the bottom shelf. This grounds the display.
- Layer the back: Stand platters or chargers up against the back wall. This covers the vertical space and creates a backdrop for smaller items. You may need to use plate stands or cut a small groove in the shelf to keep them safe.
- Vary the heights: Do not line up items that are all the same height. Stack bowls to create height. Place a small pitcher on top of a stack of dessert plates.
- Mix materials: A hutch full of only white porcelain can look flat. Mix in glass (stemware), wood (salad bowls or cutting boards), and metallics (silver teapots or brass candlesticks) to add texture.
Common Mistakes + Fixes
Mistake: Small items floating alone.
Fix: Small items like egg cups, salt cellars, or napkin rings get lost if they are scattered. Group them together on a small tray or saucer. A collection of small things reads as one large “object” when grouped.
Final Checklist
Before you call the project done, run through this list to ensure longevity and safety.
- Cure time: Waterborne enamels dry in an hour but take 20 to 30 days to fully “cure” to maximum hardness. Be incredibly gentle with the finish for the first month. Do not slide heavy ceramics on it yet.
- Shelf stability: Check the shelf pins. Old plastic pins can become brittle. Replace them with metal pins to ensure your grandmothers china doesn’t come crashing down.
- Door alignment: After painting and reinstalling doors, they might sit crooked. Adjust the hinge screws. Usually, there is a screw for horizontal movement and one for vertical.
- Floor protection: If you moved the hutch to paint it, apply new felt pads to the feet before sliding it back into place to protect your dining room floors.
- Anchor it: If you have children or pets, or if you live in an earthquake zone, secure the top of the hutch to the wall with a furniture strap. Once filled with dishes, these pieces are top-heavy.
FAQs
Can I use chalk paint for a dining hutch?
You can, but I generally advise against it for the shelves. Chalk paint is porous and requires a wax finish, which needs re-application and isn’t very durable against scratching from dishes. If you love the matte look, use a matte-finish acrylic enamel instead. It is much more durable.
How do I clean the hutch after painting?
Wait at least 30 days before using any chemical cleaners. Once cured, wipe with a damp microfiber cloth and a mild soap solution. Avoid furniture polish or wax on painted surfaces, as it can build up and attract dust.
What if my hutch shelves are bowing?
This is common in wide hutches. Remove the shelf and flip it over so the bow curves upward. Over time, the weight of the dishes will settle it back to flat. If the wood is permanently warped, you can have a local lumber yard cut a new piece of plywood or solid wood to the exact dimensions.
Should I paint the hardware?
If you cannot remove the hardware, or if it is a unique shape you can’t replace, you can paint it. However, spray painting it off the piece is best. Use a metallic spray paint followed by a clear lacquer. Hand-painting hardware while it is attached to the furniture rarely looks professional and often chips.
Conclusion
Transforming a dining room hutch is a labor of love, but the payoff is massive. You are taking a piece of furniture that likely has great bones and history and tailoring it to fit your specific style. Whether you go for a moody, dark look with brass accents or a light, airy coastal vibe with beadboard, the principles remain the same: rigorous prep, thoughtful lighting, and intentional styling.
Take your time with the sanding and the cure time. These are the boring parts, but they are the reason your project will still look beautiful five years from now. Enjoy the process of creating a home for your most gathered memories.
Picture Gallery


