
5 Tips for a Stylish Home Bar Hutch
There is something inherently sophisticated about a well-appointed home bar. It serves as a focal point for entertaining and signals to guests that they can relax and stay a while. While bar carts had their moment in the spotlight, the bar hutch has returned as the gold standard for dedicated beverage stations.
A hutch offers verticality and substantial storage that a cart simply cannot match. I remember a specific project where a client tried to force a small brass cart into a grand dining room with twelve-foot ceilings. The scale was completely off, and the room felt empty. Once we swapped it for a floor-to-ceiling vintage oak hutch, the room instantly felt grounded and complete.
However, styling a large piece of furniture can be intimidating. You have to balance practical storage needs with aesthetic display, ensuring it doesn’t just look like a cluttered cabinet of liquor bottles. Be sure to scroll down to view our curated Picture Gallery at the end of this blog post for visual examples of these concepts.
1. Master the Scale and Traffic Flow
Before we buy a single piece of glassware, we have to talk about the footprint. A bar hutch is a command center, and it carries significant visual weight. In my design practice, the most common error I see is placing a hutch where it visually or physically chokes the room.
If you are working with a freestanding unit, you need to consider the depth of the piece relative to the walkway. Standard walkway clearance in interior design is 36 inches. If your hutch has swinging doors on the bottom, you need to account for the door swing plus roughly 24 inches for a person to stand comfortably in front of it to mix a drink.
Vertical scale is just as important. In rooms with standard 8-foot ceilings, look for a hutch that stands at least 7 feet tall. Leaving too much gap between the top of the hutch and the ceiling can make the furniture look stunted. If you have tall ceilings, you might need to style the top of the hutch with baskets or ceramics to bridge that gap.
Designer’s Note: The “Heavy Bottom” Rule
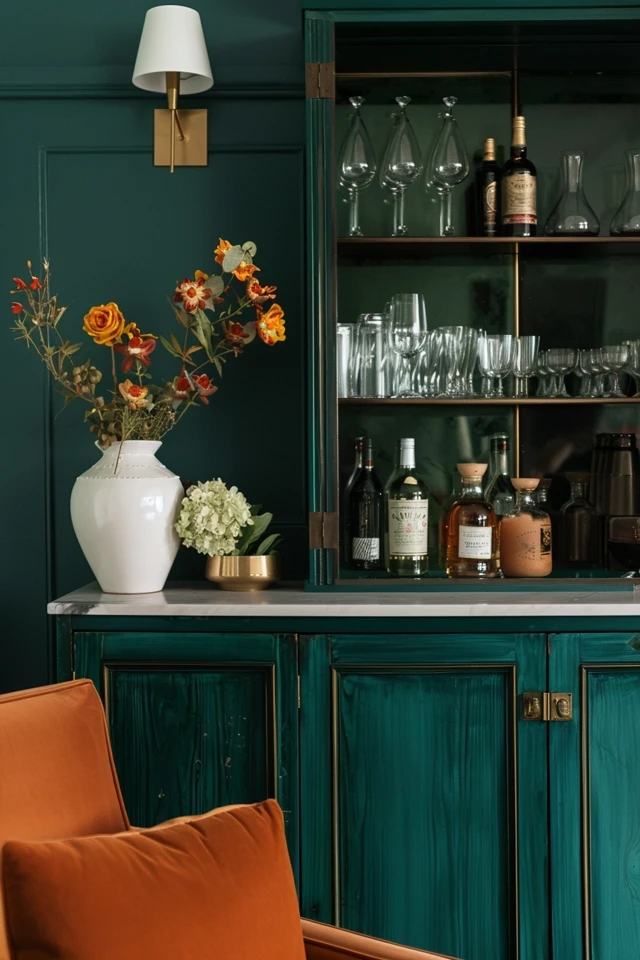
A well-balanced hutch should always look “heavier” at the bottom. This means the base cabinet (usually closed storage) should be deeper than the upper shelving (usually open or glass-front). A standard lower cabinet depth is 20 to 24 inches, while upper shelves should ideally be 12 to 14 inches deep. This step-back design prevents the piece from feeling like a looming monolith.
Common Mistakes + Fixes
- Mistake: Buying a hutch that is the exact same width as the wall it sits on.
- Fix: Leave “breathing room” on the sides. I recommend leaving at least 6 to 10 inches of wall space on either side of the hutch. If the fit is wall-to-wall, it should be a custom built-in, not a freestanding piece.
2. Curate Your “Active” vs. “Archive” Inventory
Functionality dictates form. A bar hutch can quickly become a graveyard for half-empty bottles of peppermint schnapps from five years ago. To keep the hutch stylish, you must separate your inventory into two categories: display-worthy items and necessary utility items.
I advise clients to use the “80/20 Rule” for open shelving. Only 20% of your glassware and bottles should be out on the main viewing shelves. These should be your beautiful decanters, crystal rocks glasses, and premium liquor bottles with attractive labels.
The bottom cabinet is for the “ugly” necessities. This is where you store the plastic tumblers for outdoor parties, the oversized blender, the bags of extra ice, and the backup bottles of wine. If your hutch is entirely open (no solid doors at the bottom), you must use baskets or opaque bins to corral these items.
What I’d do in a real project:
- Audit the collection: I pull everything out of the client’s current stash.
- Decant the unsightly: If a client loves a specific spirit but the bottle is neon plastic and ruins the vibe, we pour it into a clear glass decanter.
- Group by function: I dedicate one shelf specifically to wine stems and another to low-ball glasses. This visual repetition creates order.
3. Lighting is the Secret Ingredient
Lighting is often the difference between a furniture store display and a high-end home feature. A dark hutch feels like a black hole in the room, especially at night when you are most likely to use it. You need to introduce light sources that highlight the glassware and create depth.
If you are renovating or building custom, hardwire LED strip lighting into the underside of each shelf. The channels should be routed into the wood so the actual light strip is invisible; you only want to see the glow.
For renters or existing furniture, battery-operated puck lights are a lifesaver. Look for ultra-thin models that can be mounted with adhesive strips behind the face frame of the hutch. This hides the fixture from view while illuminating the objects on the shelf below.
Designer’s Note: Temperature Matters
Never use “Daylight” or 5000K bulbs in a bar hutch. It looks like a sterile hospital fridge. Aim for a Kelvin temperature between 2700K (warm white) and 3000K (soft white). This warmth reflects beautifully off amber liquids (whiskey, bourbon, cognac) and gold accents on glassware.
Common Mistakes + Fixes
- Mistake: Relying solely on overhead ceiling lights to illuminate the hutch.
- Fix: Add a small, portable table lamp to the serving surface if your hutch has a counter area (like a buffet and hutch combo). It adds an incredible layer of coziness.
4. Layering Texture and Accessories
A bar hutch should not look like a liquor store aisle. It needs soul. This comes from layering textures and introducing items that are not strictly related to drinking. If every single inch is covered in glass bottles, the result is cold and reflective.
I always introduce wood, leather, or paper elements to soften the look. Cocktail books are my favorite prop. Stack two or three beautiful hardcover cocktail books horizontally. Use this stack as a riser or podium to elevate a special bottle or a bowl of lemons.
Trays are another essential tool for visual organization. If you place twelve loose bottles on a shelf, it looks like clutter. If you place those same twelve bottles on a leather or brass tray, it looks like a curated collection.
Consider the back of the hutch as well. If the back panel is plain dark wood, the items in front of it might disappear. I often apply a temporary peel-and-stick wallpaper with a subtle texture—like a grasscloth or a linen effect—to the back panel. This provides a lighter background that makes the silhouette of bottles and glasses pop.
Specific Measurements for Layouts:
- Shelf Height: Ensure you have at least 15 inches of clearance for shelves holding tall bottles or decanters.
- Grouping: Group items in odd numbers (3, 5, or 7). Our brains find odd numbers more visually engaging than even pairs.
- Negative Space: Leave at least 20% of each shelf empty. The eye needs a place to rest.
5. Upgrade the Hardware and Finishes
If you are working with a vintage find or a budget-friendly retail piece, the hardware is usually the first thing that needs to go. Swapping out generic knobs for high-quality hardware is the highest ROI (Return on Investment) update you can make.
For a bar hutch, you can afford to go a bit bolder with the hardware than you might in a kitchen. Think unlacquered brass, polished nickel, or even leather-wrapped pulls. The hardware should relate to other metals in the room, but it doesn’t have to match perfectly. If your dining chandelier is black iron, antique brass hardware on the hutch creates a lovely, collected look.
Consider the work surface as well. If your hutch has a mixing ledge, durability is key. Alcohol and citrus acids will destroy standard wood varnishes very quickly.
If the hutch is wood, I recommend using a high-quality coaster set or a large stone slab tray for mixing drinks. For a more permanent solution, I have had clients top the lower cabinet of a two-piece hutch with a remnant piece of quartz or soapstone. This makes the unit virtually indestructible and waterproof.
Designer’s Note: Mirror Magic
If your hutch feels small or the room is dark, consider installing an antique mirror on the back panel of the open shelving area. It doubles the visual amount of glassware and bounces light around the room, making the whole setup feel glamorous and spacious.
Final Checklist: The Designer’s “Go-Live” Review
Before you invite guests over, run through this final checklist. This is the exact process I use during a final styling day to ensure the hutch is functional and beautiful.
Safety and Stability
- Is the hutch anchored to the wall? (Crucial for tall pieces loaded with heavy glass).
- Are the shelves rated for the weight? (Liquor bottles are surprisingly heavy; check for bowing).
Functionality
- Is the bottle opener easily accessible?
- Do you have a designated “wet zone” (coaster or tray) for pouring?
- Are the everyday glasses on the lower, easy-to-reach shelves?
Aesthetics
- Have you removed the “visual noise”? (Store bought cardboard boxes for beer or soda).
- Is there a mix of heights? (Tall bottles next to short stacks of books).
- Is the lighting warm and inviting?
FAQs
What is the best paint finish for a bar hutch?
I almost always recommend a semi-gloss or high-gloss (lacquer) finish for bar hutches. Not only does it look luxurious and dramatic, but it is also much easier to wipe down. Matte finishes can absorb splashes and oils from citrus rinds, leaving permanent stains.
Can I put a bar hutch in a living room?
Absolutely. In fact, the living room is often a better location than the dining room because it is where guests linger after dinner. Just ensure the style of the hutch complements your media console or bookshelves so the room doesn’t feel like a furniture showroom.
How do I organize wine glasses without them getting dusty?
If you don’t use your stemware weekly, store them upside down. This prevents dust from settling inside the bowl. For a pro look, you can install under-shelf stemware racks (gliders) that hold the glasses by the foot. This frees up shelf space below for bottles.
What if I don’t drink alcohol? Can I still have a hutch?
Yes! The “Zero-Proof” bar is a massive trend right now. Style it with beautiful glass bottles of sparkling water, artisanal syrups, sophisticated sodas, and a high-end espresso machine. The principles of scale, lighting, and texture remain exactly the same.
Conclusion
Creating a stylish home bar hutch is about more than just storage; it is about creating an experience. It is a dedicated zone that invites you to slow down and appreciate the ritual of making a drink, whether that is a complex cocktail or a simple sparkling water.
By focusing on the scale of the furniture, mastering the lighting, and curating your display with a mix of utility and beauty, you can transform a simple cabinet into the highlight of your home. Remember to leave room for the collection to grow and change over time. The best homes are not static; they evolve with the people who live in them.
Picture Gallery


