
5 Tips for Creating a Dining Room Homeschool Space
For many families, the formal dining room has undergone a massive identity shift over the last few years. It is no longer just a place for Thanksgiving turkeys or Sunday roasts. It has become the command center for algebra homework, science projects, and remote learning.
The challenge lies in making this space function efficiently for education without losing the warmth and elegance of a gathering space. You do not want your home to look like a permanent classroom with neon posters and plastic bins cluttering the corners. It is entirely possible to design a hybrid space that respects both functions.
If you are looking for visual inspiration, check out the Picture Gallery at the end of the blog post for real-world examples of dual-purpose dining rooms.
1. Master the Art of the “Transition” Layout
The biggest psychological hurdle in a dual-purpose room is the inability to “leave” work or school at the end of the day. If your dining table is covered in textbooks during dinner, the room never feels relaxing.
In my design practice, I focus heavily on the transition. The layout must allow for school materials to be completely cleared away or hidden within 15 minutes. This usually means establishing distinct zones even within a small footprint.
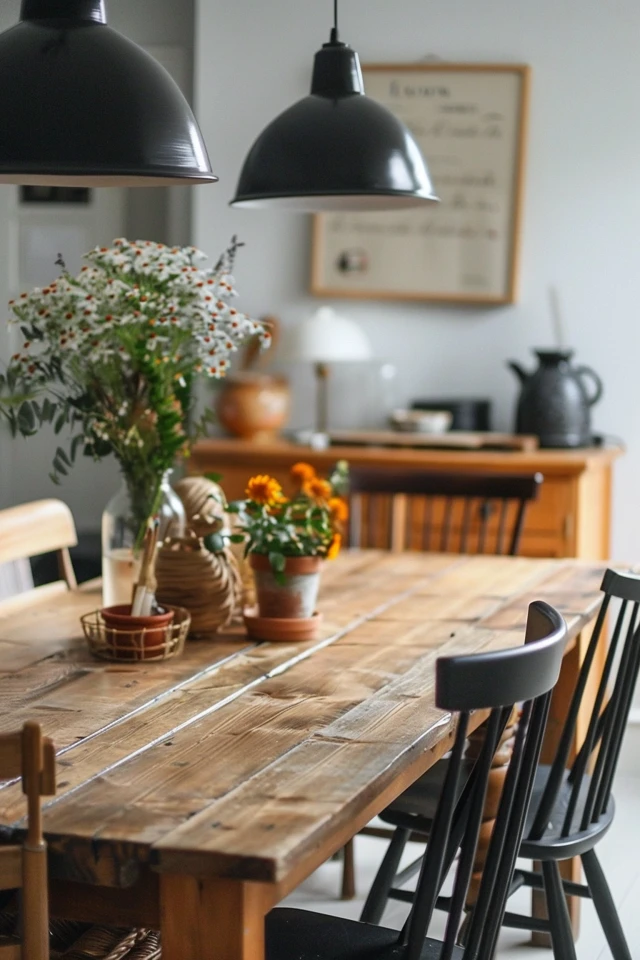
Avoid pushing the dining table against a wall to create floor space. Keep the table centered to allow circulation on all four sides. You need at least 36 inches of clearance between the table edge and the wall or buffet for comfortable movement. This allows you to walk around the student to help them without bumping into walls.
Designer’s Note:
One common mistake I see is parents trying to turn the dining table into a desk by pushing it into a corner. This ruins the flow of the room. Instead, keep the table central and use the perimeter walls for dedicated “school zones” like a console table or a rolling cart station.
Common Mistakes + Fixes:
- Mistake: Using the entire dining table surface for one child.
- Fix: Define workspace boundaries using large placemats or trays. A standard 24-inch by 18-inch work zone per child is sufficient for a laptop and notebook. This leaves the rest of the table clear and prevents sprawl.
2. Prioritize “Invisible” Storage Solutions
Storage is the lifeline of any homeschool space, but in a dining room, it needs to be disguised. You likely do not want open cubbies or colorful plastic bins visible during a dinner party.
I always recommend “closed storage” furniture pieces that mimic high-end dining furniture. A sideboard or buffet is your best friend here. Look for a unit that is at least 18 inches deep. This depth is critical because it allows you to store standard 3-ring binders and textbooks upright or in magazine files.
If you are tight on floor space and cannot fit a deep buffet, look vertical. A tall hutch or a bookcase with doors on the bottom half works wonders. Use the upper open shelves for decor, styling objects, or nice books, and use the closed bottom cabinets for the unsightly school supplies.
What I’d do in a real project:
- Assess the inventory: I count every textbook, workbook, and art supply bin before buying furniture.
- The “Decanting” Rule: I remove ugly branded packaging. Pencils go in ceramic cups, paper goes in leather trays, and loose items go in woven baskets. This makes the “school stuff” look like decor.
- Rolling Carts: If built-ins aren’t an option, I use a high-quality metal rolling cart. During school hours, it sits table-side. At 3:00 PM, it rolls into a closet or pantry.
3. Select Lighting That Does Double Duty
Dining rooms usually feature ambient, moody lighting designed for evening meals. This is terrible for reading and writing. A chandelier with dim bulbs will lead to eye strain and fatigue for your student by midday.
You need to layer your lighting. The overhead fixture—your chandelier or pendant—should ideally be on a dimmer switch. However, the bulbs you choose matter immensely. I recommend bulbs with a color temperature of 3000K to 3500K. This is a “bright white” that is crisp enough for reading but warm enough to not feel sterile during dinner.
Supplement the overhead light with specific task lighting. Since dining tables rarely have floor outlets underneath them, cord management is a nightmare. I specifically source rechargeable, cordless LED table lamps for my clients. These can be placed on the table during school hours and moved to the sideboard at night to recharge.
Designer’s Note:
Scale is critical here. If you hang a pendant light, the bottom of the fixture should be 30 to 36 inches above the table surface. If it is too low, it blocks the view between teacher and student. If it is too high, the light disperses too much to be useful for detailed work.
4. Choose Performance Fabrics and Rugs
Homeschooling is messy. There will be glue, marker slips, eraser shavings, and snack spills. If your dining room has a delicate silk rug or linen chairs, they will be ruined within a month.
For flooring, I strictly advise against high-pile or shag rugs in a homeschool space. Eraser shavings and small paper scraps get trapped deep in the fibers and are impossible to vacuum out. Choose a low-pile wool rug or a high-quality polypropylene flatweave. Wool is naturally stain-resistant and durable, while polypropylene can often be bleached or scrubbed vigorously.
For seating, comfort and durability must coexist. Wooden dining chairs are beautiful but uncomfortable for six hours of sitting. I often suggest “performance velvet” for chair upholstery. It sounds fancy, but high-performance synthetic velvet is virtually indestructible. You can wipe off pen marks with soap and water, and it adds a soft, tactile comfort that helps kids sit longer.
Common Mistakes + Fixes:
- Mistake: Using ghost chairs or acrylic chairs for the “modern” look.
- Fix: These are hard and cold. If you must use them, add a sheepskin throw or a structured seat cushion. Your child’s focus is directly linked to their physical comfort.
5. Protect Your Table Surface
The dining table is often an investment piece. Soft woods like pine or expensive finishes like walnut veneer are highly susceptible to scratches from pencils and indentations from writing firmly on paper.
You have a few options to protect the surface without covering it in an ugly plastic tablecloth. My preferred method for serious homeschooling is a custom-cut piece of tempered glass. You can have a local glass shop cut a piece to the exact dimensions of your table. It protects the wood completely, wipes clean instantly, and allows the beauty of the wood to show through.
If glass feels too cold or formal, use high-quality desk pads. Do not rely on thin placemats. Look for thick leather or felt desk blotters that define the workspace and provide a dense barrier between the pen tip and the table surface.
What I’d do in a real project:
- Measure the table: I measure the exact length and width.
- Source the blotters: I buy oversized desk pads (at least 24″ x 16″) in a color that contrasts with the wood. Navy blue on oak, or cognac leather on a white table.
- The “Coaster” Rule: I integrate coasters into the school supply kit. Condensation from water bottles is the number one cause of damage to dining tables in my experience.
Final Checklist: Designing Your Space
Before you start buying furniture or rearranging the room, run through this checklist to ensure you are covering both function and form.
The “Must-Haves” List:
- Traffic Flow: Is there 36 inches of clearance around the table?
- Outlet Access: Where will laptops be charged? Do you need a surge protector extension cord that can be hidden?
- Storage Volume: Do you have 1.5x the storage space you think you need? (Books always accumulate).
- Lighting Temperature: Are your bulbs between 3000K and 3500K?
- Seating Height: Is the chair seat height 10 to 12 inches lower than the table top? This is the ergonomic “sweet spot.”
- Rug Durability: Is the rug low-pile and easy to vacuum?
Frequently Asked Questions
How do I homeschool in a dining room that is part of an open floor plan?
Acoustics are your biggest challenge in an open plan. Use soft materials to absorb sound. Add heavy drapery to windows, use a thick rug pad under your rug, and consider adding upholstered dining chairs. You can also use a freestanding folding screen to visually block the kitchen or living area during school hours, which helps the child focus.
What if I have multiple children of different ages at the same table?
Zoning is essential here. Seat them at opposite ends or sides of the table rather than right next to each other to minimize bickering and distraction. Use headphones for the child who is doing independent work while you are teaching the other. I also recommend assigning specific drawers or baskets in the sideboard to each child so their supplies don’t mix.
My dining chairs are hurting my child’s back. What should I do?
Standard dining chairs are designed for 1-2 hour meals, not 6-hour school days. If buying new ergonomic chairs isn’t in the budget, look for lumbar support pillows. For younger children, their feet must touch a solid surface to maintain posture. If their feet dangle, place a stool or a stack of books under the table for them to rest their feet on.
How do I handle wall decor in a dining room/school room?
Avoid hanging standard whiteboards, as they kill the dining room vibe. Instead, look for large framed glass boards (which act as whiteboards but look like modern art) or use a gallery wall of art where one or two frames are actually cork boards covered in linen fabric. This allows you to pin up schedules or art projects without it looking industrial.
Conclusion
Creating a dining room that functions as a homeschool space is about balancing durability with aesthetics. You do not have to sacrifice your personal style or your home’s adult atmosphere to provide a great learning environment.
By focusing on “invisible” storage, flexible lighting, and protective materials, you can build a room that transitions seamlessly from math class to dinner time. It requires intentionality and a strict adherence to organization, but the result is a home that works as hard as you do.
Picture Gallery


