
5 Tips for Creating a Stunning Home Bar Back Wall
Designing a home bar is about more than just having a place to pour a drink; it is about creating a destination within your home that signals relaxation and hospitality. The back wall is the visual heartbeat of this space, acting as the backdrop for your finest spirits and glassware while setting the stylistic tone for the entire room.
Whether you are converting a small closet or building a full-scale basement lounge, you will find plenty of inspiration and visual examples in our curated Picture Gallery located at the very end of this post. Getting the back wall right requires a balance of ergonomics, lighting, and material selection that reflects your personal style.
At-a-Glance: Key Takeaways
- Balance Form and Function: Your back wall should be as practical for storage as it is beautiful to look at.
- Lighting is Non-Negotiable: Use layered lighting, including task and accent lights, to create depth and ambiance.
- Material Contrast: Mix textures like cold stone, warm wood, and reflective glass to avoid a flat appearance.
- Measure Twice: Proper spacing between shelves and the depth of the counter are critical for comfort and accessibility.
- Personalize the Palette: The back wall is a great place to take a color risk, whether it is a moody dark navy or a shimmering metallic wallpaper.
What This Style Means (and Who It’s For)
The “Stunning Home Bar” concept is for the homeowner who views their residence as a social hub. It moves away from the utilitarian “liquor cabinet” of the past and toward a bespoke architectural feature. This style is for people who appreciate the ritual of a well-made cocktail and want their environment to reflect that level of intentionality.
This design approach is incredibly versatile. For some, it means a sleek, minimalist setup with floating glass shelves and integrated LED strips. For others, it is a rich, traditional mahogany build with antique mirror inserts. Regardless of the specific aesthetic, the focus is on the “back wall”—the vertical surface behind the bar counter—because that is where the eye naturally rests.
If you have a corner of a dining room, an unused alcove, or a dedicated basement space, this guide will help you maximize that vertical real estate. We are looking at ways to make the space feel expansive, expensive, and effortlessly cool.
The Signature Look: Ingredients That Make It Work
To achieve a professional-grade home bar back wall, you need to think in layers. A flat wall with a few shelves rarely feels finished. Designers use “ingredients” to build a composition that feels intentional and high-end.
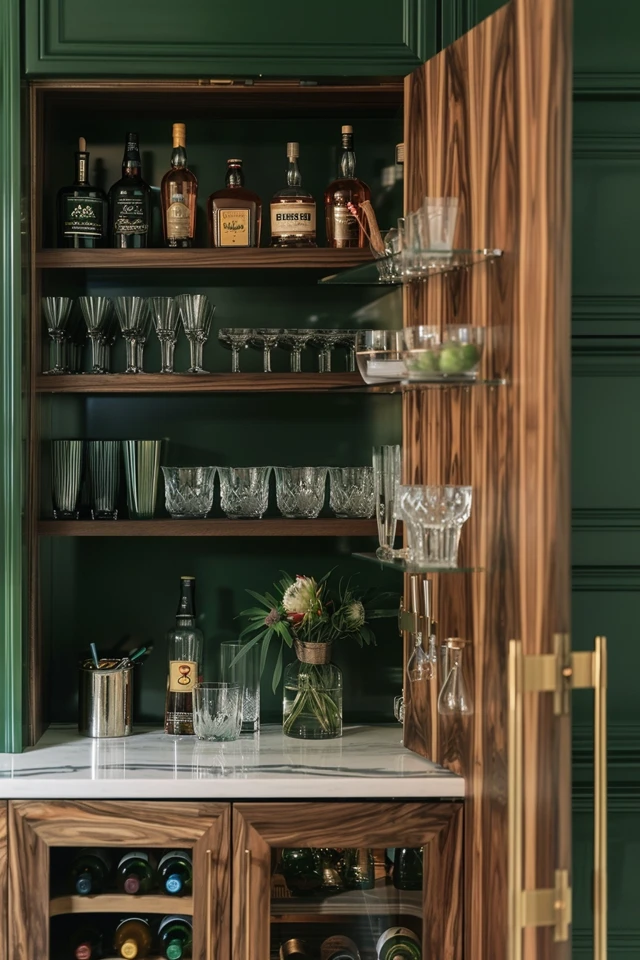
1. The Anchor Material: This is your background. Common choices include mirrored glass (which doubles the depth of your bottles), high-end wallpaper, or textured tile. A dark, moody stone like soapstone or leathered granite can also serve as a sophisticated backdrop.
2. Strategic Shelving: Floating shelves are popular for a modern look, but they must be sturdy. Thick wood shelves (at least 2 inches deep) convey a sense of permanence and quality. Glass shelves allow light to pass through, which is essential if you are lighting the bar from the top down.
3. Glass and Metal Accents: Brass, chrome, or matte black hardware adds a “jewelry” element to the bar. These finishes should coordinate with your kitchen or the surrounding room’s hardware but do not necessarily have to match perfectly.
4. Lighting Layers: This is the secret sauce. You need a combination of “wash” lighting (to illuminate the whole wall) and “point” lighting (to highlight specific bottles or decorative items).
5. Intentional Glassware Display: The back wall is a gallery. Displaying sets of crystal highballs, coupe glasses, or decanters adds a layer of sparkle that flat liquor bottles cannot provide on their own.
Layout & Proportions (Designer Rules of Thumb)
In interior design, scale and proportion are what separate a DIY project from a professional installation. When planning your back wall, keep these measurements in mind:
- Counter Height: Standard bar height is 42 inches. If you are using a standard counter height (36 inches), make sure your back wall shelving starts at least 18–24 inches above the counter to allow for workspace and tall appliances like blenders or espresso machines.
- Shelf Depth: For liquor bottles, a depth of 10 to 12 inches is ideal. If you go deeper, bottles get lost in the back. If you go shallower, you risk larger decanters hanging over the edge.
- Vertical Spacing: Space your shelves 12 to 15 inches apart. Standard wine and liquor bottles are about 12 inches tall, but some specialty bottles (like certain vodkas or tequilas) can reach 16 inches. Always measure your tallest bottle before mounting permanent shelves.
- Eye Level: Your “hero” items—the best-looking bottles or vintage glassware—should be placed between 54 and 60 inches from the floor. This is the natural line of sight for most people standing at the bar.
- Symmetry vs. Asymmetry: A symmetrical layout feels formal and traditional. An asymmetrical layout (e.g., shelves on one side, a large piece of art on the other) feels modern and casual.
Designer’s Note: One of the biggest mistakes I see in home bars is the “Hospital Light” effect. People often install cool-white LEDs (5000K) because they are bright. In a bar, you want warmth. Always stick to 2700K or 3000K for your light strips or puck lights. This mimics the warm, inviting glow of a high-end lounge and makes the amber tones in whiskey or bourbon look incredible.
Step-by-Step: How to Recreate This Look
Creating a stunning back wall is a process that requires a clear order of operations, especially if you are dealing with electrical work or heavy materials.
Step 1: Define the Function
Decide if this is a “wet bar” (with a sink) or a “dry bar.” If it’s a wet bar, your back wall materials need to be water-resistant. If you plan to have a wine fridge or beverage cooler, measure its dimensions now, as it will dictate the base of your back wall design.
Step 2: Electrical and Plumbing Rough-in
Before you put up any decorative finishes, run your wires. You will want outlets for a blender or lamp, and low-voltage wiring for any LED tape lights under the shelves. If you want a mirror, consider if you need a cutout for a sconce or an outlet.
Step 3: Choose and Install the Backdrop
Install your wall treatment first. This could be paint, wallpaper, or tile. If you are using a mirror, I recommend “antique mirror” tiles or a custom-cut sheet. Mirror expands the space, which is vital for small rooms or basement nooks.
Step 4: Mount the Shelving
Ensure your shelving is anchored into studs. A collection of full glass bottles is surprisingly heavy. If you are using floating shelves, use heavy-duty brackets that are hidden within the shelf itself.
Step 5: Install the Lighting
Add your LED strips to the back or underside of the shelves. If using tape lights, install them in a “channel” with a diffuser to avoid seeing individual “dots” of light reflected in your glassware.
Step 6: The “First Pour” Styling
Group your bottles by height or by type. Place your most beautiful glassware in front of the lighting. Add a small piece of art, a bowl of citrus, or a stack of cocktail books to make the space feel lived-in.
Budget Breakdown: Low / Mid / Splurge
The Low-Budget Option ($200 – $600)
- Materials: Use peel-and-stick “mercury glass” wallpaper instead of real mirrors.
- Shelving: Stock floating shelves from a big-box retailer.
- Lighting: Battery-operated puck lights with a remote.
- Pro Tip: Focus on paint. A deep, matte charcoal or forest green paint can make inexpensive shelves look much more expensive than they are.
The Mid-Range Option ($1,500 – $4,000)
- Materials: Real ceramic or porcelain tile backsplash, or a custom-cut mirror.
- Shelving: Custom-cut wood or thick glass shelving with professional brackets.
- Lighting: Hardwired LED tape lighting with a dimmer switch.
- Pro Tip: Invest in a small “bar sink” or a high-quality faucet if it’s a wet bar; these touchpoints matter.
The Splurge Option ($7,000+)
- Materials: Full slab stone back wall (marble or quartzite) or hand-poured antique mirror.
- Shelving: Integrated metal-framed shelving with built-in “light pockets.”
- Lighting: Smart-home integrated lighting that can change temperature or color, plus designer sconces.
- Pro Tip: Add a specialized appliance like a built-in “pebble ice” maker or a dual-zone wine column.
Common Mistakes (and How to Fix Them)
The Mistake: Underestimating Weight
Liquor bottles are heavy. A single shelf full of bottles can easily weigh 50–70 pounds.
The Fix: Never rely on drywall anchors. Always screw shelf brackets directly into the wall studs, or use a French cleat system for floating shelves.
The Mistake: Poor Cord Management
Nothing ruins a high-end bar like a mess of black wires hanging down from a shelf light or a blender.
The Fix: Plan your outlets behind where the appliances will sit. If adding shelf lights after the fact, use cord covers that match your wall color or hide the wires behind a vertical trim piece.
The Mistake: Clutter Overload
Trying to fit every bottle you own onto the back wall makes it look like a liquor store, not a home bar.
The Post-Fix: Use the “Rule of Three.” Group items in odd numbers. Put the “ugly” plastic bottles in a lower cabinet and keep only the premium, aesthetically pleasing bottles on display.
The Mistake: Neglecting the “Working Surface”
Sometimes people focus so much on the shelves that they don’t leave room on the counter to actually make a drink.
The Fix: Keep the area directly in front of the back wall clear of permanent decor so you have space for a cutting board, shaker, and glasses.
Room-by-Room Variations
The Kitchen Nook Bar
In a kitchen, you want the bar to feel like a “cousin” to the main design. Use the same cabinetry but change the backsplash to something more decorative, like a mirrored tile or a metallic mosaic, to distinguish it as a beverage station.
The Basement Lounge
Basements often lack natural light, so the back wall needs to work harder. Use a fully mirrored back wall to bounce whatever light you have around the room. This is the place for “moody” designs—dark woods and warm, dimmable lights.
The Dining Room Buffet Bar
If your bar is in the dining room, keep it elegant and “furniture-like.” Instead of open shelving, you might use a hutch with glass doors. The back wall inside the hutch can be lined with a subtle fabric wallpaper to add softness to the room.
The Small Apartment / Renter Bar
If you can’t drill into the walls, use a tall bar cabinet or a “hutch” top that sits on a sideboard. You can use removable wallpaper on the back of the furniture piece itself to create that “back wall” effect without losing your security deposit.
Finish & Styling Checklist
Before you call the project finished, go through this “What I’d do in a real project” checklist:
- Check the lighting at night. Is there a glare on the TV? Is it too bright for a movie? (Install a dimmer if so).
- Level check. Ensure every shelf is perfectly level; even a 1/8-inch tilt will be obvious once bottles are lined up.
- Glassware polish. Dust and fingerprints show up instantly under LED lights. Wipe everything down with a microfiber cloth.
- Scale check. Are the items on the top shelf too small? Use larger items (like a decorative tray or a tall vase) on higher shelves to balance the visual weight.
- Functional check. Can you reach the most-used bottles without a step stool? If not, rearrange for ergonomics.
- The “Spill Test.” Are your surfaces sealed? If you have a marble or wood counter/backsplash, ensure it has a high-quality sealant to prevent stains from citrus juice or red wine.
FAQs
What is the best material for a bar back wall?
Mirror is the most popular because it adds depth and sparkle. However, if you want something more modern, a textured “3D” tile or a slab of natural stone provides a stunning focal point.
How high should bar shelves be?
The first shelf should be 18–24 inches above the counter. Subsequent shelves should be 12–15 inches apart.
Do I need a sink for my home bar?
It is not strictly necessary, but it is highly convenient. If you don’t have plumbing, a “dry bar” works perfectly well for most homeowners; just ensure you have a place nearby to dump ice or rinse a shaker.
How do I light my bar without it looking “cheap”?
Avoid exposed bulbs at eye level. Use “hidden” light sources like LED tape tucked into a recessed channel or small puck lights hidden by a “lip” on the front of the shelf.
Can I use wood for the backsplash?
Yes, but it must be sealed. Wood is porous and can warp or stain if it is constantly splashed with water or alcohol. Use a marine-grade varnish for the best protection.
Conclusion
Creating a stunning home bar back wall is an exercise in both architecture and personal expression. By paying attention to the technical details—like shelf height and light temperature—you ensure that the space is as functional as it is beautiful. Remember that the back wall is your “stage,” and the bottles, glassware, and accessories are the performers.
Whether you choose a minimalist glass-and-metal look or a warm, traditional wood aesthetic, the key is consistency and quality. Take your time with the planning phase, measure your favorite glassware, and don’t be afraid to add a bit of drama with your lighting choices. A well-designed bar back wall doesn’t just hold your drinks; it elevates the entire atmosphere of your home.
Picture Gallery


