
5 Tips for Decorating Your Dining Room Buffet
Dining rooms are often the hardest working spaces in a home. They have to pivot from hosting loud family dinners to serving as quiet homework stations, all while looking polished enough for holiday gatherings. The buffet, or sideboard, is usually the focal point of this room when the table isn’t set.
However, styling a long, flat surface can feel intimidating. It is easy to accidentally clutter it with small knick-knacks or, conversely, leave it feeling cold and empty. For plenty of visual inspiration on how these measurements come together, be sure to check out the Picture Gallery at the end of this blog post.
In my design practice, I view the buffet as an opportunity to add personality and practical lighting to a dining space. It is the perfect place to display a collection, anchor the room with art, and serve drinks during a party. The key is finding the balance between beauty and utility.
Here are my top five tips for decorating your dining room buffet like a pro, including the specific measurements I use in client projects.
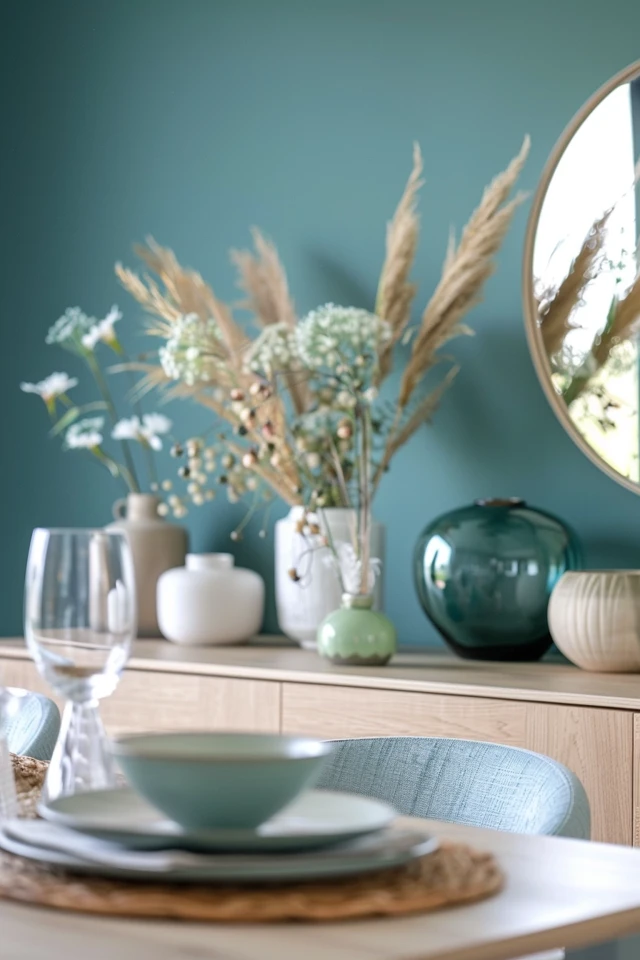
1. Start With a Substantial Anchor Piece
The most common mistake I see in DIY dining room designs is art that is too small. When you have a buffet that is 60 to 70 inches wide, an 8×10 picture frame hung in the middle will look lost. You need an “anchor” to ground the vignette.
This anchor is usually a large piece of art or a statement mirror. This piece dictates the vibe of the entire surface. A mirror is excellent for small dining rooms because it bounces light and makes the space feel larger. Large canvas art adds acoustic dampening and color.
The Designer’s Rule of Thumb for Scale:
Your wall décor should span roughly two-thirds of the width of the buffet. If your buffet is 60 inches wide, your art (or grouping of art) should be about 40 inches wide. If you go much smaller than that, the furniture will overpower the art.
Placement and Height:
Do not hang the art too high. This is crucial. The art and the buffet need to relate to each other as one cohesive unit. Ideally, the bottom of the frame should be 4 to 8 inches above the tabletop.
If you hang it 12 inches or higher, the art feels like it is floating away, and the visual connection is broken.
For Renters and Commitment-Phobes:
If you cannot drill holes in the wall, or if you have heavy plaster walls, simply lean the art. A large framed print leaning against the wall looks effortless and chic.
To prevent the “lean” from slipping, place a small piece of rubber drawer liner under the frame. If you have cats or active kids, secure the top back of the frame to the wall using a command strip or museum wax for safety.
Designer’s Note: The “Floating” Mistake
I often walk into a room and see a mirror hung near the ceiling while the buffet sits low. We call this the “floating anchor.”
It makes the ceiling feel lower and the furniture feel heavy. Always bring the art down. It should feel like part of the conversation, not an observer from above.
2. Use the “Triangle Rule” to Create Height
Once your anchor is up, you need to address the items sitting on the surface. A flat surface with items all the same height looks static and boring. We want the eye to move up and down as it scans the room.
To achieve this, professional designers use the concept of a “visual triangle.” Imagine a triangle superimposed over your buffet arrangement.
You want a high point (usually the lamp or a tall vase), a medium point (decorative objects or books), and a low point (a tray or bowl). This leads the eye through the composition comfortably.
Creating Asymmetry:
Symmetry is formal and safe. Placing a lamp on both ends of the buffet creates instant order. However, asymmetry often feels more modern and dynamic.
To do this, place a tall lamp on the left side. Balance it on the right side not with another lamp, but with a grouping of items that has visual weight, like a large ceramic vase with tall branches.
The Rule of Three:
Items generally look better in odd numbers. A single item can look lonely, and two items can look like they are squaring off. Three items create a natural center and a balanced grouping.
For example, on one side of your buffet, group a candlestick, a small stack of books, and a sculptural object. Vary the heights so they don’t form a straight line.
Common Mistakes + Fixes:
Mistake: Using too many small items (the “clutter” effect).
Fix: Group small items onto a tray. If you have five small candle votives, put them on a marble tray. The eye reads the tray as one large object rather than five messy ones.
3. Add Lighting for Ambiance and Depth
Dining rooms usually have a chandelier, which provides general top-down lighting. However, overhead lighting can cast unflattering shadows on faces during a dinner party.
Buffet lamps are essential because they introduce light at eye level. This creates a warm, flattering glow that makes the room feel cozy and intimate. It is the secret to that “high-end restaurant” atmosphere.
Lamp Height Matters:
A common error is buying small “accent lamps” that look like toys on a substantial buffet. Your buffet lamps need presence.
Look for lamps that are between 24 and 32 inches tall. If the lamp is too short, the light pool will only hit the buffet surface and won’t contribute to the overall room ambiance.
Managing the Cords:
Nothing ruins a sleek buffet styling faster than a tangle of black cords hanging down the back.
If your outlet is behind the buffet, you are in luck. If the outlet is to the side, run the cord down the leg of the buffet. Use clear zip ties or painter’s tape (on the back of the leg) to secure the cord so it is invisible from the front.
Wireless Options:
If you have no outlets nearby, do not despair. Rechargeable light bulbs are a game-changer for interior design. You can buy a standard lamp, screw in a rechargeable LED bulb, and place the lamp anywhere without worrying about cords.
Designer’s Note: Sconces
If your buffet is narrow and surface space is premium, install wall sconces instead of table lamps.
Ideally, hardwired sconces are best, but plug-in sconces with cord covers can look very industrial-chic. Mount them so the bulb is roughly 60 to 66 inches from the floor, or slightly above eye level.
4. Layer in Texture and “Life”
A buffet made of wood, styled with glass vases and metal lamps, can feel very hard and cold. You need to soften the look with organic textures. This is what makes a house feel like a home.
Add Greenery:
Every room needs something living (or something that looks living). A vase of eucalyptus, a preserved boxwood ball, or fresh seasonal flowers adds movement and softness.
If you do not have a green thumb, high-quality faux olive branches are a great investment. They last forever and add that necessary height and color.
Books as Risers:
Coffee table books are not just for coffee tables. I use them constantly on buffets to add color and, more importantly, to act as pedestals.
If you have a beautiful bowl that feels a bit too low, stack two large art books underneath it. This gives the object importance and fixes the height variation we discussed in Tip 2.
Mixing Materials:
Aim for contrast. If your buffet is a high-gloss lacquer, use matte ceramic vases and rough linen-shaded lamps. If your buffet is rustic reclaimed wood, use polished brass accents and glass to add sparkle.
Realistic Constraints (Pets and Kids):
If you have cats that love to jump on high surfaces, skip the fragile glass vases near the edges. Instead, opt for heavy stone or wood bowls that won’t shatter if nudged.
Use museum putty (also called earthquake putty) to secure the bottoms of lighter vases to the table surface. It is invisible and holds items surprisingly well against curious paws.
5. Function First: The “Mise en Place”
While we are discussing decoration, we must remember the piece’s name: Buffet. Its primary historical function is to hold food and serving ware.
If you cover every square inch of the surface with books, lamps, and sculptures, you will have to clear it all off every time you host Thanksgiving. That is not practical design.
Leave Negative Space:
I always recommend leaving the center third of the buffet relatively clear or styled with items that are easily movable. A low, long dough bowl or a tray is perfect here. When it is time to serve dinner, you can simply move the one tray to the kitchen and you have space for platters.
Surface Protection:
If your buffet is vintage wood, it likely does not react well to heat or moisture.
Style the surface with a runner or have trivets integrated into the design. For example, a stack of nice marble or slate cheeseboards can look decorative when not in use, but they are ready to be unstacked and used as heat-safe trivets when you bring out the hot casserole dishes.
Storage Strategy:
Don’t forget the inside. I like to keep the “entertaining essentials” in the top drawers of the buffet. This includes napkin rings, tapers, matches, and wine openers.
Having these items right where you need them prevents the frantic kitchen scramble when guests arrive.
What I’d Do in a Real Project:
1. Assess the Outlet: Check where the power is before buying lamps.
2. Measure the Length: Ensure the art is 2/3 the length.
3. Check the Depth: Ensure the lamps usually fit without hanging off the edge. Standard buffets are 18-20 inches deep; ensure your lamp base isn’t wider than 10 inches so you have room for decor.
Final Checklist: The Designer’s Walkthrough
Before you consider your buffet “done,” run through this quick checklist. This is the same mental list I use when finishing a client’s dining room.
The Squint Test: Stand back and squint at the buffet. Does one side feel “heavier” or darker than the other? If so, shift items until the visual weight feels balanced.
The Height Check: Do you have low, medium, and high items? Ensure you don’t have a “flatline” where everything is 10 inches tall.
The Cord Check: Are any electrical cords visible? Tuck them, tape them, or hide them behind books.
The Breathability Test: Is there empty space? You should see some of the buffet’s surface. If you can’t see the wood/stone top, remove two items.
* The Connection: Is the art low enough? It should feel connected to the items on the buffet, not floating near the molding.
FAQs
How high should a buffet be?
Standard buffet height is usually between 30 and 36 inches. A 36-inch height is generally preferred (counter height) as it is the most comfortable height for serving food standing up. If your ceilings are very high (over 9 feet), a taller buffet helps fill the vertical volume of the room.
Can I put a TV over my dining room buffet?
Ideally, no. The dining room is for conversation and eating. A TV kills the social vibe. However, in small apartments or open-concept homes where the dining area is part of the living space, it is sometimes unavoidable. If you must, treat the TV like art: flank it with lamps and try to use a “Frame TV” or art mode so it looks decorative when turned off.
Should the buffet match the dining table?
No, and in fact, I prefer when it doesn’t. Matching sets (table, chairs, and buffet all from the same collection) can look very generic and “catalog-like.” If you have a wood table, try a painted buffet (navy, black, or gray) or a wood tone that is significantly different (e.g., a dark walnut table with a lighter white oak buffet).
How do I mix metals on a buffet?
Mixing metals adds sophistication. A good rule is to pick a dominant metal and an accent metal. If your chandelier is brass, let your buffet lamp bases be brass (dominant). Then, you can use a silver or matte black tray (accent). Just ensure the finishes share a similar vibe—for example, don’t mix ultra-shiny chrome with rustic oil-rubbed bronze.
Conclusion
Decorating your dining room buffet is about more than just filling a blank wall. It is about creating a moment in your home that serves both your style and your lifestyle.
By anchoring the space with the right-sized art, layering lighting for ambiance, and keeping the surface functional for serving, you turn a piece of furniture into a focal point.
Remember to start with the anchor, build your visual triangles, and leave enough breathing room for the food. Design is an experiment, so do not be afraid to move things around until it clicks.
Picture Gallery


