
5 Tips for Designing Home Bar Glass Shelves
Glass shelving in a home bar is often the difference between a simple storage nook and a high-end design statement. When done correctly, glass shelves allow light to travel through the cabinetry, making your collection of spirits and crystalware sparkle. If you are looking for visual inspiration, you can skip straight to the Picture Gallery at the end of the blog post.
However, glass is an unforgiving material that requires precise planning regarding weight loads, lighting integration, and safety. I once worked on a renovation where a client tried to DIY their shelves using standard window glass, and the result was a shattered collection of vintage scotch. That experience reinforced that structure must always precede aesthetics.
Designing these shelves involves more than just picking a clear surface; it requires understanding scale, hardware constraints, and how light interacts with liquids. Whether you are building a full wet bar or a small tasting corner, the following tips will help you execute the design safely and beautifully.
1. Prioritize Glass Thickness and Weight Capacity
The most critical aspect of designing glass shelves for a bar is ensuring they can handle the weight of heavy liquor bottles. A standard 750ml bottle of spirits weighs roughly 3 pounds, and a 1.5L magnum can weigh over 6 pounds. If you line up ten bottles on a thin shelf, you are looking at significant static load.
For home bars, I never recommend using glass thinner than 3/8-inch (10mm). This is the industry entry-level standard for shelving that spans any significant distance. For a truly luxurious look and maximum durability, 1/2-inch (12mm) glass is the superior choice.
Thicker glass effectively eliminates the visual “sag” that occurs in the center of a shelf over time. It also feels substantial to the touch when you set down a heavy tumbler. If your design requires a span wider than 24 inches without a central support bracket, you must use 1/2-inch tempered glass to prevent bowing.
Designer’s Note: The “Green Edge” Factor
Standard clear glass has a high iron content, which results in a distinct green tint at the edges. On a 1/2-inch thick shelf, that green edge becomes very prominent and can clash with warm wood tones or neutral paint.
I almost always specify “Starphire” or low-iron glass for my clients. This glass is crystal clear, even at the edges, allowing the true colors of your wall treatments and liquor bottles to shine through without a teal cast.
Common Mistakes + Fixes
- Mistake: Using annealed (standard) glass to save money.
- Fix: Always insist on tempered glass. If annealed glass breaks, it creates dangerous jagged shards. Tempered glass crumbles into small, safer pebbles and is four times stronger.
- Mistake: Ignoring span limits.
- Fix: Install a middle support bracket if your shelf is longer than 30 inches, or upgrade to a thicker glass gauge.
2. Calculate Vertical Spacing for Real Life
One of the most frustrating design flaws in a home bar is shelving that is too short for the bottles you actually want to display. Standard cabinetry shelving is often adjustable, but glass shelves are frequently fixed in place due to the mounting hardware. You have one shot to get the measurements right.
Most standard liquor bottles (vodka, whiskey, gin) stand between 11 and 13 inches tall. However, premium bottles often have elongated necks or oversized stoppers that can reach 14 or 15 inches. Think of brands like Grey Goose, St-Germain, or tall decanters.
I typically space glass shelves 15 to 16 inches apart (vertical clearance). This allows enough room to lift a tall bottle, tilt it slightly if necessary, and remove it without clinking the glass above. It also provides negative space so the display doesn’t look cramped.
The “Zone” Strategy
When planning the vertical layout, I divide the bar into three distinct zones based on ergonomics:
- The Reach Zone (36″ to 60″ off floor): This is your prime real estate. Place your most frequently used spirits and mixing glasses here.
- The Display Zone (60″ to 78″ off floor): Use this area for premium bottles you rarely drink, fragile crystal, or decorative objects.
- The Work Zone (Counter height): Keep the first shelf at least 18 inches above the countertop to allow for workspace, bottle prep, and tall appliances like blenders or ice buckets.
What I’d Do in a Real Project
If I am designing a built-in bar with three glass shelves, I do not space them evenly. I often leave the bottom shelf with the most height (18 inches) for tall bottles and decanters. I then space the upper two shelves slightly tighter (14 inches) for standard glassware and shorter bottles to create a balanced visual hierarchy.
3. Integrate Lighting for Drama and Depth
Glass shelves and lighting are a symbiotic relationship; one rarely looks good without the other in a bar setting. Light traveling through glass shelves illuminates the amber and gold hues of whiskey and cognac, creating a glowing jewel-box effect.
The best way to light glass shelves is usually through LED channels recessed into the sides or the back of the cabinet. However, the most modern and clean approach is using specific extrusion hardware that grips the back of the glass and shoots light through the pane itself.
When the light travels through the body of the glass, it hits the front polished edge and glows. This adds a futuristic, high-end definition to the horizontal lines of your bar. This requires significant electrical planning before the drywall is closed up.
Color Temperature Matters
The color of the light (Kelvin rating) will dramatically change the look of your liquor.
- 2700K (Warm White): Best for traditional bars with wood cabinetry. It enhances the rich browns of dark spirits.
- 3000K (Soft White): A more modern, crisp look. Good for bars with white cabinetry, marble, or clear spirits like gin and vodka.
- 4000K+ (Daylight): Avoid this. It will make your home bar look like a commercial pharmacy.
Designer’s Note: Glare Control
If you are using overhead puck lights to shine down through the shelves, be careful about shadows. The bottles on the top shelf will cast shadows on the bottles below. This is why linear LED strips mounted vertically inside the cabinet frame (facing inward) are often superior to top-down lighting.
4. Select the Correct Mounting Hardware
How the glass attaches to the wall defines the style of the bar. There are three main methods, and your choice depends on your budget and the stage of construction. The hardware should match the finish of your wet bar faucet or cabinet pulls for a cohesive look.
Recessed Channels (The “Floating” Look)
This is the cleanest, most professional look. The glass appears to grow directly out of the wall or tile.
The Constraint: This requires installing a U-channel into the wall studs before the drywall or tile is installed. It is very difficult to retrofit this into a finished room without major demolition.
Standoffs and Cables
For a modern, industrial, or commercial vibe, floor-to-ceiling cable systems or metal standoffs are excellent.
The Benefit: These systems are incredibly strong and adjustable. If you decide later that you need more height for a new bottle, you can simply slide the connectors up the cable.
Brackets and Clips
These are the most common and accessible options.
The Rule: Avoid the “alligator mouth” style clips commonly found at big box stores if you want a high-end look. Look for solid brass brackets that support the shelf from underneath. Ensure the bracket depth is at least two-thirds the depth of the shelf to prevent tipping.
Common Mistakes + Fixes
- Mistake: Relying on drywall anchors.
- Fix: Glass is heavy; liquor is heavier. You must have wood blocking behind the wall. If you are retrofitting and cannot add blocking, you must locate the studs and only mount your hardware there.
- Mistake: Mismatched finishes.
- Fix: If your cabinet handles are matte black, your shelf brackets should be matte black. Do not mix chrome brackets with brass hardware unless you are very confident in your eclectic styling skills.
5. Style with Balance and Negative Space
Once the shelves are installed, the way you arrange the contents determines the final success of the design. A common impulse is to cram every bottle owned onto the shelves, but this creates visual chaos. A home bar should look curated, not like a liquor store inventory.
Glass shelves are transparent, meaning they carry very little “visual weight.” If you overload them, they can look top-heavy and cluttered. You want to aim for roughly 20% to 30% empty space on each shelf.
The Triangle Method
Arrange your items in loose triangular groupings. Place a tall bottle, a shorter mixing glass, and a small stack of coasters together. This guides the eye comfortably across the shelf. Vary the heights across the span of the shelf so you don’t have a solid wall of glass.
Material Mixing
Glass on glass can sometimes feel cold or sterile. To warm it up, incorporate other textures:
- Wood: Use a wooden tray on a glass shelf to corral small bitters bottles.
- Metal: Display a copper shaker or brass jigger.
- Textile: This is harder to do on a shelf, but ensure the backsplash behind the glass adds texture, such as a grasscloth wallpaper or a textured tile.
Designer’s Note: The Mirror Trick
Installing an antique or smoked mirror on the back wall behind glass shelves is a classic trick for a reason. It doubles the light, makes the bottle collection look twice as deep, and adds a sense of glamour. If you use a mirror, ensure the back of your bottles are clean, as they will be visible in the reflection.
Final Checklist: What I’d Do in a Real Project
If I were managing your home bar installation today, this is the exact workflow I would follow to ensure success:
- Open the walls: During the framing stage, I would install 2×6 wood blocking horizontally between the studs exactly where the shelves will go.
- Rough-in electrical: Run low-voltage wiring to the shelf locations for LED strips.
- Finish the wall: Install the drywall, paint, or tile.
- Measure precisely: Measure the final opening width at the front, middle, and back. Walls are rarely perfectly square.
- Order the glass: Order 1/2″ low-iron (Starphire) tempered glass. I would deduct 1/8″ to 1/4″ from the total width to allow for installation wiggle room.
- Specify edges: Request a “flat polished edge” for a modern look.
- Install hardware: Mount heavy-duty brackets into the pre-installed blocking.
- Place glass: Set the glass, tighten the set screws, and use clear silicone bumpers to prevent sliding.
- Style: Group liquor by type (whiskey, vodka, tequila) and balance with glassware.
FAQs
How do I clean glass shelves without streaking?
Remove all items from the shelf. Use a mixture of distilled water and white vinegar (50/50 mix) or a high-quality glass cleaner free of ammonia. Use two microfiber cloths: one to wipe the dirt and a second dry one to buff the glass to a shine. Do not use paper towels, as they leave lint.
Can I put glass shelves in front of a window?
Yes, this is a beautiful look that maintains natural light. However, direct sunlight can degrade the quality of liquor over time (especially whiskey and scotch). If you do this, apply a UV-protective film to your window or use the shelves primarily for glassware rather than alcohol storage.
What is the maximum depth for a glass shelf?
For a home bar, I rarely go deeper than 10 or 12 inches. Anything deeper makes it difficult to reach the items in the back without knocking over the items in the front. Additionally, deeper shelves require much more robust support to prevent leverage-based failure.
Is frosted glass better than clear?
Frosted glass hides dust and fingerprints better than clear glass. However, it blocks the visual flow and makes the room feel smaller. For a bar, clear glass is generally preferred because it showcases the bottles. If you want to hide clutter, use solid wood shelves or cabinetry instead.
Conclusion
Designing home bar glass shelves is a balancing act between engineering and art. You need the structural integrity to hold your collection safely and the aesthetic sensitivity to display it elegantly. By choosing the right thickness, planning your lighting early, and respecting the spacing requirements of your bottles, you can create a feature that feels like a high-end lounge.
Don’t be afraid to invest in the 1/2-inch low-iron glass; the difference in clarity and quality is noticeable every time you pour a drink. Treat your shelving not just as storage, but as the stage for your hospitality.
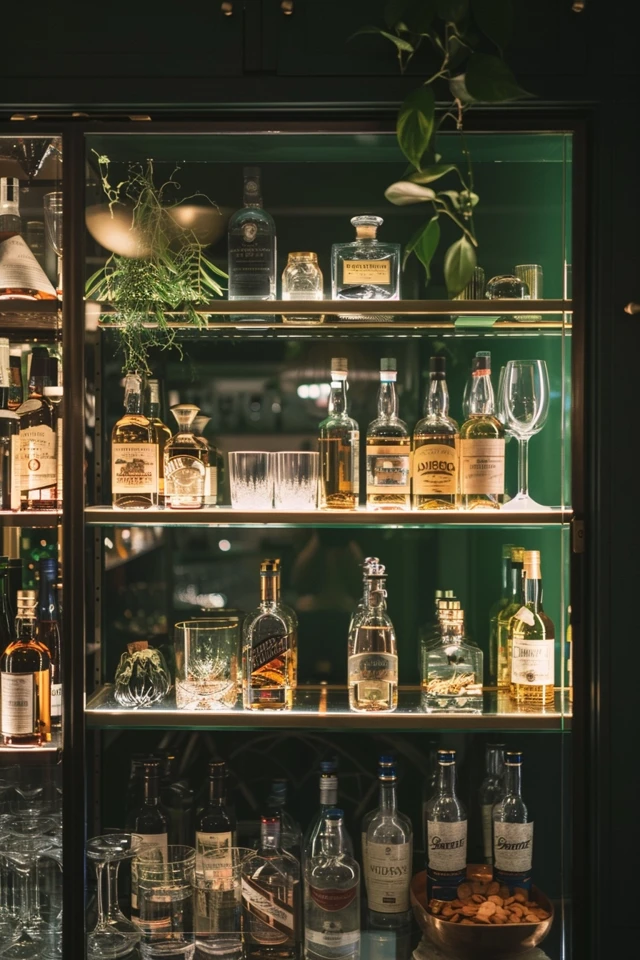
Picture Gallery


