
5 Tips for Setting Up a Functional Basement Kitchenette
Transforming a basement from a storage dump into a usable living space is one of the most rewarding home renovation projects you can undertake. Whether you are creating a rental unit, an in-law suite, or just a sophisticated entertainment zone, the kitchenette is often the anchor of the design. However, basements present unique challenges that ground-floor kitchens simply do not face, such as low ceilings, limited natural light, and tricky plumbing access.
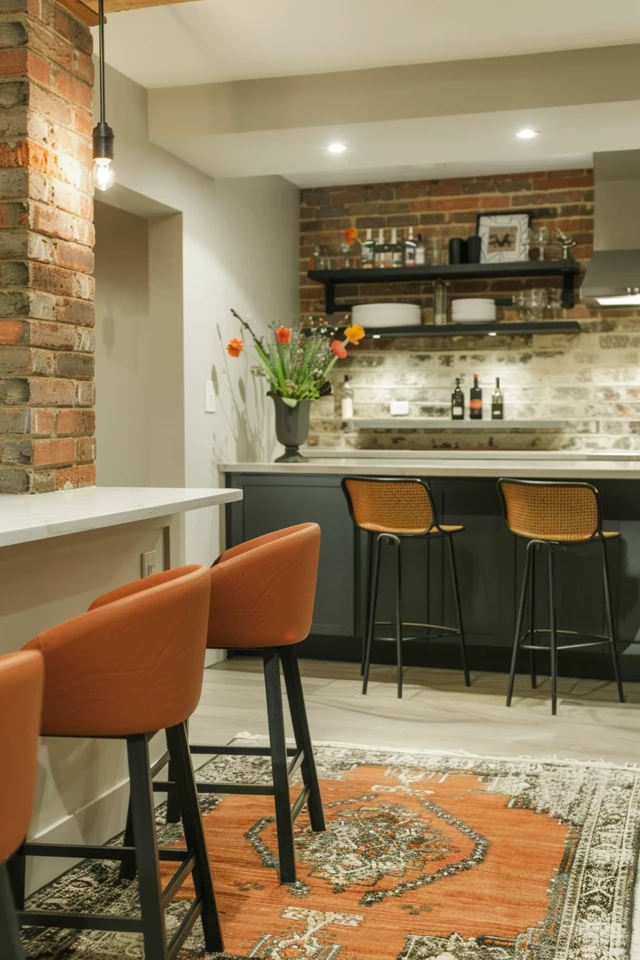
I have designed dozens of lower-level spaces, and I have learned that success lies in balancing aesthetics with rigorous functionality. You cannot simply shrink a standard kitchen design and expect it to work underground; you have to design specifically for the environment. For a visual guide on how these principles come together, be sure to look at the Picture Gallery at the end of the blog post.
In this guide, I will walk you through the five most critical elements of designing a basement kitchenette. We will cover everything from managing moisture to choosing appliances that fit strange layouts. Let’s get your project started on the right foot.
1. Strategic Layout and Plumbing Access
The most expensive part of any basement renovation is almost always the plumbing. Unlike upper floors where gravity works in your favor, basements often require breaking up concrete slabs or installing pump systems to handle wastewater.
Before you fall in love with a specific layout, you need to identify your “wet wall.” This is the wall where existing plumbing stacks or water lines are already located. Placing your sink and dishwasher along this wall can save you thousands of dollars in excavation and labor costs.
If your ideal layout requires the sink to be far from the main drain line, you will likely need an up-flush (ejector) pump system. While effective, these require a dedicated closet or cabinet to hide the mechanicals, which eats into your square footage.
Designer’s Note: The “Work Triangle” Still Applies
Even in a small kitchenette, the relationship between your fridge, sink, and cooking element matters.
- Keep the distance between these three points between 4 feet and 9 feet.
- In a single-wall kitchenette (common in basements), ensure there is at least 36 inches of continuous counter space between the sink and the fridge or cooktop for prep work.
Common Mistakes + Fixes
Mistake: Ignoring clearance zones because the space is small.
Fix: Never compromise on aisle width. You need a minimum of 36 inches of clearance between the counter edge and any island or furniture. If you can manage 42 inches, that is ideal for traffic flow, especially if you plan to entertain.
2. Mastering the Lighting Plan
Lighting is the make-or-break factor in a basement. Without the benefit of large windows, a poorly lit kitchenette will feel like a cave, no matter how expensive your cabinetry is. The goal is to mimic natural daylight through a layered lighting approach.
You need three distinct layers: ambient, task, and accent lighting. For ambient light, recessed “can” lights are your best friend because they don’t take up vertical headspace. Space them roughly 4 to 6 feet apart to ensure even coverage without creating shadows in the corners.
Task lighting is non-negotiable. Installing LED strips under your upper cabinets is essential because your body will block the overhead lights when you are working at the counter. If you have open shelving instead of cabinets, consider wall sconces positioned 60 to 66 inches from the floor to illuminate the workspace.
What I’d Do in a Real Project
- Temperature Matters: I always specify LED bulbs with a color temperature of 3000K. This provides a warm, crisp white that looks like natural morning light. Avoid 5000K (too blue/clinical) or 2700K (too yellow/sleepy).
- Dimmers are Mandatory: Put every light switch on a dimmer. A kitchenette used for a Super Bowl party needs full brightness, but that same space used for movie night needs to be moody and subtle.
- Reflective Surfaces: I often use a glossy tile backsplash or mirrored elements to bounce light around the room, making the space feel twice as large.
3. Scale and Appliance Selection
One of the biggest errors homeowners make is trying to wedge full-sized, suburban-kitchen appliances into a basement kitchenette. Standard appliances often protrude too far into the room, disrupting traffic flow and making the space feel cramped.
Unless you are building a full apartment for a long-term tenant, you likely do not need a 36-inch refrigerator or a four-burner gas range. Instead, look for “apartment size” or compact appliances that offer high performance with a smaller footprint.
For refrigeration, a 24-inch wide column fridge or high-quality under-counter drawer units are excellent choices. They sit flush with standard cabinetry (24 inches deep), giving you a sleek, built-in look without the custom price tag.
Cooking Constraints
Venting a gas range in a basement can be a nightmare due to ductwork requirements. I almost exclusively recommend induction cooktops for basement kitchenettes.
- They require less aggressive venting than gas.
- They cool down immediately, which is safer for multi-purpose rooms where kids or pets might be playing.
- A two-burner induction cooktop is usually sufficient for a kitchenette and saves 12 to 15 inches of counter space compared to a standard range.
Designer’s Note: The Microwave Placement
Don’t waste precious counter space on a microwave. I prefer installing a microwave drawer in the lower cabinetry or building a designated shelf in the upper cabinetry. If you put it in the uppers, ensure the bottom of the microwave is no higher than 54 inches off the floor for safe access.
4. Moisture-Resistant Materials and Finishes
Basements are inherently prone to humidity and temperature fluctuations. Even a “dry” basement will experience higher moisture levels than the second floor of your home. Your material choices must reflect this reality to ensure longevity.
Flooring
Avoid solid hardwood flooring. It expands and contracts with moisture changes, leading to warping and cupping over time.
- Best Choice: Luxury Vinyl Plank (LVP). It is waterproof, durable, and warmer underfoot than tile. Look for a wear layer of at least 20 mil for durability.
- Runner Up: Porcelain tile. It is indestructible and waterproof, but it is cold. If you choose tile, I highly recommend installing electric radiant heat mats underneath. It is a relatively low-cost upgrade that makes the space feel luxurious.
Cabinetry and Countertops
For countertops, Quartz is the superior choice for basements. Unlike granite or marble, quartz is non-porous. It does not require sealing and won’t harbor mold or mildew if the environment gets damp.
For cabinetry, check the construction of the boxes. Avoid cheap particleboard, which acts like a sponge if there is ever a minor flood or leak. Plywood construction is more stable. If your basement has a history of dampness, consider using marine-grade plywood or even stainless steel cabinetry for a modern, industrial look.
Common Mistakes + Fixes
Mistake: Using standard drywall right down to the concrete floor.
Fix: Leave a ½-inch gap between the bottom of the drywall and the concrete floor to prevent moisture from wicking up the wall. Cover this gap with PVC or composite baseboards rather than wood, as they won’t rot.
5. Storage and Vertical Integration
Basement ceilings are often lower than the standard 8 or 9 feet found upstairs. They also frequently have soffits covering ductwork or beams. This makes vertical storage tricky.
If you fill the walls with heavy, solid upper cabinets, the ceiling will feel like it is crushing you. To combat this, I often use open shelving or glass-front cabinets for the upper storage. This allows the eye to travel all the way to the wall, increasing the perceived depth of the room.
If you must use closed upper cabinets for storage needs, paint them the same color as the walls. This “color drenching” technique makes the cabinets blend in, reducing visual clutter.
Handling Soffits
Soffits are inevitable in basements. Do not try to hide them with awkward trim.
- Embrace them: Run your cabinetry right up to the bottom of the soffit to create a built-in look.
- Extend the width: If a soffit stops halfway through the kitchen, consider framing it out to run the full length of the wall. It looks intentional rather than accidental.
What I’d Do in a Real Project: Rug Sizing
To define the kitchenette zone in an open basement, use a runner rug.
- Leave 6 to 10 inches of floor visible between the edge of the rug and the cabinets.
- Choose a low-pile, synthetic rug (like polypropylene) that resists mold and can be easily cleaned. Avoid thick wool or jute in basements, as they hold onto moisture and smells.
Final Checklist: Ready to Build?
Before you call the contractor or head to the hardware store, run through this final checklist to ensure you haven’t missed any critical details.
Planning & Systems
- Have I identified the “wet wall” to minimize plumbing costs?
- Does the electrical panel have enough capacity for new appliances (especially induction cooktops)?
- Is there a plan for venting cooking odors (recirculating fan vs. external vent)?
- Have I checked local codes regarding basement sleeping areas/egress windows if this is an apartment?
Layout & Dimensions
- Is there at least 36 inches of walking space between counters and islands?
- Does the refrigerator door have room to swing fully open without hitting a wall?
- Is the sink positioned comfortably relative to the stove/cooktop?
Materials & Finishes
- Are the flooring materials rated for below-grade (basement) installation?
- Have I selected lighting with a 3000K color temperature?
- Is the hardware (faucets, handles) high quality to resist potential corrosion from humidity?
Frequently Asked Questions
Do I need a permit for a basement kitchenette?
Almost certainly, yes. Adding plumbing and electrical circuits requires inspection in most municipalities. If you are adding a stove, some zones classify this as a “second dwelling unit,” which triggers stricter fire and zoning codes. Always check with your local building department to avoid fines or insurance issues later.
How much does a basement kitchenette cost?
Costs vary wildly based on DIY vs. pro labor, but a functional kitchenette typically ranges from $10,000 to $35,000. The biggest cost drivers are plumbing relocation (if you aren’t using the wet wall), cabinetry quality, and countertop materials. You can save significantly by using stock cabinets and mid-range appliances.
Can I install a garbage disposal in a basement sink?
Yes, but with caution. If you are using an ejector pump (up-flush system), you must check if the pump is rated for grinding food waste. Many standard sewage ejector pumps can clog with food scraps. You may need a heavy-duty grinder pump, which is more expensive.
How do I keep the kitchenette from smelling like a basement?
Moisture control is key. Install a dehumidifier that drains directly into a floor drain or your sink line so you don’t have to empty it manually. Ensure your range hood has a charcoal filter if it recirculates air, and change it every 3 to 6 months. Avoid absorbent materials like heavy drapes or wall-to-wall carpet near the kitchen area.
Conclusion
Designing a basement kitchenette is an exercise in problem-solving. You are constantly balancing the desire for style against the hard realities of plumbing stacks, low ceilings, and moisture control. However, when done correctly, it unlocks the full potential of your home.
By sticking to the proper clearance rules, investing in lighting, and choosing materials that can withstand the basement environment, you create a space that feels just as inviting as your main kitchen. Remember to keep the layout logical and the palette bright.
Whether you are hosting game day or welcoming family for an extended stay, a functional kitchenette changes the way you live. Take your time with the planning phase—it is the cheapest part of the project but the most valuable.
Picture Gallery


