
5 Tips for Setting Up an Elegant Basement Wet Bar
Transforming a basement from a storage catch-all into a sophisticated entertaining space is one of the most rewarding home improvement projects you can undertake. There is something inherently cozy and exclusive about a lower-level lounge; it feels like a private speakeasy tucked away from the chaos of daily life upstairs. Over the years, I have helped countless clients reclaim this square footage, turning concrete corners into stunning wet bars that become the heart of the home during holidays and parties.
However, basements come with a unique set of challenges that can derail a design if you aren’t careful. From navigating low ceilings and awkward support columns to managing plumbing logistics, the margin for error is slimmer than in an upstairs kitchen. For a dose of inspiration before you start swinging a sledgehammer, be sure to check out the Picture Gallery at the end of the blog post.
In this guide, I will walk you through the five most critical elements of designing an elegant wet bar. We will move past the basics and dive into the specific measurements, lighting rules, and material choices that separate a DIY weekend project from a high-end, professional design.
1. Master the Layout and Clearances First
Before you pick out a moody navy paint color or a brass faucet, you must nail the floor plan. In interior design, we often say that luxury is actually just the absence of friction. If you are squeezing behind guests to grab a lime or bumping your hip against a counter corner, the elegance creates to exist.
The first decision is determining the shape: a straight run (single wall), an L-shape, or a galley with an island. For basements, I often prefer a single-wall back bar with a parallel island if space permits. This encourages flow and keeps guests out of your “working zone” while you are mixing drinks.
You need to respect standard clearance rules even if it is “just a basement.” I always mandate a minimum of 36 inches of walkway space between the back counter and the island, though 42 inches is the ideal sweet spot for two people to move comfortably. If you plan on having barstools, you need to account for the slide-out room. Plan for at least 36 inches of clearance behind a seated stool so traffic can pass behind a seated guest without forcing them to scoot in.
Designer’s Note: The Plumbing Reality Check
One lesson I learned the hard way early in my career involved a client who wanted a sink on a basement island far from the main stack. We had to break up the concrete slab to run the drain, which ate up 15% of the total budget.
Always locate your wet bar as close to existing plumbing lines as possible. If you are far from the main drain line, you might need a pump system (like a Saniflo) to push waste water up to the sewer line. This is noisy and requires a hide-away cabinet, so factor that into your cabinetry layout immediately.
Common Mistakes + Fixes
- Mistake: Ignoring soffits and ceiling drops.
- Fix: Integrate them. If a duct runs through your bar area, build the cabinetry or a bulkhead around it intentionally. Do not let a cabinet crown molding crash awkwardly into a dropped ceiling.
- Mistake: Crowding the seating.
- Fix: Allow 24 inches of width per barstool (measured center-to-center). If your island is 6 feet long, you can fit three stools comfortably, not four.
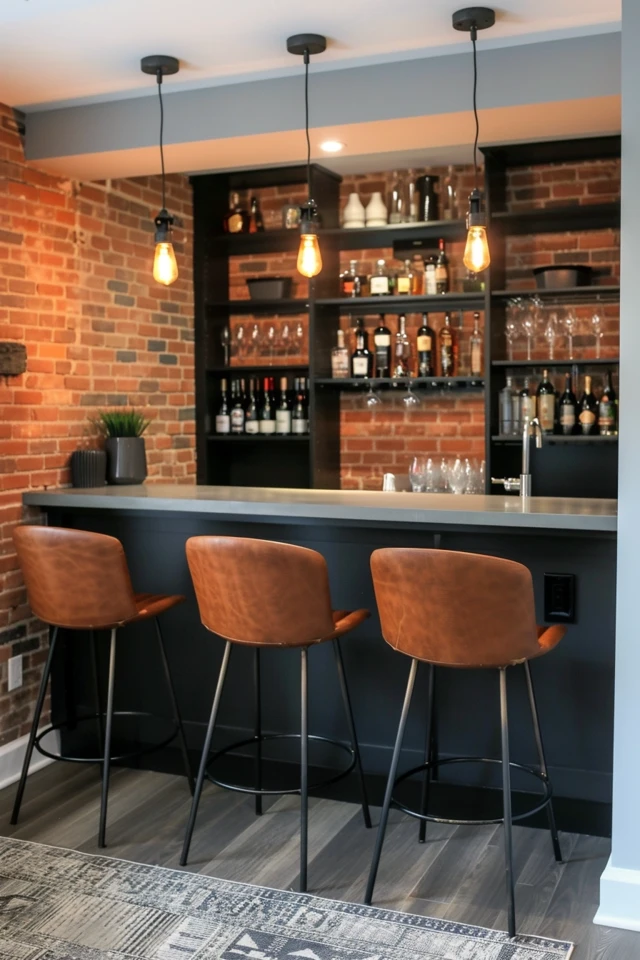
2. Layer Your Lighting to Create “Mood”
Basements are notorious for feeling like caves, but that is actually an asset for a wet bar. You aren’t fighting aggressive daylight, so you have total control over the atmosphere. The difference between a cafeteria and a lounge is entirely in the lighting plan.
You must rely on three specific layers: ambient, task, and accent. For ambient light, recessed cans are standard, but put them on a dimmer—always. For task lighting, under-cabinet LED strips are non-negotiable. They highlight the texture of your backsplash and allow you to see what you are pouring without turning on the overhead “big lights.”
Accent lighting is where the elegance happens. I love using wall sconces flanking the liquor display or shelving. If you have an island or peninsula, pendants are great, but watch the height. Because basement ceilings are often lower (around 8 feet or even 7 feet), standard pendant lengths won’t work.
Pro Rules of Thumb for Lighting
- Pendant Height: The bottom of your pendant light should sit 30 to 32 inches above the countertop. If you have 7-foot ceilings, you might need flush mounts or semi-flush fixtures instead to avoid visual clutter.
- Color Temperature: Stick to 2700K or 3000K bulbs. Anything higher (4000K+) looks clinical and blue, which will kill the cozy vibe instantly.
- Shelf Lighting: If you are using glass shelves to display bottles, run an LED channel along the back edge. It uplights the liquid in the bottles and creates a glowing, high-end commercial look.
3. Select Materials That Can Handle Moisture and Spills
A basement wet bar is a high-traffic, high-moisture zone. Unlike an upstairs kitchen, you are dealing with potential humidity from the ground and the inevitable spills that happen during parties. Durability must match the aesthetic.
For flooring, I rarely recommend solid hardwood in a basement due to moisture fluctuations that cause warping. Instead, look for high-quality Luxury Vinyl Plank (LVP) or engineered wood with a robust wear layer. Porcelain tile is also excellent for the immediate bar area because it is impervious to water, but it can be cold on the feet, so consider installing radiant heating mats underneath if the budget allows.
Countertops require serious thought. While I love the look of real marble, it is porous and etches instantly when it touches red wine or citrus (lemons and limes). For a wet bar, this is a recipe for disaster. I almost exclusively specify quartz or a natural quartzite (which is harder than granite) for these spaces. You can get quartz that mimics the veining of Calacatta marble without the anxiety of staining.
Cabinetry Concerns
Standard kitchen cabinets usually have particle board boxes. In a basement, I strongly suggest upgrading to plywood construction. Plywood resists moisture much better than particle board, which acts like a sponge and swells if your basement ever has a minor flood or leak.
What I’d Do in a Real Project
- Countertop: Honed Black Granite or Soapstone. It looks moody, hides shadows, and feels incredibly tactile.
- Backsplash: Antique mirror tile. This is my secret weapon for basements. It reflects light to make the room feel double the size, but the “antique” finish hides smudges and splashes better than clean glass.
- Hardware: Unlacquered brass. It develops a patina over time that looks established and expensive, contrasting beautifully with dark cabinetry.
4. Right-Size Your Appliances for the Space
Appliance selection for a wet bar is a game of inches. You generally do not need full-sized kitchen appliances, which overwhelm the scale of a small bar. The goal is convenience and integration.
The most essential piece is the beverage center or wine fridge. Be careful here: standard kitchen base cabinets are 24 inches deep. Many wine fridges require clearance for the plug and venting. Ensure you buy a “built-in” or “zero-clearance” unit that vents out the front toe-kick. If you buy a freestanding unit and shove it under a counter, it will overheat and fail because it cannot vent out the back.
For the sink, avoid a tiny “prep sink” that is only 10 inches wide; they are practically useless for washing barware. Aim for a sink that is at least 15 to 18 inches wide and 9 inches deep. This allows you to wash a wine glass or a pitcher without splashing water everywhere.
The Ice Maker Dilemma
Everyone wants a clear ice maker, but you need to know what you are signing up for. A dedicated ice machine requires a drain line (gravity or pump), regular cleaning (every 6 months) to prevent mold, and they are noisy. They constantly drop ice and hum.
If your wet bar is part of an open media room where you watch movies, the noise of an ice maker might be distracting. In those cases, I often recommend a high-quality freezer drawer with an ice bin instead. It is silent and keeps your vodka chilled.
Common Mistakes + Fixes
- Mistake: Putting a fridge next to a wall.
- Fix: If your layout has a fridge at the end of a run against a wall, you need a 2 to 3-inch filler strip. Without it, the fridge door will hit the wall when you open it, and you won’t be able to pull the shelves out.
- Mistake: Forgetting the trash.
- Fix: Do not ruin your beautiful design with a plastic bin sitting on the floor. Dedicate a 15-inch or 18-inch cabinet for a pull-out trash and recycling center.
5. Style with Scale and Texture
Once the construction dust settles, the styling brings the “elegant” factor to life. Because wet bars are usually smaller than kitchens, you can afford to take risks with texture and color that might feel overwhelming in a larger room.
I love using dark, saturated colors for basement cabinetry—charcoal, navy, forest green, or even black. These colors recede visually, blurring the lines of the room and making the ceiling height less noticeable. To prevent it from feeling gloomy, balance the dark cabinets with metallic accents (brass or polished nickel) and warm wood tones in the shelving or barstools.
Open shelving is very popular, but it requires discipline. Only display what is beautiful. Group your glassware by type and keep the color palette consistent. If you have mismatched plastic cups or branded beer koozies, hide them behind solid cabinet doors.
The Barstool Equation
Comfort is king. If you want people to sit and chat for hours, avoid backless metal stools. They look industrial and cool, but they are uncomfortable after twenty minutes. Choose a stool with a back and, crucially, an upholstered seat.
Pay attention to the height. There are two standard heights:
- Counter Height: For 36-inch counters (standard kitchen height). Look for seat heights of 24-26 inches.
- Bar Height: For 42-inch raised bars. Look for seat heights of 30 inches.
Do not mix these up, or your guests will either be crushing their knees against the counter or sitting like toddlers at the grown-up table.
Designer’s Note: The Footrail
If you build a custom bar with a panel front, you must install a footrail. It is not just decorative. Without a place to rest their feet, guests’ legs dangle, which puts pressure on the lower back. A brass or stainless steel footrail running the length of the bar adds instant commercial-grade legitimacy and comfort.
Final Checklist: The “Real Project” Run-Through
Before you finalize your plans or order materials, run through this checklist. This is the exact mental loop I do for my own projects to catch errors before they become expensive change orders.
- Electrical Check: Do you have outlets on the backsplash for blenders or phone chargers? Are they GFI protected (required near sinks)?
- Flooring Transition: How does the bar flooring meet the rest of the basement carpet or tile? Is the transition strip low-profile to avoid tripping?
- Access Panel: If you have plumbing shut-off valves behind the bar, is there an access panel tailored into the back of the cabinet?
- Soffit Integration: Does the cabinetry layout account for overhead ductwork, or will a door swing hit a low-hanging light fixture?
- Ventilation: Does the beverage fridge have front-venting capabilities?
- Hardware Scale: Are the cabinet pulls large enough? For heavy panel-ready appliance doors, use 8-inch to 12-inch pulls, not standard knobs.
FAQs
What is the average cost of a basement wet bar?
Costs vary wildly based on DIY vs. pro labor, but a mid-range professionally installed wet bar usually lands between $15,000 and $30,000. This includes cabinetry, stone counters, plumbing, electrical, and mid-range appliances. Luxury builds with custom millwork and high-end appliances can easily exceed $50,000.
Do I really need a sink? Can I just do a dry bar?
If plumbing is too far away or the budget is tight, a dry bar is a fantastic alternative. You lose the ability to wash glasses or dump ice, but you save thousands on plumbing labor and permits. A dry bar still offers storage, counter space, and refrigeration, which is 90% of the functionality for most hosts.
What is the best countertop overhang for seating?
For comfortable knee space, aim for an overhang of 12 to 15 inches. Anything less than 12 inches is uncomfortable for adults. If your overhang exceeds 12 inches on a stone top, you will likely need steel support brackets hidden under the counter to prevent the stone from snapping.
Can I use standard upper cabinets in a basement?
You can, but be careful with ceiling height. Standard uppers are hung 18 inches above the counter. If you have a low dropped ceiling, standard 30-inch or 36-inch tall cabinets might not fit. You may need to order custom heights or use horizontal “lift-up” cabinets to fit the vertical space.
Conclusion
Creating an elegant basement wet bar is about balancing practical constraints with aesthetic ambition. It is about embracing the moodiness of the underground space rather than fighting it, and investing in the touchpoints—the countertop, the faucet, the lighting—that your guests will interact with most.
Don’t be afraid to go bold with your choices. The basement is the perfect place to experiment with that dark paint color or that dramatic wallpaper you were too nervous to use in the main living room. When you combine smart layout planning with durable, luxurious materials, you end up with more than just a place to store drinks; you create a destination within your own home.
Picture Gallery


