
5 Tips for Showcasing Dining Room Glass Cabinet Display
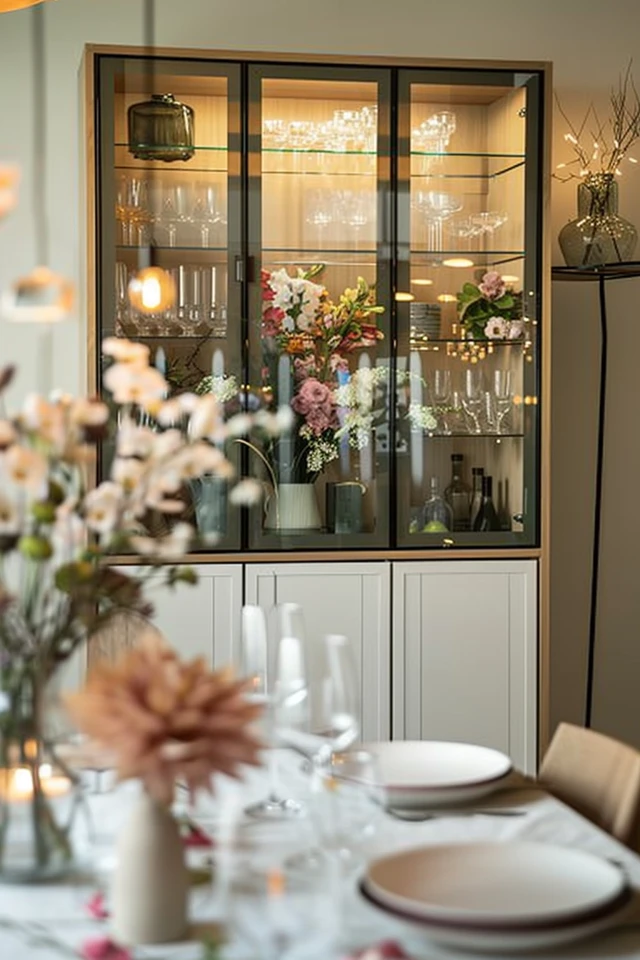
Glass-front cabinets are the crown jewels of a dining room, offering a sophisticated way to merge storage with storytelling. They protect your cherished heirlooms from dust while allowing them to contribute to the overall aesthetic of the space. However, they can also be intimidating; unlike solid doors that hide clutter, glass doors demand a disciplined and artistic eye.
Many homeowners fall into the trap of either overstuffing the shelves or spacing items out so sparsely that the display feels cold and unfinished. The goal is to create a visual journey that feels curated rather than cluttered, balancing practical dining needs with decorative flair. It is about creating depth, rhythm, and interest behind the glass.
In this guide, I will walk you through the exact methods I use to style these cabinets for clients, from lighting specifications to structural composition. For a dose of visual inspiration before you start rearranging, be sure to check out our curated Picture Gallery at the end of this post.
1. Establish a Cohesive Color Palette and Theme
Before you place a single dish inside the cabinet, you need to decide on the visual story. A glass cabinet acts as a frame, and if the contents are visually chaotic, the entire dining room will feel disorganized.
I usually recommend sticking to a strict palette of two to three colors, plus metallics and neutrals. If your dining room features navy blue walls, filling the cabinet with conflicting bright orange and purple ceramics will create visual vibration that is unpleasant to the eye. Instead, repeat the room’s accent colors inside the cabinet to create harmony.
The 60-30-10 Rule Inside the Cabinet
You can apply the classic interior design ratio here. Let 60% of the items be a neutral base (white china, clear glass, cream stoneware). Make 30% a secondary color (perhaps the wood tone of serving boards or woven textures). Use the final 10% for a bold accent color to draw the eye.
Designer’s Note: The “Edit” Phase
The biggest issue I see in client homes is the “storage locker effect.” Just because it fits doesn’t mean it belongs. I always ask clients to pull everything out of the cabinet first.
We then separate items into “display worthy” and “purely functional.” Tupperware, chipped mugs, and unmatched plastic cups do not belong behind glass. If you must store them there, use opaque baskets on the bottom shelf to hide them.
2. Master the Art of Layering and Depth
A flat display is a boring display. If you simply line up plates in a row or place one bowl in the center of each shelf, the cabinet will look two-dimensional and museum-like in a bad way. You need to utilize the full depth of the shelf.
Create Zones of Interest
Imagine a “Z” pattern as you look down the shelves. If you have a heavy grouping on the left side of the top shelf, the eye should travel to a heavy grouping on the right side of the middle shelf, and back to the left on the bottom. This zigzag keeps the eye moving.
The Pyramid Technique
Group items in triangular formations. Place a tall item, like a pitcher or vase, at the back. Place a medium-sized item, like a stacked set of bowls, slightly to the side and forward. Place a small item, like a salt cellar or votive, in the very front.
This triangle shape is naturally pleasing to the human eye. It creates depth and ensures that the items in the back aren’t completely obscured by the items in the front.
Common Mistakes + Fixes
Mistake: Lining glasses up in straight, soldier-like rows.
Fix: Group glassware in clusters of odd numbers (3, 5, or 7). Stagger them so they aren’t perfectly aligned. This looks more organic and casual.
Mistake: Ignoring the back wall.
Fix: Prop up platters or large dinner plates vertically against the back of the cabinet. This acts as a backdrop for the smaller items in front and adds immediate color to the shadow areas.
3. Prioritize Interior Lighting
Lighting is the single most transformative element for a glass cabinet. Without it, your beautiful display disappears into a black hole once the sun goes down. In my projects, I consider cabinet lighting mandatory, not optional.
Color Temperature Matters
You must match the lighting temperature to the rest of your room.
- 2700K (Warm White): Best for traditional dining rooms with wood tones. It mimics candlelight and incandescent bulbs.
- 3000K (Soft White): A bit crisper and cleaner. Good for transitional spaces or white cabinets.
- 4000K+ (Daylight): Avoid this. It will make your dining room look like a commercial refrigerator.
Hardware Solutions for Every Situation
If you are renovating, hardwire LED tape lights into the vertical face frame of the cabinet. This hides the light source and casts a glow backward onto the objects.
If you are a renter or working with an existing antique piece, use rechargeable LED puck lights. Many now come with remote controls and dimmers. While they require charging, they save you from having ugly cords trailing down the side of your furniture.
What I’d Do in a Real Project
If I am designing a custom built-in, I specify glass shelves with a wood frame. I then route an LED channel into the top of the wood frame of every shelf. This ensures that light travels all the way down through the glass, illuminating every level equally.
4. Vary Heights and Materials for Texture
A cabinet filled entirely with clear glass objects will look ghost-like and lack weight. Conversely, a cabinet filled only with solid ceramic blocky items will feel heavy and imposing. You need a mix.
Grounding the Shelves
I always place the visually heaviest items on the bottom shelf. This usually means large serving tureens, stacks of heavy dinner plates, or large wooden bowls. This “grounds” the cabinet. If you put these heavy items on the top shelf, the piece will feel top-heavy and precarious.
Mixing Materials
To avoid a monotonous look, introduce contrast.
- If you have a lot of white ceramics: Introduce wood serving boards, woven chargers, or antique silver pieces.
- If you have a lot of clear crystal: Add matte pottery or leather-bound books to absorb some light.
- If you have metal shelves: Soften them with paper items or fabric napkins stacked neatly.
Using Books as Risers
One of my favorite styling tricks is using cookbooks or coffee table books to create artificial height. If you have a small object that feels lost on a tall shelf, stack two or three books horizontally and place the object on top. This gives the item importance and fills the vertical void.
5. Functional Spacing and Airflow
Negative space is just as important as the objects themselves. In the design world, we call this “breathing room.” If items are touching each other, the display looks cluttered.
The 2-Inch Rule
As a general rule of thumb, try to leave at least 2 to 3 inches of space between distinct groupings. You should also leave clearance between the top of your tallest object and the shelf above it. If an item scrapes the ceiling of the shelf, the scale is wrong.
Adjusting Shelf Heights
Most glass cabinets have adjustable shelving, yet most people never change the factory settings. Move them! If you have a tall pitcher, lower the shelf to give it 2 inches of clearance. If you have a shelf dedicated to small teacups, raise the shelf below it to close the gap. Customizing the shelf heights makes the piece look tailored to your specific collection.
Earthquake and Safety Considerations
If you live in an active seismic zone or have heavy foot traffic (active kids or pets), use museum wax or museum putty. A tiny pea-sized amount under your breakables will secure them to the shelf without damaging the finish. This is invisible to the eye but prevents items from “walking” due to vibration.
Final Checklist: The Styling Audit
Before you close the doors and call it a day, run through this quick audit to ensure your display is polished.
- Balance Check: Step back 10 feet. Does one side feel “heavier” or darker than the other? Rearrange to distribute visual weight evenly.
- The Backdrop: Are there plates propped up in the back to cover the dark rear wall?
- Light Test: Turn on the cabinet lights. Are there any weird shadows? Adjust item placement to let light flow through.
- Grouping: Are small items clustered together rather than scattered individually?
- Color Flow: Is your accent color repeated at least 3 times in a triangle pattern throughout the height of the cabinet?
- Cleanliness: Did you wipe the fingerprints off the glass shelves and doors before closing them?
FAQs
How do I display a complete set of dinnerware without it looking boring?
Avoid stacking all 12 plates in one tower. Stack 4 or 6, then prop one vertically behind the stack. Place the bowls in a separate stack nearby. Use the cups and saucers to flank the plates. Breaking up the set into smaller groups makes it look styled rather than stored.
Can I mix silver and gold in a glass cabinet?
Absolutely. Mixing metals adds a layer of sophistication. The key is to ensure one finish is dominant (about 70%) and the other is the accent (30%). For example, if your cabinet hardware is brass, use mostly gold-toned items inside, with a few silver pieces for sparkle.
What if my shelves are not adjustable?
If you are stuck with fixed shelves and have too much vertical space, use art or tall foliage (dried botanicals work well) to fill the height. You can also lean framed artwork against the back of the cabinet to bridge the gap between the object and the shelf above.
How do I hide the cords for the lighting?
If you cannot drill holes, use cord clips to run the wire down the inside front corner of the cabinet, right behind the door hinge. This is usually the “blind spot” of the cabinet. Use tape that matches the cabinet color to secure the wire, or paint the wire to match the interior wood.
Conclusion
Styling a dining room glass cabinet is a creative exercise that evolves over time. It is not a static display; it should change with the seasons or as you acquire new pieces. By focusing on cohesive colors, proper lighting, and the strategic use of negative space, you can turn a simple storage unit into a stunning focal point.
Remember that perfection is not the goal—personality is. Your cabinet should reflect the meals you have shared and the treasures you have collected. Don’t be afraid to experiment with heights and layers until it feels right to you.
Picture Gallery


