
Affordable Above Ground Pool Ideas & Tips
There is a common misconception in the design world that you have to spend tens of thousands of dollars on an in-ground excavation to get a backyard oasis. I have worked on plenty of projects where site constraints, rocky soil, or rental agreements made digging impossible, yet we still managed to create a stunning, cohesive swim space. The secret lies not in the pool itself, but in how you integrate it into the surrounding landscape.
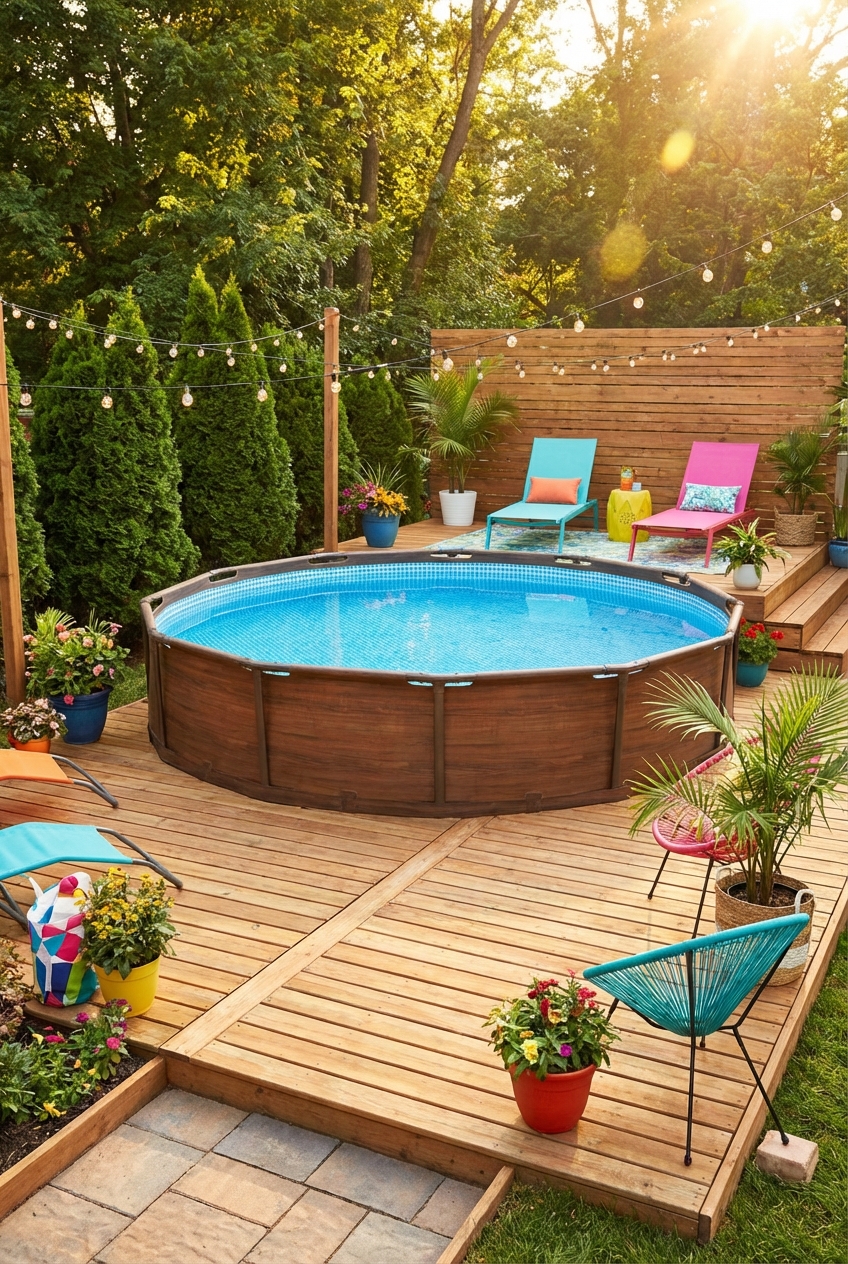
An above-ground pool often gets a bad reputation for looking like a temporary blue blob sitting awkwardly in the middle of the lawn. However, with strategic decking, thoughtful landscaping, and the right accessories, you can elevate the aesthetic entirely. If you are looking for visual inspiration to see how these elements come together, be sure to check out the Picture Gallery at the end of the blog post.
This guide is designed to walk you through the practical steps of planning, styling, and integrating an affordable pool into your yard. We will look at specific measurements, material choices, and layout tricks that professional designers use to make these structures feel permanent and intentional.
1. Choosing the Right Structure and Placement
The first step in any successful exterior design is site planning. Before you buy a pool, you need to understand the scale of your yard. A massive pool in a small yard makes the space feel claustrophobic, while a tiny pool in a large yard looks like an afterthought.
Rules of Scale and Clearance
When I draft a backyard layout, I never place a pool without accounting for circulation. You need a minimum of 3 to 4 feet of clearance all the way around the pool perimeter. This is essential for maintenance, cleaning, and eventual repairs. If you push the pool right up against a fence or a retaining wall, you will regret it the first time you need to scrub algae off that side.
Shape Matters
Rectangular pools generally look more high-end and modern than round ones. They mirror the architectural lines of most homes and are easier to wrap with decking later. However, round pools are structurally stronger and often more affordable. If you are on a strict budget, a round pool is fine, but plan to use landscaping to soften the curve.
Leveling is Non-Negotiable
You cannot simply set a pool on the grass. The ground must be perfectly level, usually within an inch across the entire diameter. In professional projects, we excavate the sod, put down a layer of crushed stone, and top it with sand or specialized foam pads. This protects the liner and ensures the water level is even.
Designer’s Note: The “View” Rule
When positioning the pool, think about the view from your living room or kitchen window. You do not want the pool equipment (pump and filter) to be the focal point. Always position the mechanicals on the side of the pool least visible from the house and main seating areas.
2. Decking Solutions to Upgrade the Look
The single most effective way to make an above-ground pool look expensive is to alter the entry point. Climbing a flimsy A-frame ladder is functional, but it screams “temporary.” Building a deck, even a small one, changes the psychology of the space.
The “Side Deck” Strategy
You do not need to wrap the entire pool to get the effect of a built-in look. A “side deck” or platform deck that covers just one arc or side of the pool is budget-friendly and effective. I recommend building a platform that is at least 8 feet by 10 feet. This provides enough room for two lounge chairs and a small side table.
Height and Transition
The goal is to create a flush transition. The deck floor should sit just under the top rail of the pool. This allows you to sit on the edge of the deck and dangle your feet in the water.
Railing and Safety Codes
As a designer, safety is my primary liability concern. Most municipalities require a self-closing, self-latching gate for any pool access point.
- Railings should generally be 36 to 42 inches high.
- Balusters (the vertical spindles) should be spaced no more than 4 inches apart so children cannot squeeze through.
- Always check your local zoning laws before buying lumber.
Material Choices
Pressure-treated pine is the most affordable option, but it requires annual staining. If the budget allows, composite decking (like Trex) is superior for wet areas because it does not splinter. Nothing ruins a swim day faster than a splinter in a bare foot.
Common Mistakes + Fixes
Mistake: Building the deck tight against the pool wall.
Fix: Leave a gap of about 1/2 inch to 1 inch between the wood deck and the pool’s top rail. The pool needs room to expand and contract with water weight and temperature changes. If the deck is too tight, it can damage the pool structure.
3. Landscaping: Softening the Edges
Once the pool is up, you are left with the industrial-looking outer walls. Landscaping is the makeup that hides these blemishes. The goal is to create layers that draw the eye away from the pool supports and toward the greenery.
The 2-Foot Buffer Zone
Never plant grass or flowers directly against the pool wall. You do not want weed whackers or lawnmowers hitting the liner, and you don’t want roots growing under the frame.
- Create a 12 to 24-inch border around the entire base of the pool.
- Fill this border with decorative river rock or crushed gravel.
- This aids in drainage and keeps mud from splashing up onto the pool walls during rainstorms.
Plant Selection
Choosing the right plants is critical for maintenance. You want plants that do not drop leaves, seeds, or heavy pollen into the water.
- Ornamental Grasses: Varieties like Maiden Grass or Zebra Grass are excellent. They grow tall enough to screen the pool walls but don’t drop debris.
- Evergreen Shrubs: Boxwoods or small Arborvitae provide year-round coverage.
- Avoid: Crape Myrtles, fruit trees, or anything with thorns (like roses) near the swim zone.
Using Planters for Height
If digging into the ground isn’t an option, use large, tall planters. I often use clusters of three planters of varying heights to break up the visual monotony of the pool wall. Place them near the entrance of the pool or at the corners of your deck.
Designer’s Note: Creating Privacy
If your neighbors can see into your pool, you won’t use it as often. You don’t need a massive fence. Install a localized privacy screen on the deck itself using horizontal wood slats, or plant “Green Giant” Arborvitae about 5 feet away from the pool perimeter. They grow fast and create a dense green wall.
4. Cladding and Disguising the Structure
If building a deck isn’t in the budget, you can still hide the “blue blob” aesthetic by cladding the exterior of the pool itself. This is a high-impact, low-cost solution that works particularly well for renters who need a temporary fix.
Reed and Bamboo Fencing
Rolls of reed or bamboo fencing are incredibly affordable and available at most home improvement stores. You can wrap these around the exterior of the pool, securing them with heavy-duty weather-resistant zip ties or wire. This instantly gives the pool a tropical, spa-like feel.
Wood Paneling
For a more structured look, you can build a frame around the pool and attach lightweight wood lattice or horizontal fence pickets.
- Ensure the wood does not touch the actual vinyl or metal wall of the pool; it should be a freestanding screen.
- Stain the wood a dark charcoal or deep brown. Darker colors recede visually, making the pool look smaller and more integrated into the garden.
Stone Veneer (Faux)
There are lightweight, faux-stone panels made of high-density foam or polyurethane that mimic the look of stacked stone. These can be adhered to a frame built around the pool. This mimics the look of a high-end, custom-built masonry pool for a fraction of the price.
What I’d Do in a Real Project
If I had a client with a standard white metal pool, I would paint the upright supports a matte black (using metal-safe spray paint) and wrap the wall panels in a dark grey reed fencing. The contrast between the black supports and the natural texture looks custom and chic.
5. Lighting and Styling for Ambiance
Lighting is what takes a pool from a daytime activity to an evening feature. It extends the usability of your investment and adds a layer of safety.
String Lights
The easiest way to add ambiance is overhead lighting. However, never run 120-volt lines directly over water unless installed by a licensed electrician with proper clearance.
- Install 4×4 posts in planters or concrete buckets around the perimeter (about 5 to 8 feet away from the water).
- Drape bistro lights in a perimeter square or a “V” shape.
- Use shatterproof, solar-powered bulbs to eliminate the need for extension cords running across the lawn.
Solar Path Lights
Safety is paramount at night. You must illuminate the path from the house to the pool ladder. I prefer downward-facing solar path lights. They reduce light pollution and focus the illumination exactly where you walk. Place them every 4 to 6 feet along the walkway.
Furniture Scale and Flow
On an elevated deck, space is tight. Avoid massive, overstuffed sofas.
- Bistro Sets: A small round table (24-30 inches) and two chairs fit perfectly in corners.
- Storage: Use a resin deck box to store chemicals, skimmers, and pool noodles. It doubles as a bench for extra seating.
- Textiles: Add an outdoor rug to the deck. It defines the “lounge” area and prevents splinters. Choose a rug made of polypropylene, which resists mold and fades less in the sun.
Color Palette
Stick to a cohesive color palette. If your pool liner is bright blue, avoid clashing colors like red or orange for your cushions. Stick to neutrals (whites, tans, greys) or cool tones (navy, teal) to create a serene resort vibe.
Final Checklist: The Project Roadmap
If I were managing your pool project, this is the order of operations I would follow to ensure nothing is missed.
1. Permits & Zoning: Call your local building department. Ask about setbacks (distance from property lines) and fence requirements.
2. Site Prep: Mark the area with spray paint. Excavate the sod. Level the ground perfectly (use a laser level or a long 2×4 with a bubble level).
3. Foundation: Lay a base of crusher run (gravel) and masonry sand.
4. Assembly: Assemble the pool according to manufacturer instructions. Do this on a sunny day; the vinyl liner needs heat to stretch without wrinkles.
5. Electrical: Have an electrician install a GFCI outlet near the equipment pad for the pump.
6. Water Fill: Fill the pool. This can take 12-24 hours. Watch for leaks immediately.
7. Hardscaping: Lay your gravel perimeter border and stepping stone path.
8. Decking: Construct the deck or platform.
9. Planting: Install shrubs and privacy screens.
10. Styling: Add lights, furniture, and enjoy.
FAQs
How long do above-ground pools last?
With proper maintenance, the structure can last 15 to 20 years. The vinyl liner usually needs replacement every 5 to 9 years, depending on your climate and chemical usage.
Can I put an above-ground pool partially in the ground?
Some models are rated for “semi-inground” installation, but most are not. Standard walls will collapse under the pressure of the soil if buried. Always check the manufacturer’s warranty before digging a pit.
What is the best base for an above-ground pool?
Masonry sand or a specialized foam pool pad is best. Never install directly on concrete (it’s too hard and can damage the liner) or mulch (it rots and causes the pool to settle unevenly).
Is saltwater better than chlorine for above-ground pools?
Saltwater systems are gentler on the skin and eyes, but salt is corrosive. If you choose saltwater, you must have a resin or aluminum pool frame. Steel pools will rust quickly with salt exposure.
Conclusion
Creating a backyard retreat doesn’t require a second mortgage or heavy machinery. An affordable above-ground pool, when treated with the same design principles as an in-ground one, can be beautiful, functional, and incredibly fun. By focusing on the surroundings—the deck, the plants, and the lighting—you shift the focus from the plastic structure to the experience of the space.
Take your time with the site preparation, prioritize safety in your decking choices, and use landscaping to blend the pool into your environment. Your backyard is an extension of your home; with a little creativity, you can make it your favorite room in the house.
Picture Gallery


