
Title: Affordable Concrete Patio Designs for Your Home
Introduction
Concrete often gets a bad reputation in the residential design world as being cold, industrial, or unfinished. However, early in my career, I worked on a project for a young couple who had blown their entire renovation budget on the interior kitchen and had almost nothing left for the backyard. We turned a simple, existing gray slab into the highlight of the home using just stain, stenciling, and strategic landscaping. That project taught me that concrete is actually the most versatile, budget-friendly blank canvas a designer can ask for.
When approached correctly, concrete offers a durability that wood decks cannot match, and it provides a neutral foundation that allows your furniture and landscaping to shine. Whether you are pouring a new slab or trying to rescue an old, cracked one, the potential for high-end style on a low-end budget is massive. It requires understanding scale, texture, and how to soften the hard edges so the space feels like an outdoor living room rather than a parking spot.
In this guide, I will walk you through actionable strategies to elevate concrete patios without overspending. We will cover layout rules, finishing techniques, and the styling secrets I use to make these spaces feel warm and inviting. Be sure to check out the Picture Gallery at the end of this blog post for visual examples of these concepts in action.
1. The High-End Look of Large Format Pavers and Gravel
One of the most affordable ways to achieve a custom look without the expense of a massive continuous pour is using large concrete pavers separated by negative space. This design breaks up the visual monotony of gray concrete and aids with drainage.
Why this works for budgets:
Pouring a massive slab requires professional grading, framing, and a concrete truck. Pavers can often be purchased at big-box hardware stores and laid as a DIY project or by a handyman for a fraction of the cost. The visual impact mimics high-end modern resorts.
Design Rule: The 4-Inch Gap
When laying square or rectangular pavers (commonly 24” x 24”), leave a gap of 2 to 4 inches between them. Fill this gap with contrasting material. Black star gravel or decorative river rock creates a modern, architectural look. For a softer, organic feel, plant ground cover like creeping thyme or sturdy Mondo grass in the gaps.
Scale and Proportion
If you have a small patio area (under 100 square feet), stick to smaller pavers (12” x 12” or 18” x 18”) to keep the scale appropriate. For expansive areas, small pavers look busy and cluttered. Go for the largest format available to minimize visual noise.
Material Selection Tip
Avoid the cheapest, standard gray “sidewalk” pavers if possible. Look for pavers with an aggregate finish or a slight color variation (charcoal or sand). If you must use standard gray, sealing them with a “wet look” sealer can darken the tone and make them look more like slate.
2. Surface Treatments: Staining, Stenciling, and Paint
If you already have an existing concrete slab that looks tired or stained, demolition is expensive. The smarter design choice is to resurface it visually. This is where paint and stain come into play, effectively treating the floor like an interior design element.
Acid Stains vs. Water-Based Stains
Acid stains react chemically with the lime in the concrete. This produces a variegated, marble-like finish in earth tones (browns, reddish-terracottas, and tans). It looks natural and expensive. Water-based stains sit on top like paint but are semi-transparent. They offer a wider range of colors (blues, greens, grays) but look slightly more uniform.
The Stenciled “Tile” Look
This is a massive trend that solves the budget issue of buying expensive outdoor tile. By painting the slab a base color (usually white or light gray) and using a large-scale stencil with a contrasting color, you can mimic the look of encaustic cement tiles.
- Pro Tip: Use a stencil size of at least 12” x 12”. Tiny patterns get lost outdoors and can make the space feel dizzying.
- Durability: You must use proper concrete porch and floor paint, and you must seal it with a clear, non-yellowing exterior sealer, or it will peel within a year.
Texture Matters (Safety Alert)
Never paint outdoor concrete with standard high-gloss paint. It becomes an ice rink when wet. Always add a non-slip additive (often called “shark grip” or sand texture) to your final coat of sealer or paint. This adds grit that is invisible to the eye but essential for traction.
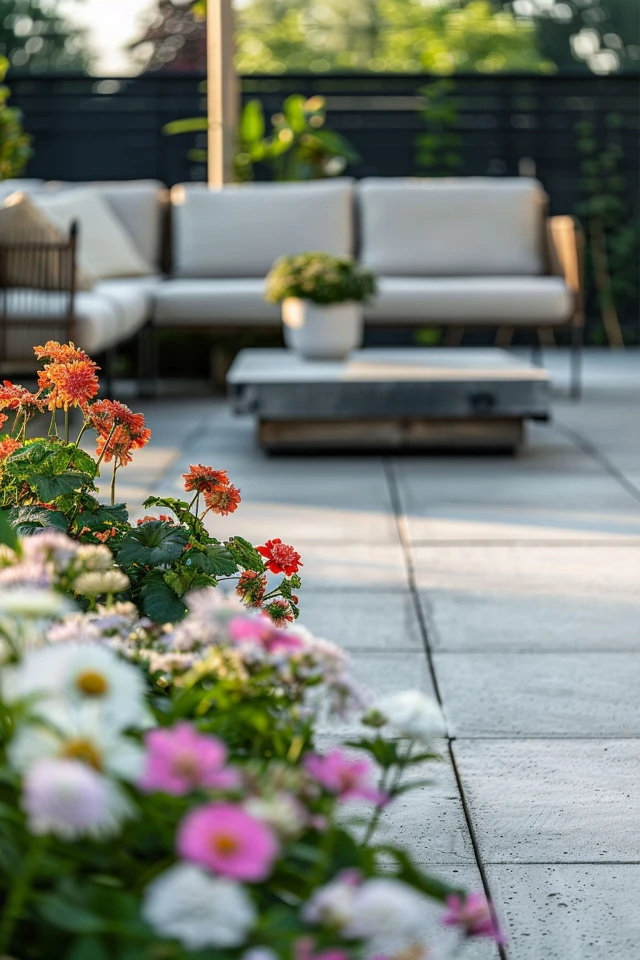
3. Zoning and Layout: Treating the Patio Like a Living Room
The biggest mistake homeowners make with concrete patios is pushing all the furniture against the house wall. This highlights the emptiness of the concrete. To design a high-end look, you must zone the space just as you would an open-concept living room.
The Rug Rule
Concrete is hard and cold. You need an outdoor rug to ground the seating area. The “front legs on” rule applies here: choose a rug large enough that at least the front legs of your sofa and chairs sit on it.
- Measurement: For a standard conversation set, an 8×10 rug is usually the minimum. A 5×7 rug often looks like a postage stamp floating in the middle of a slab.
- Material: Polypropylene rugs are best for concrete as they don’t trap moisture against the slab, which can cause mildew stains.
Creating Flow with Negative Space
Leave clear walkways. You need a minimum of 30 to 36 inches of clearance for a comfortable walkway. If your patio is a square slab, arrange furniture to create a diagonal flow, which makes the space feel dynamic rather than boxy.
Defining Zones with Pots
Use large planters to act as “walls.” If your concrete patio opens up to a sprawling lawn, it can feel undefined. placing three large pots in a row along the edge of the concrete creates a visual boundary that separates the “living room” from the “yard,” making the patio feel cozier and more intentional.
4. Softening the Hardscape with Mixed Materials
A concrete patio essentially adds a large gray mass to your yard. To keep it from feeling like a parking lot, you must introduce warm materials and textures that contrast with the stone.
Wood Accents
Wood is the perfect partner for concrete. The warmth of timber balances the coolness of the slab. You don’t need to build a deck to get this effect.
- Furniture: Choose teak or eucalyptus dining tables.
- Screens: Build or buy a simple slat-wood privacy screen.
- Benches: A built-in floating bench made of cedar anchored to a concrete retaining wall is a classic designer move that looks incredibly expensive but is relatively cheap to build.
Metal and Fabrics
Avoid matching gray metal furniture to the gray concrete. It washes out the design. Go for black powder-coated aluminum for a sharp, graphic pop, or white for a breezy, coastal feel. Layer heavily with outdoor textiles. Throw pillows and blankets in chunky knits or wovens help absorb sound and visually soften the hard surface.
The Softening Edge
If you are pouring a new slab, avoid hard 90-degree corners if possible. A curved edge looks more organic. If the slab is existing and square, use round planters and round tables to break up the “boxiness” of the geometry.
5. Lighting and Vertical Interest
Concrete patios are exclusively ground-level features. To make the design feel complete, you must draw the eye upward. Lighting and vertical structures are the key to making a budget patio look designed.
String Light Architecture
String lights are affordable, but hanging them poorly ruins the effect. Do not just drape them loosely. They need tension and structure.
- Height Rule: The lowest point of the drape should be at least 8 feet off the ground so tall guests don’t feel the heat of the bulbs.
- Installation: If you don’t have trees or a pergola, install 4×4 posts in planter barrels filled with concrete at the corners of your patio. This creates a “room” without walls.
Vertical Gardens
If your concrete patio is bordered by a fence, use that vertical space. Wall-mounted planters or a trellis with climbing jasmine draws the eye up and surrounds the concrete with life. This “green wall” effect reduces the feeling of being surrounded by hard surfaces.
Temperature of Light
Always check the Kelvin rating on your outdoor bulbs. For concrete patios, you want 2700K (Warm White). Anything higher (3000K-5000K) will look blue and clinical, making your concrete patio feel like a hospital loading dock rather than a cozy retreat.
Designer’s Note: The Drainage Reality Check
In my years of designing outdoor spaces, the number one issue that ruins a concrete patio isn’t the furniture—it’s water. Concrete is non-porous. If water has nowhere to go, it sits.
The Lesson: I once consulted on a DIY project where the homeowner poured a slab perfectly level. The first time it rained, a two-inch puddle formed right at the back door. It eventually caused rot in the door frame.
The Fix: A concrete patio must be pitched away from the house. The standard rule is a slope of 1/4 inch per foot. If you are doing pavers with gravel gaps, the water can drain into the ground, which makes pavers a much safer bet for DIYers than a solid slab. If you have an existing slab that pools water, you may need to cut a channel drain into the concrete to divert the water before investing in expensive furniture.
Common Mistakes + Fixes
Mistake: Using Indoor Rugs Outside
Natural fibers like Jute or Sisal will rot on concrete. They absorb water and turn into a moldy mess that stains the slab black.
Fix: Use 100% polypropylene or PET (recycled plastic) rugs. They are hose-washable and allow the concrete underneath to breathe.
Mistake: Tiny Furniture on Large Slabs
Placing a bistro set on a 20×20 slab makes the furniture look doll-sized and the patio look barren.
Fix: Scale up. If you can’t afford a massive sectional, space out two club chairs and a sofa with side tables. Use the furniture to consume volume.
Mistake: Ignoring Texture
Smooth concrete, smooth metal table, smooth plastic chairs. It feels flat.
Fix: Introduce wicker, rattan, wood, or rope. Texture variation creates the “luxury” feel even if the items are budget-friendly.
Real Project Checklist: What I’d Do
If I were managing your patio project on a tight budget, here is the exact order of operations I would follow:
1. Assess the Drainage: Before buying a single thing, hose down the area. See where the water flows. Resolve any standing water issues first.
2. Define the Perimeter: Clean up the edges. If the grass meets the concrete, use a metal landscape edging to create a crisp line. A messy edge makes the concrete look cheap.
3. Surface Prep: Power wash the concrete. You cannot stain, paint, or seal dirty concrete. It is the most satisfying step and makes the biggest difference.
4. Select the Palette: Choose one metal finish (black or white) and one wood tone. Stick to this. Do not mix dark espresso wicker with blonde teak wood.
5. Layout the Rug: Place the rug first. It defines the center of your zone.
6. Place Main Furniture: Sofa and chairs go on the rug.
7. Add Lighting: Install poles or hooks and run your string lights.
8. Layer Accessories: Add planters to corners, pillows to chairs, and a lantern or centerpiece to the coffee table.
FAQs
How do I stop my concrete patio from cracking?
Concrete will almost always crack eventually; there is a saying in the industry that there are two types of concrete: concrete that has cracked, and concrete that will crack. To minimize this during installation, control joints (grooves) must be cut into the slab every 8 to 10 feet. These tell the concrete exactly where to crack so it happens in a straight line rather than a spiderweb.
Is a stamped concrete overlay worth the money?
Stamped concrete mimics stone, but it can be slippery and difficult to patch if it chips. For a budget-friendly update, I usually prefer staining or painting an existing slab over doing a stamped overlay. Overlays are labor-intensive and can often cost as much as pouring new concrete.
Can I put a fire pit on a concrete patio?
Yes, concrete is heat resistant and is one of the safest surfaces for a fire pit. However, intense heat can cause localized spalling (flaking) over time. I recommend placing a fire pit pad or a layer of heat-resistant stone under portable fire pits to protect the finish of your slab.
How often do I need to reseal my concrete patio?
Generally, you should reseal every 2 to 3 years. You will know it is time when water stops beading up on the surface and soaks in immediately, darkening the concrete. Sealing protects against oil stains from BBQ grills and prevents freeze-thaw damage in colder climates.
Conclusion
Creating a beautiful outdoor space doesn’t require importing Italian marble or building an elaborate wooden deck. Affordable concrete patio designs offer a clean, modern, and incredibly durable foundation for your home. The secret lies not in the cost of the concrete itself, but in how you dress it.
By using large-format pavers to play with scale, applying stains or stencils to add character, and bringing in the warmth of wood and textiles, you can transform a slab into a sanctuary. Remember that design is about problem-solving. Use lighting to solve the lack of vertical interest, use rugs to solve the coldness underfoot, and use landscaping to soften the hard edges.
With a little planning and elbow grease, your concrete patio can become the most used “room” in your house. It is time to stop looking at that gray slab as a burden and start seeing it as the potential-filled canvas it really is.
Picture Gallery


