
Boxwood Landscaping Ideas for Elegant Gardens
There is a reason boxwood has been a staple in garden design for centuries. Few plants offer the same combination of dense evergreen foliage, structural integrity, and versatility. In my design projects, I constantly rely on boxwood to provide the “bones” of a landscape, ensuring that the garden looks just as polished in the dead of winter as it does in the height of spring. It serves as the visual anchor that prevents a flower bed from looking messy or chaotic.
However, achieving that effortless, high-end look requires more than just digging a hole and dropping in a shrub. I have seen many DIY attempts fail because of improper spacing, poor soil drainage, or selecting the wrong variety for the climate. When used correctly, boxwood adds a sense of permanence and history to a home, instantly elevating curb appeal. For a huge dose of inspiration to kickstart your own project, make sure to check out the Picture Gallery at the end of the blog post.
Whether you are looking to create a formal English knot garden or simply want to define your front walkway, the principles remain the same. This guide will walk you through the practicalities of designing with boxwood, from calculating spacing measurements to selecting the right companion plants. We will look at how to maintain that crisp green color and avoid the common pitfalls that plague many homeowners.
Defining Spaces with Hedges and Borders
The most common application for boxwood is the low hedge. This creates a clear separation between the lawn and the garden beds, or between a walkway and the planting zone. From a design perspective, this provides a crisp line that guides the eye and organizes the space.
When planning a low border, you must choose a dwarf variety that grows slowly. Varieties like ‘Winter Gem’ or ‘Green Velvet’ are industry standards for a reason. They maintain a nice spherical habit but take well to shearing if you prefer a squared-off look.
Spacing and Measurements
Getting the spacing wrong is the most frequent mistake I see. If you plant them too far apart, you wait years for the hedge to connect. If you plant them too close, they compete for nutrients and develop fungal issues due to poor airflow.
For a seamless low hedge (12 to 18 inches high), I recommend planting dwarf boxwoods 12 to 15 inches apart, measuring from the center of one trunk to the center of the next. If you are using larger varieties for a privacy screen, spacing should increase to 24 or 30 inches on center.
Designer’s Note: The “Air Gap” Rule
One lesson I learned the hard way involves planting hedges right up against a walkway. You must account for the mature width of the plant.
- If a plant will grow 24 inches wide, plant the center of the root ball at least 15 inches away from the edge of the concrete.
- If you plant too close, the boxwood will encroach on the path, forcing you to shear it vertically, which exposes the woody interior and looks unnatural.
- Always leave a 3-inch visual gap between the mature edge of the plant and the hardscape for a clean, estate-quality look.
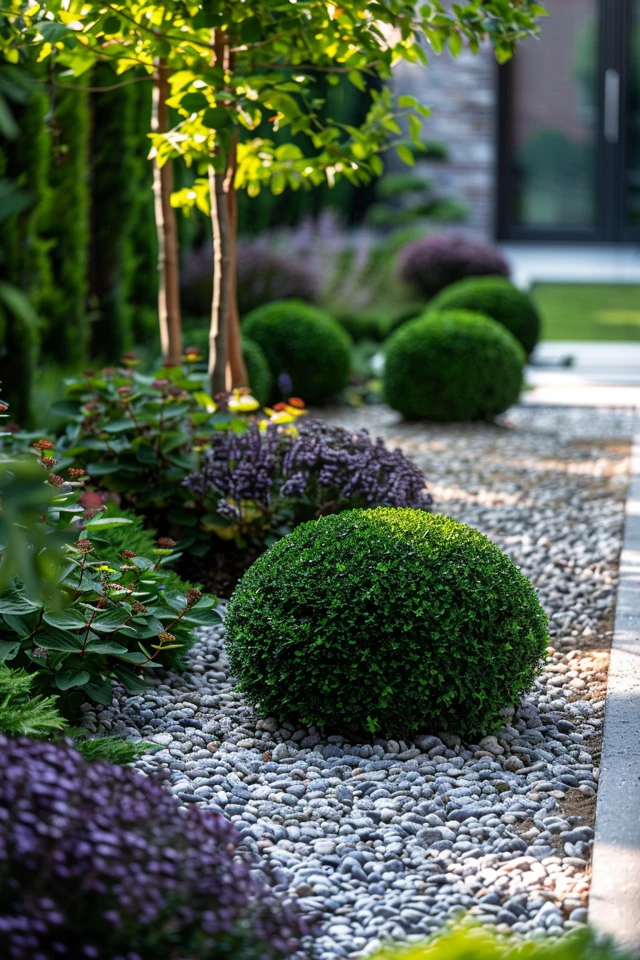
The Art of Topiary and Geometric Accents
If you want to add drama to an entryway or a garden corner, geometric boxwoods are the answer. We aren’t necessarily talking about intricate animal shapes, but rather simple spheres, cones, or pyramids. These shapes introduce vertical interest and architectural weight to a garden.
In my designs, I often use a “rule of three” when placing spherical boxwoods. I might group three spheres of varying sizes (for example, one 24-inch, one 18-inch, and one 15-inch) in a corner bed. This creates an organic yet structured focal point that looks modern and intentional.
Placement and Visual Weight
Boxwood is visually “heavy” because of its dense, dark leaves. You need to balance this weight. If you have a large cone boxwood on the left side of your porch steps, you generally need a matching one on the right for symmetry.
However, in asymmetrical cottage gardens, you can use a large boxwood sphere to “anchor” a drift of airy, floaty plants like ornamental grasses or cosmos. The contrast between the rigid boxwood and the moving grasses creates a sophisticated texture palette.
Common Mistakes + Fixes
Mistake: Trying to shape a young plant too aggressively.
Fix: Patience is key. Let the plant establish its root system for a full year before you do any heavy shaping. Purchase wire topiary frames if you are a beginner; place them over the shrub and simply clip off anything that pokes through the wire.
Boxwood in Containers for Porches and Patios
You do not need a sprawling estate to enjoy boxwood; they thrive in containers. This is an excellent strategy for renters or homeowners with limited ground space. A pair of potted boxwoods flanking a front door is a classic design trick to increase curb appeal instantly.
When selecting pots, scale is critical. The pot should visually support the weight of the plant. A good rule of thumb is that the pot should be roughly half the height of the visible plant, or the plant should be two-thirds the height of the pot.
Container Requirements
- Size: Choose a container that provides at least 2 inches of clearance around the nursery pot’s root ball.
- Material: In colder climates, avoid terracotta, which can crack in freezing cycles. Opt for fiberglass, stone, or high-quality resin that mimics cast iron.
- Drainage: Boxwood hates “wet feet.” Ensure your pot has multiple drainage holes. I usually elevate the pot on “pot feet” or bricks to ensure water flows freely out the bottom.
Winter Protection for Pots
The roots of a potted boxwood are more exposed to the cold than those in the ground. If you live in Zone 5 or colder, the freeze-thaw cycle can kill the roots.
- Move pots against the house wall for shelter during extreme cold snaps.
- Wrap the pot (not the plant) in burlap or bubble wrap if you cannot move it.
- Water them periodically in winter during thaws; dried-out roots are the primary cause of winter death, not the cold itself.
Softening the Look with Companion Planting
While boxwood provides structure, a garden made entirely of evergreens can feel stiff or overly formal. To create a welcoming, elegant garden, you must soften the hard lines of the boxwood with looser textures and colors.
In my projects, I treat boxwood as the “neutral” backdrop. The deep green color makes whites pop and purples look richer. It creates a canvas that allows your seasonal blooms to shine without the garden looking bare when the blooms fade.
The “White Garden” Aesthetic
One of the most elegant combinations is boxwood paired with white blooming plants. This mimics the famous Sissinghurst White Garden style.
- Hydrangea ‘Annabelle’ or ‘Limelight’: The giant white blooms flop gently over the crisp green boxwood hedge. The contrast is stunning.
- White Roses: Use shrub roses like ‘Iceberg’ behind a low boxwood border. The boxwood hides the “knobby” knees of the rose canes, leaving only the blooms visible.
- Hostas: In shady areas, variegated white-and-green hostas echo the greenery while adding a completely different leaf texture.
What I’d Do in a Real Project: Layering
If I were designing a foundation planting bed that is 6 feet deep, here is the layering plan I would use:
1. Back Layer: Tall deciduous shrubs (like Lilac or Viburnum) or climbers on a trellis.
2. Middle Layer: Loose flowering perennials (Peonies, Coneflower, or Salvia).
3. Front Anchor: Boxwood spheres or a low hedge to contain the perennials.
4. Edging: A low groundcover like creeping thyme or mulch.
Critical Care, Pruning, and Blight Prevention
Boxwood is generally low maintenance, but it is not “no maintenance.” The biggest threat to modern boxwood gardens is Boxwood Blight, a fungal disease that causes leaf drop and black streaks on stems. Understanding how to prevent this is crucial for protecting your investment.
Proper sanitation is the first line of defense. When you prune your boxwoods, dip your shears in a solution of rubbing alcohol or bleach water between plants. This prevents the spread of spores from a sick plant to a healthy one.
Pruning Best Practices
Timing is everything. Do not prune boxwood in late fall. Pruning stimulates new growth, and if that new growth is hit by frost, it will turn brown and die.
- Best Time: Late spring, after the danger of frost has passed. This is when you do your heavy shaping.
- Touch Ups: You can do light snipping in mid-summer to remove stray branches.
- Technique: Avoid just shaving the outside. Reach inside the plant and thin out some branches to allow light and air to reach the center. This prevents the “hollow shell” effect.
The “Bronzing” Issue
In winter, you might notice your boxwood turning orange or bronze. This is usually caused by wind burn and winter sun exposure, combined with frozen roots that cannot pull up water.
- Prevention: deeply water your boxwoods in late November before the ground freezes.
- Location: If you live in a windy area, spray an anti-desiccant spray on the leaves in late autumn to seal in moisture.
Final Checklist for Boxwood Success
Before you head to the nursery, run through this quick checklist to ensure your site is ready.
- Sun Exposure: Most boxwoods prefer dappled shade or morning sun/afternoon shade. Full, blasting afternoon sun can scorch them in hot climates.
- Soil Drainage: Dig a test hole and fill it with water. If it hasn’t drained in 4 hours, you need to amend the soil with organic matter or choose a different spot. Boxwood will die in standing water.
- Variety Selection: Check your USDA Hardiness Zone. ‘Green Velvet’ and ‘Green Mountain’ are cold hardy (Zone 4/5). American Boxwood is better for warmer zones but grows larger.
- Spacing Plan: Measure your bed length and divide by 1.25 (for 15-inch spacing) to buy the exact right number of plants.
- Mulch: Plan for 2 inches of mulch to keep roots cool, but keep the mulch pulled back 2 inches from the main trunk to prevent rot.
FAQs
Are boxwoods deer resistant?
Generally, yes. Deer tend to avoid boxwood because of the alkaloids in the leaves which taste bitter and emit a scent deer dislike. However, if deer are starving in a harsh winter, they may nibble, but it is rarely their first choice.
How fast do boxwoods grow?
They are notoriously slow growers. Dwarf varieties may only grow 1 to 3 inches per year. Larger varieties like American Boxwood can grow up to 6 inches a year. This is why mature specimens are expensive—you are paying for the time it took to grow them.
Can I plant boxwood in full shade?
Yes, boxwood tolerates full shade very well, making it a hero for planting under large trees or on the north side of a house. However, in deep shade, they may grow slightly more open and less dense than they would with some sunlight.
What if I am terrified of Boxwood Blight?
If blight is prevalent in your area, consider alternatives that mimic the look. Inkberry Holly (Ilex glabra ‘Gem Box’) or Japanese Holly (Ilex crenata) look very similar to boxwood but are immune to boxwood blight.
Conclusion
Boxwood landscaping offers a timeless elegance that few other plants can match. It provides the essential structure that allows other garden elements to shine, acting as the frame for your landscape’s living art. By paying attention to proper spacing, choosing the right variety for your zone, and committing to a basic care schedule, you can create a garden that feels established and sophisticated.
Remember that a garden is a long-term project. Boxwoods grow slowly, but their longevity is their reward. Whether you are lining a walkway, potting them for a patio, or creating a formal parterre, these evergreen sentinels will serve your home beautifully for decades.
Picture Gallery


