
Brighten Up Your Cherry Cabinet Kitchen Easily!
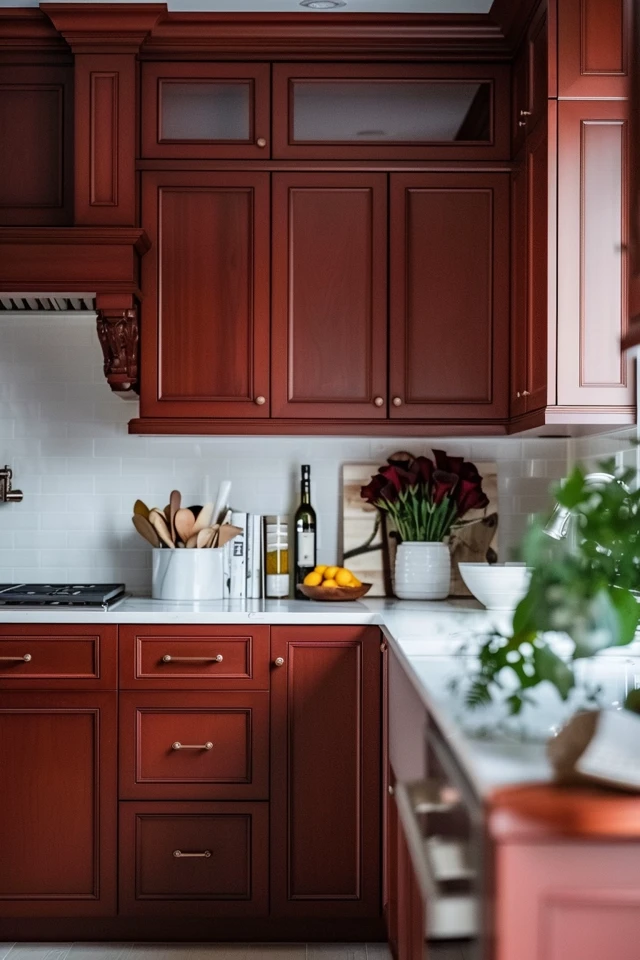
One of the most common requests I receive from clients involves “fixing” a kitchen full of dark cherry cabinets. They often inherit these kitchens when buying homes built in the early 2000s and assume the only solution is a costly paint job or a complete demolition. I always encourage them to pause before they pick up a paintbrush or a sledgehammer.
Cherry wood actually has a richness and warmth that modern flat-pack cabinetry often lacks. The problem usually isn’t the cabinets themselves; it is what is happening around them. If you are looking for visual proof of how small changes create big impact, make sure to check out the Picture Gallery at the end of this blog post.
By adjusting the supporting elements like wall color, lighting, and hardware, you can neutralize the heavy red undertones and create a space that feels fresh and intentional. Let’s walk through exactly how to modernize your space without a full renovation.
1. Mastering the Undertones: Wall Paint and Palette Strategy
The biggest mistake homeowners make with cherry cabinets is ignoring color theory. Cherry wood has distinct red, orange, or sometimes burgundy undertones. If you try to pair this with a cool, blue-based gray, the cabinets will look even redder by contrast. The goal is to choose wall colors that bridge the gap.
Why “Builder Beige” Has to Go
Many cherry kitchens were originally painted in yellow-based beige or gold. This creates a “muddy” effect where the walls and the cabinets blend into a singular, heavy visual block. You need contrast to brighten the space.
The Best White Paints for Cherry
Going stark white can be too harsh against the deep wood. You want a creamy, off-white that feels soft but bright.
- Benjamin Moore White Dove: This is my go-to. It has a tiny touch of warmth that connects with the wood but reads as a clean white.
- Sherwin Williams Alabaster: Slightly warmer than White Dove, this works beautifully if your kitchen gets limited natural light.
- Sherwin Williams Greek Villa: A great middle-ground that prevents the room from feeling sterile.
Using Greens and Blues
If you dislike white walls, look across the color wheel. Green is the complementary color to red. A soft, sage green or a muted blue-green can actually tone down the redness of the cabinets, making them look more like a neutral brown.
Designer’s Note: The 60-30-10 Rule
In a kitchen with wood cabinets, the cabinets usually take up about 60% of the visual space. Your wall color and countertops are the 30%. Your accents (rugs, hardware) are the 10%. Since the 60% (cherry) is dark, the remaining 40% needs to be significantly lighter to achieve balance.
2. The Lighting Overhaul: Lumens and Kelvin Temperatures
If your kitchen feels like a cave, paint alone won’t fix it. Most older kitchens suffer from poor lighting plans, often relying on a single central fixture or outdated can lights with yellow bulbs.
Lighting is the single most effective tool for brightening dark cabinetry. It changes how the human eye perceives the volume of the room.
Understanding Color Temperature (Kelvin)
The “temperature” of your light bulb makes or breaks cherry wood.
- 2700K (Warm White): Avoid this. It casts a yellow glow that enhances the orange in the wood and makes the room feel dated.
- 3000K (Soft White): This is the “sweet spot” for residential interiors. It is crisp and clean but not clinical.
- 4000K (Cool White): Use this only if you have a very modern, industrial aesthetic. It can sometimes turn cherry wood a strange purple-brown hue.
Layering Your Light Sources
You cannot rely on just ceiling lights. You need three distinct layers to banish the shadows that dark cabinets create.
- General Overhead: Recessed cans are standard. A good rule of thumb for spacing is to divide your ceiling height by two. If you have 8-foot ceilings, space lights about 4 feet apart.
- Task Lighting: This is non-negotiable for cherry cabinets. Under-cabinet LED strips illuminate the dark counter space and reflect light off the backsplash. This creates a “glow” that breaks up the heavy block of wood.
- Decorative Lighting: Pendants over an island or a sconce above the sink draw the eye upward. Choose fixtures with glass or light fabric shades rather than solid metal to allow light to pass through.
Common Mistakes + Fixes
Mistake: Relying on a single ceiling fan light kit.
Fix: If you cannot add recessed lights, install a track lighting system that uses the existing junction box. Aim the heads at the cabinetry faces to wash them with light, rather than aiming them straight at the floor.
3. Countertops and Backsplash: Breaking the Heavy Pattern
In the era when cherry cabinets were most popular, they were almost always paired with “Santa Cecilia” or “Uba Tuba” granite. These stones are busy, speckled, and dark.
When you have dark cabinets and dark, busy counters, the eye has nowhere to rest. Replacing these surfaces is an investment, but it transforms the kitchen instantly.
Selecting the Right Countertop
To brighten the room, you need a high LRV (Light Reflectance Value) surface.
- Engineered Quartz: Look for white or off-white quartz with subtle grey or warm gold veining. Avoid heavy, thick veins that look artificial.
- Solid Surface (Corian): A solid white or cream matte finish creates a modern, seamless look that contrasts beautifully with the grain of the wood.
- Natural Marble: If you can handle the maintenance of Carrara marble, the cool grey tones balance the warm wood perfectly.
Backsplash Strategy
The backsplash is the vertical visual plane that connects the dark upper cabinets to the counter. This needs to be light.
- Glossy Tile: A glossy finish reflects light, which helps brighten the space. A classic white subway tile is timeless for a reason.
- Zellige or Hand-formed Tile: If you want more character, choose a hand-glazed tile in a pearlescent white or cream. The uneven texture catches light and adds depth without adding darkness.
- Grout Color: Do not use dark contrast grout. It creates a grid pattern that feels busy. Stick to white or a very pale silver grout to keep the surface looking expansive.
Real-World Constraint: Rental Solutions
If you are renting or on a strict budget, you cannot rip out granite.
The Fix: Use high-quality peel-and-stick vinyl tile over the backsplash. There are also contact paper solutions for countertops, though they are not heat resistant. A large, light-colored cutting board placed permanently on the counter can also help break up a dark surface.
4. Updating Hardware and Fixtures
Builder-grade cherry kitchens often came with two types of hardware: cheap, shiny brass or dull, round wooden knobs. Both age the kitchen significantly. Changing hardware is the “jewelry” of the kitchen and creates an immediate style shift.
Hardware Finishes that Work
- Brushed Gold / Champagne Bronze: This is my favorite pairing for cherry. The warm gold tones complement the red wood rather than fighting it, but the modern brushed finish feels current.
- Matte Black: If you want a more transitional or farmhouse look, matte black offers a crisp, sharp contrast. It grounds the space and looks very intentional.
- Polished Nickel: This is a warmer silver than chrome. It reflects light beautifully and feels luxurious.
Scale and Proportion
Old knobs are often too small for large cabinet doors.
Designer Rule of Thumb: For drawers wider than 24 inches, use two knobs or one long pull (at least 5-6 inches long).
For standard cabinet doors, a pull that is 3 to 5 inches long usually feels appropriate.
If you are switching from knobs to pulls, you will need a drill template. If you can, try to reuse existing holes or use a backplate to cover old markings.
The Faucet Upgrade
A high-arc faucet in a matching finish to your cabinet hardware helps modernize the room. It adds height and shine to the sink area. If your sink is stainless steel, you can still mix metals. A matte black faucet looks great with a stainless sink.
5. Textiles, Rugs, and Styling
Once the hard surfaces are addressed, you need soft goods to absorb sound and add texture. This is often where a kitchen goes from “house” to “home.”
The Flooring Dilemma
A major issue with cherry kitchens is “wood-on-wood.” If you have cherry cabinets and oak floors, the orange tones can clash, or the room can feel like a sauna.
You need a “visual break” between the cabinets and the floor.
The Solution: A runner rug.
Place a long runner between the island and the main sink wall.
Rug Sizing and Materials
- Material: For kitchens, I recommend Polypropylene or PET (recycled plastic). They mimic wool but are scrubbable and bleach-cleanable. Vintage wool is durable but stains easily with grease.
- Sizing: Measure the length of your cabinet run and subtract 12 inches. You want about 6 inches of floor visible on either end of the rug.
- Color: Choose a rug with a light base color (cream, light gray) to reflect light upward.
Window Treatments
Remove heavy wooden blinds or dark drapes. You want to maximize natural light.
What I’d do: Install a woven wood shade in a light, natural reed color (like bamboo or blonde wood). This introduces a new wood tone that is lighter than the cherry, helping the cabinets feel less heavy. Alternatively, a simple white linen roman shade works wonders.
Styling the Counters
Clutter makes a dark kitchen feel smaller. Clear the counters of appliances you don’t use daily.
Group items on trays. A white marble tray holding your oils and salt cellar looks organized and bright against a dark counter. Use white ceramic crocks for utensils and display white serving ware if you have glass-front cabinets.
Final Checklist: Your Brightening Roadmap
Use this checklist to tackle your kitchen systematically. I recommend following this order for the best budget management.
Phase 1: The Basics (Low Cost)
- Deep clean cabinets (grease makes them look darker).
- Swap all light bulbs to 3000K LEDs.
- Remove heavy window treatments.
- Declutter countertops completely.
Phase 2: The Updates (Medium Cost)
- Paint walls a warm white or soft sage green.
- Install under-cabinet lighting.
- Replace cabinet hardware (knobs and pulls).
- Add a light-colored runner rug.
Phase 3: The Investment (High Cost)
- Replace dark backsplash with light tile.
- Replace dark granite with light quartz.
- Add pendant lighting over the island or sink.
Frequently Asked Questions
Q: Can I mix cherry cabinets with cool grey floors?
A: It is difficult. Cool grey vinyl or tile often makes cherry wood look very orange. If you are stuck with grey floors, use large area rugs with warm tones (creams, rusts, browns) to bridge the gap between the cool floor and the warm cabinet.
Q: Should I just paint the cabinets white?
A: Painting cabinets is labor-intensive and expensive if done professionally. Factory-finish cherry is much more durable than a site-painted finish. I always advise clients to try changing the walls, lights, and counters first. If you still hate it, then consider painting.
Q: What if my appliances are black?
A: Black appliances can get lost in a dark kitchen. While stainless steel reflects light better, you don’t need to replace working appliances. Focus on lightening the backsplash and countertops nearby to create separation between the appliance and the cabinetry.
Q: How do I handle the space above the cabinets?
A: If your cherry cabinets don’t go to the ceiling, you likely have a dark shadow gap up there. Do not fill it with fake ivy or decorative plates. Paint that bulkhead the same color as the ceiling (usually flat white) to make the room feel taller, or install LED strip lighting up there to bounce light off the ceiling.
Conclusion
Living with cherry cabinets does not mean you are stuck in the past. These cabinets are often built with superior craftsmanship compared to today’s budget options. By shifting your focus to lighting, color balance, and surface materials, you can honor the quality of the wood while creating a bright, welcoming kitchen.
The goal is not to hide the cherry, but to give it a supporting cast that makes it shine. Start with your lighting, move to your wall color, and finish with hardware. You might be surprised at how much you love your wood kitchen once it is properly styled.
Picture Gallery


