
Budget-Friendly Above Ground Pool Deck Ideas
There is a common misconception in the design world that above-ground pools cannot look chic. I have seen countless homeowners shy away from these affordable swimming options because they fear the “big blue blob” aesthetic in their backyard. However, with the right decking strategy, you can elevate the entire experience without spending the equivalent of a luxury car on construction. Make sure to check out the Picture Gallery at the end of the blog post for visual inspiration on these layouts.
The secret to a budget-friendly deck is prioritizing placement and materials over massive square footage. You do not need a deck that wraps 360 degrees around the pool to achieve a high-end look. By focusing on a strategic “sun deck” or a designated entry platform, you save thousands on lumber and labor while still gaining functional lounge space.
In this guide, I am going to walk you through the design principles I use when clients need to stick to a strict budget but want a resort-style feel. We will cover smart layouts, material swaps, and the styling tricks that distract the eye from the pool structure itself.
1. The Power of the Partial Deck (Platform Decks)
The most expensive mistake homeowners make is assuming they need to encircle the entire pool. A full perimeter deck requires a massive amount of lumber, intricate cuts for the curve, and extensive structural footings.
Instead, I almost always recommend a “platform deck” or a “side deck.” This is a square or rectangular deck built adjacent to one side of the pool. Rectangular shapes are significantly cheaper to build than curves because they result in less material waste and require less specialized labor.
A 10×12 foot platform provides enough space for two chaise lounges and a small side table. If you want a dining area, aim for at least 12×14 feet. This layout creates a designated “destination” rather than just a walkway around the water.
Placement Rules of Thumb
- Sun Orientation: Build the deck on the side of the pool that gets the most afternoon sun if you enjoy tanning. If you prefer shade, position it on the eastern side so the house or trees block the harsh 4:00 PM rays.
- View Lines: Position the deck so that when you are lounging, you are looking away from the house and toward your landscaping or view. This makes the yard feel larger.
- Access: Ensure the deck connects logically to your back door. If the pool is far away, create a simple gravel path to the deck stairs to prevent a dirt trail from forming in your grass.
2. Material Selection: Where to Save and Where to Splurge
When working with a tight budget, pressure-treated pine is your best friend. It is significantly cheaper than composite decking or cedar. While composite materials are low-maintenance, they can cost three to four times as much upfront.
If you choose pressure-treated wood, you can make it look high-end with a solid color stain. A dark charcoal or a deep warm walnut stain can hide the greenish tint of treated lumber and mimic the look of more expensive hardwoods.
The “Hybrid” Ground-Level Approach
Another cost-saving measure is to keep the main lounging area on the ground level and only build a small stair landing at the pool’s height.
- Build a ground-level patio using pavers or pea gravel right next to the pool.
- Construct a small 4×4 or 4×6 elevated landing at the top of the pool wall for entry and exit.
- Connect the two with a wide staircase.
This approach creates a “pool zone” without the cost of an elevated structure, which requires deep footings and extensive bracing. You get the functionality of a deck for a fraction of the lumber cost.
3. Safety First: Railings and Gates
Budget constraints should never compromise safety, especially with pool decks. Building codes generally require a barrier of at least 48 inches in height around the access point of the pool.
Glass railings are the design standard for visibility, but they are incredibly expensive. A great budget-friendly alternative that still feels modern is “hog wire” or welded wire mesh panels framed in wood.
This agricultural-style fencing is durable, allows for airflow, and keeps sightlines open so you can supervise swimmers from the deck. It is much cheaper than custom aluminum spindles or cable railing systems.
Gate Hardware Essentials
- Self-Closing Hinges: Your gate must close on its own. Spring-loaded hinges are affordable and easy to install.
- Self-Latching Mechanism: The latch should be placed high enough (usually 54 inches) so that young children cannot reach it.
- Swing Direction: Always install the gate to swing away from the pool. If a child pushes on it, it should close tighter against the latch rather than opening into the water.
4. Designing for Flow and Function
One of the biggest complaints I hear about DIY decks is that they feel cramped. When you are drawing out your plan, you must account for “circulation space.” This is the empty floor space required for people to walk past furniture safely.
Key Measurements to Remember
- Traffic Lanes: Leave at least 30 to 36 inches of clear walking path. Do not block the path from the stairs to the pool ladder with a lounge chair.
- Chair Clearance: If you have a dining table, you need 24 to 30 inches behind each chair so guests can slide out without hitting the railing.
- Lounger Space: A standard chaise lounge is about 80 inches long. Ensure your deck is at least 10 feet deep if you plan to place loungers facing the pool, or they will block the flow.
Zoning Small Spaces
If your budget deck is small, do not try to do too much. Pick one primary function: dining OR lounging. Squeezing a dining table and a sofa set onto a 10×10 deck will make the space unusable. If you must have both, use the ground level for dining and the elevated deck for sunbathing.
5. Skirting and Landscaping: Hiding the Structure
The area underneath an elevated deck and the exposed walls of the pool are often unsightly. “Skirting” is the process of enclosing the space under the deck.
Standard lattice is the cheapest option, but the classic diamond pattern can look dated. For a more modern look, buy square grid lattice or use horizontal 1×4 wood slats spaced an inch apart. This horizontal banding mimics high-end architectural screening.
Using Plants as Architecture
Landscaping is often cheaper than carpentry. Instead of building a wooden wall to hide the pool equipment or the pool supports, use tall ornamental grasses.
- Miscanthus or Feather Reed Grass: These grow fast, reach heights of 4-6 feet, and provide soft coverage that sways in the wind.
- Evergreen Shrubs: For year-round coverage, boxwoods or hydrangeas can create a lush “skirt” around the base of the deck.
- Potted Plants on Deck: Place large pots with tall plants in the corners of the deck. This draws the eye up and softens the hard edges of the wooden railing.
Designer’s Note: The “Heat” Factor
In my years of designing outdoor spaces, the most common regret homeowners have is choosing a deck color that becomes scorched in the sun. Dark composite or black-stained wood looks incredible in photos, but it can reach temperatures of over 140 degrees Fahrenheit in direct summer sun.
If your pool deck has no shade cover, stick to lighter wood stains or light gray composites. If you are committed to a dark aesthetic, you must budget for an outdoor rug to create a walkable path from the door to the water. Your bare feet will thank you.
Common Mistakes + Fixes
Mistake: Slippery Surfaces
Pool decks get wet; that is a given. Standard deck paint or smooth composite can become like ice when covered in pool water.
The Fix: If you are painting or staining wood, mix in a non-skid additive (available at any hardware store). It adds a subtle grit that provides traction without feeling like sandpaper.
Mistake: Inadequate Lighting
People often forget that pool parties happen at night, too. Pitch black decks are a tripping hazard.
The Fix: Install solar post caps on your railing posts. They require no wiring and provide just enough ambient light to define the perimeter. String lights hung overhead can add general illumination for under $50.
Mistake: Ignoring Weight Limits
Homeowners sometimes place heavy hot tubs or large concrete planters on decks not built to support them.
The Fix: Standard decks are built for 40-50 lbs per square foot live load. If you plan to put anything heavier than standard furniture on the deck, you must add extra footings and double up your joists during the framing phase.
What I’d Do in a Real Project: The $4,000 Budget Checklist
If a client came to me with a standard 24-foot round pool and a $4,000 budget for a deck, here is exactly how I would allocate the funds for maximum impact:
- The Layout: I would design a 12×12 foot freestanding square platform deck adjacent to the deep end. No curves, no complex cuts.
- The Foundation: I would use pre-cast concrete deck blocks (floating foundation) to save on digging and pouring wet concrete, provided the soil is stable.
- The Material: Pressure-treated pine for framing and decking. I would install the deck boards diagonally for a custom look that adds rigidity.
- The Railing: 4×4 wooden posts with black aluminum balusters (sold in packs). This looks much more expensive than all-wood spindles but is easy to install.
- The Finish: A semi-transparent “Driftwood Gray” stain. It weathers well and stays cooler than dark brown.
- The Styling: A 8×10 indoor/outdoor rug to anchor the space, two white resin chaise lounges (easy to clean), and a ceramic side table.
- The Lighting: Four solar post caps for the corners and a battery-operated LED lantern for the table.
Final Checklist
Before you buy your first lumber board, run through this list to ensure your project stays on track.
- Check Utility Lines: Call 811 to have underground lines marked before digging any post holes.
- Verify Setbacks: Check your property survey. You usually cannot build within a certain number of feet from your neighbor’s fence line.
- Secure Permits: Most decks over 30 inches high require a building permit. Do not skip this; it can void your home insurance.
- Order 10% Extra: When buying lumber, always purchase 10% more than your calculations to account for bad boards or cutting mistakes.
- Plan the Gate: Ensure you have the specific hardware for a self-closing gate before you start framing the opening.
FAQs
Do I need to attach the deck to the pool?
No, and you usually shouldn’t. Above-ground pools are not designed to support the weight of a deck. The deck should be a freestanding structure that sits next to the pool, typically with a gap of 1/2 to 1 inch to allow for movement and prevent damage to the pool wall.
Can I build a deck over the pool rail?
Generally, you should build the deck surface flush with or slightly below the top rail of the pool (the coping). Cantilevering the deck over the top rail can make it difficult to change the pool liner in the future.
How do I maintain a wood pool deck?
Because of the constant exposure to chlorinated or saltwater, you need to clean the deck annually with a deck cleaner to remove mold and mildew. You should also re-seal or re-stain the wood every 2 to 3 years to prevent rot and splintering.
Conclusion
Building a deck for your above-ground pool transforms it from a temporary yard fixture into a permanent outdoor living room. It changes the psychology of how you use the space—suddenly, you aren’t just going for a swim; you are lounging by the water.
By sticking to square layouts, utilizing pressure-treated lumber, and using smart styling tricks like outdoor rugs and solar lighting, you can achieve a designer look on a DIY budget. Remember that safety is the only place you cannot cut corners; everything else is open for creative interpretation.
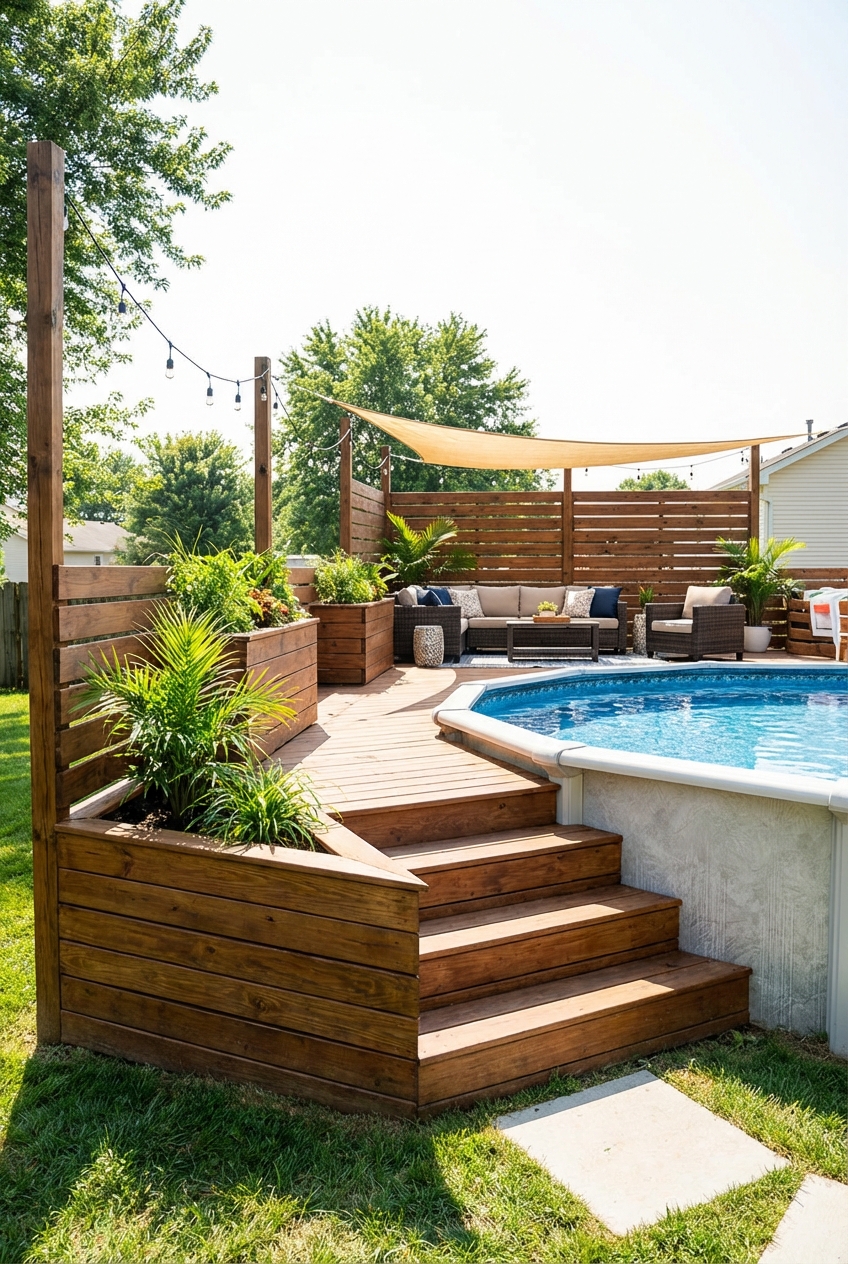
Picture Gallery


