
California Landscape Ideas for Vibrant Gardens
California living is synonymous with indoor-outdoor flow. We are lucky to have a climate that allows us to treat our gardens as extended living rooms for most of the year. However, designing a landscape here comes with a specific set of responsibilities, primarily regarding water conservation and heat management. For those seeking immediate visual inspiration, a curated Picture Gallery is waiting at the end of this post.
I recall a project in Santa Monica where the client wanted an “English Cottage” garden. While beautiful, that style requires a level of water that simply isn’t sustainable or practical in Southern California. We compromised by using climate-adapted Mediterranean plants that mimicked that lush, romantic texture without the heavy irrigation demands. The result was actually more vibrant because the plants were happy in their native environment.
Creating a vibrant California garden isn’t just about planting a few cacti and calling it a day. It requires a thoughtful approach to hardscaping, hydro-zoning, and selecting a color palette that pops against the golden California light. In this guide, I will walk you through the exact process I use to design landscapes that are both stunning and sustainable.
1. Establishing Structure with Hardscaping
Before we buy a single plant, we must address the “bones” of the garden. Hardscaping defines how you move through the space and how you use it. In California design, hardscaping usually takes up about 40% to 50% of the usable yard space to reduce water dependency.
The most versatile material I use in California landscapes is Decomposed Granite (DG). It offers a relaxed, European vibe that works perfectly with Spanish, Modern, or Ranch-style homes. I prefer using “stabilized” DG for pathways and seating areas. It binds the granules together so they don’t track into the house, but it remains permeable enough to let rain sink into the soil.
When pouring concrete or laying pavers, scale is everything. A common mistake I see is narrow pathways. A main walkway should be at least 48 inches wide to allow two people to walk side-by-side. Secondary paths can drop to 36 inches, but never go narrower than that or it will feel cramped.
Designer’s Note: The Heat Island Effect
I learned this the hard way early in my career: avoid pouring vast slabs of dark concrete or using dark pavers in full sun areas. These materials absorb heat during the day and radiate it back at night, making your patio unbearable. Stick to lighter colors like sand, beige, or cool light grays to keep the surface temperature down.
2. The Softscape: Native Plants and Layering
Vibrancy in a garden comes from texture and contrast, not just flowers. Many people think drought-tolerant means “brown and dry,” but that is a misconception. I create vibrancy by mixing silver foliage (like Olive trees or Westringia) with deep greens (like Arbutus) and pops of architectural color (like Agave or Kangaroo Paw).
Layering is the key to a professional look. You want three distinct tiers.
- Canopy: Trees that provide shade and scale (e.g., Palo Verde, Coast Live Oak).
- Mid-layer: Shrubs that define boundaries (e.g., Sage, Ceanothus).
- Groundcover: Low plants that suppress weeds and retain moisture (e.g., Dymondia, Creeping Thyme).
When placing plants, always plant in odd numbers. Groups of three, five, or seven look organic and natural to the human eye. Even numbers tend to look forced and soldier-like. Also, pay attention to the mature size of the plant.
Common Mistakes + Fixes
Mistake: Planting too close together for “instant gratification.”
Fix: Research the full mature width of the plant. If a shrub grows to 4 feet wide, plant them 4 feet apart on center. It will look sparse for the first year, but this prevents overcrowding and fungal issues later. Use mulch to fill the visual gaps in the meantime.
3. Water Management and Hydro-Zoning
Water is our most precious resource in California. A vibrant garden must be a smart garden. I never design a landscape without a dedicated drip irrigation system. Overhead sprayers are generally wasteful; much of the water evaporates before it hits the roots, or it sprays onto foliage, promoting disease.
I use a technique called “hydro-zoning.” This means grouping plants with similar water needs together on the same valve. You should never put a thirsty hydrangea on the same zone as a drought-loving succulent. One will die of thirst, or the other will rot from overwatering.
Smart controllers are non-negotiable in my projects. Systems like Rachio or Hunter Hydrawise connect to local weather stations via Wi-Fi. If rain is in the forecast, the system cancels the watering cycle automatically. This saves an immense amount of water and money over time.
Mulch Matters
Finish every planting bed with a 2 to 3-inch layer of organic mulch. This is not just for aesthetics. A thick layer of mulch keeps the soil temperature consistent, reduces evaporation by up to 50%, and breaks down over time to feed the soil. I recommend shredded redwood bark or gorilla hair mulch for slopes, as it knits together and doesn’t wash away.
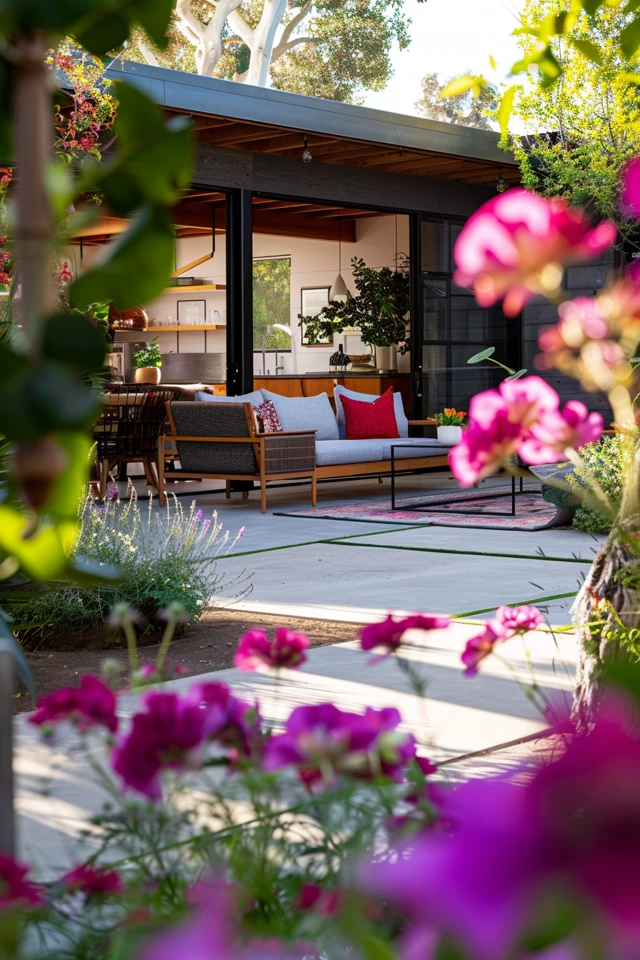
4. Blending Indoor and Outdoor Living
The “California Room” is a concept where the boundary between inside and outside dissolves. To achieve this, the flow needs to feel seamless. If you are renovating, consider installing sliding or bi-fold doors with a flush threshold. This eliminates the step down, physically extending your floor plan.
Furniture selection is critical here. Treat your outdoor furniture with the same rigor as your indoor pieces. I look for frames made of teak, powder-coated aluminum, or high-density polyethylene (HDPE). Teak will silver over time, which is a beautiful look, but if you want it to stay brown, be prepared to oil it twice a year.
What I’d Do in a Real Project: The Layout Checklist
- Rug Sizing: Just like indoors, your outdoor rug should anchor the furniture. Ensure the front legs of the sofa and chairs are sitting on the rug. A 5×8 rug is usually too small for a conversation set; aim for an 8×10 or 9×12.
- Traffic Flow: Leave 30 to 36 inches of clearance around dining tables so guests can push chairs back comfortably without hitting a wall or falling off the patio edge.
- Fabric Choice: Use 100% solution-dyed acrylic fabrics (like Sunbrella or Perennials). They resist fading and can be bleached if mildew occurs.
5. Lighting for Drama and Usability
A garden that goes dark at sunset is a wasted investment. Lighting adds depth, drama, and safety. However, less is more. You do not want your backyard to look like a football stadium. We are aiming for “moonlight,” not “floodlight.”
Focus on three types of lighting:
- Path lighting: To safely guide feet along walkways.
- Up-lighting: To highlight the architectural structure of trees or home facades.
- Down-lighting: Mounted in trees or on trellises to cast a soft wash over dining areas.
For color temperature, I strictly use 2700K or 3000K LED bulbs. This creates a warm, inviting glow. Anything higher (4000K+) looks blue and clinical, which is unappealing for a relaxing evening space.
Designer’s Note: The Runway Effect
A common DIY error is placing path lights in straight lines on both sides of a walkway. This creates a “runway effect” that looks like an airport landing strip. Instead, stagger the lights on alternating sides of the path and hide the fixtures inside planting beds so you see the light, not the source.
Final Checklist: Planning Your Project
Before you break ground, run through this checklist to ensure you have covered all bases. This is the exact mental framework I use when consulting on a new landscape.
- Site Analysis: Have you mapped out the sun and shade patterns? (Where is the sun at 10 AM, 2 PM, and 5 PM?)
- Microclimates: Identify areas that are windier or frost-prone (usually low spots in the yard).
- Budget Allocation: Have you set aside 10-15% of the budget for soil prep and irrigation? (Do not spend it all on plants).
- Access: If you plan to install a pool or large trees later, do you have wide enough access for machinery?
- Permits: Have you checked with your HOA or city regarding water restrictions, fence heights, or parkway planting rules?
FAQs
What is the best time to plant a garden in California?
Fall is the absolute best time. The soil is still warm from summer, but the air is cooler, and the winter rains help establish roots. Planting in the heat of July or August stresses new plants and requires excessive water.
How much does a landscape renovation cost?
It varies wildly, but a good rule of thumb for a professional install (hardscape, irrigation, plants, lighting) is $25 to $45 per square foot. If you are doing significant masonry or concrete work, that number goes up.
Should I use artificial turf?
I have mixed feelings. It saves water, but it gets incredibly hot in the sun—too hot for dogs’ paws or kids’ feet. If you must use it, choose a high-quality turf with “Cool yarn” technology and place it in shaded areas if possible.
How do I keep weeds out of DG (Decomposed Granite)?
Weeds will eventually find a way. Installing a landscape fabric underneath helps, but wind-blown seeds will still sprout on top. The best maintenance is a monthly rake and spot treatment. Do not let organic matter (leaves) decompose on top of the DG, as it creates soil for weeds to grow.
Conclusion
Designing a California landscape is about balancing the rugged beauty of our natural environment with the comfort of modern living. It is a puzzle of water conservation, functional zoning, and aesthetic layering.
Start with a strong hardscape foundation, choose plants that actually want to live here, and don’t forget the lighting. When done correctly, your garden will not only be vibrant and beautiful but will also serve as a peaceful retreat that requires surprisingly little maintenance.
Picture Gallery


