
Carport Privacy Ideas for Your Peaceful Retreat
Carports are fantastic for protecting your vehicle from the elements without the heavy cost of building a full garage. However, they often come with one glaring downside: a complete lack of privacy.
I remember walking through a project with a client who felt like she was on a stage every time she unloaded her groceries. Her carport faced the street directly, and she felt exposed to every passerby and neighbor. It turned a functional space into a source of anxiety.
The goal of this guide is to help you reclaim that space, turning a utilitarian parking spot into a private, stylish extension of your home. If you are looking for visual inspiration, don’t miss the extensive Picture Gallery at the end of the blog post.
1. Structural Screening: The Architectural Approach
The most permanent and polished way to add privacy to a carport is through structural screening. This involves installing fixed panels or walls that mimic the look of the home’s architecture. This is my go-to solution for homeowners who want to increase property value.
Horizontal Slat Walls
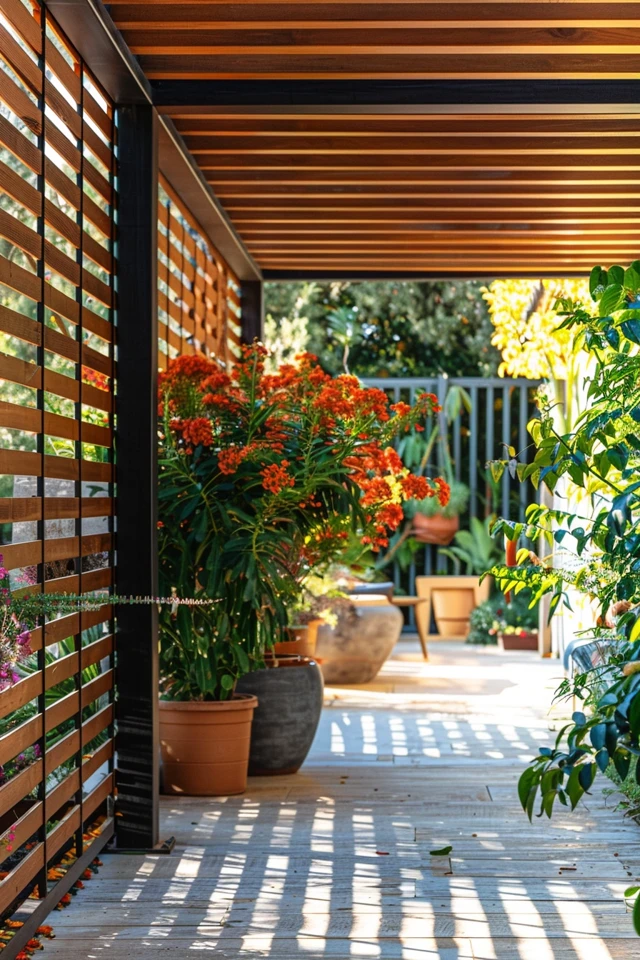
Horizontal wood slats are the darling of modern landscape and interior design. They provide a clean, linear look that filters light while obstructing the view from the street.
When designing a slat wall, the “void” (the space between boards) is just as important as the board itself. I typically recommend using 1×4 cedar or redwood boards with a 0.5-inch to 0.75-inch gap. This spacing allows air to flow through, which prevents the structure from becoming a wind sail during storms.
If you are in a rental or on a budget, you can achieve this look using pre-made lattice panels. However, avoid the cheap, diagonal plastic lattice often found at big-box stores. Look for “privacy lattice” with smaller square openings, or build your own frame using pressure-treated lumber.
Decorative Metal Screens
Laser-cut metal screens have gained massive popularity in the last five years. They come in aluminum or Corten steel (which rusts to a beautiful orange patina) and offer artistic flair.
These are excellent for carports that feel dark or enclosed. Because the patterns are often intricate, they let in plenty of sunlight while confusing the eye, making it hard for outsiders to see clearly into the space.
I usually specify these panels to be mounted on 4×4 wooden posts or steel columns. If you choose this route, ensure the metal is at least 1/8-inch thick to prevent warping in the heat.
Breeze Blocks
Mid-century modern design is back in a big way, and breeze blocks are the perfect material for a retro-inspired carport. These are concrete blocks with decorative geometric patterns cut through them.
They are incredibly durable and can withstand impact, making them great for driveways where kids might be playing ball.
Designer’s Note: Breeze blocks are heavy. You cannot just stack them on a standard concrete slab without checking the footing. You may need to pour a reinforced footing to handle the weight load.
2. Greenery and Living Walls: The Soft Solution
As a designer, I love softening the harsh lines of concrete driveways with organic elements. Using plants for privacy is a strategy that benefits both the interior view and the curb appeal.
The Planter Wall Technique
If you cannot dig into the ground because of concrete, use large, rectangular planters to create a barrier.
The key here is scale. A common mistake is buying small, residential pots that look cluttered. You need commercial-grade planters that are at least 30 inches tall and 15 to 20 inches deep.
Fill them with tall, upright plants like Horseshoe Bamboo (non-invasive), Snake Plants (for warm climates), or tall ornamental grasses. This creates an instant “hedge” that is movable if you ever need to widen the driveway.
Trellis and Vines
For a romantic, cottage-style look, install a heavy-duty wire trellis or a wooden grid on the open sides of the carport.
Fast-growing vines like Star Jasmine or Clematis can fill a trellis in one or two growing seasons. Star Jasmine is particularly nice because it remains evergreen in many climates and offers a beautiful scent.
Ensure you maintain a 12-inch gap between the trellis and your car. Vines can hold moisture and harbor insects, neither of which you want touching your vehicle’s paint job.
Hedges and Buffer Zones
If you have soil access along the perimeter of the carport, planting a dense hedge is the most classic solution.
For total privacy, Arborvitae ‘Emerald Green’ is the standard choice. They grow tall and narrow, meaning they won’t encroach on your parking space. Plant them 3 feet apart for a dense wall.
Common Mistake: Planting hedges too close to the driveway pavement.
The Fix: Always plant at least 24 to 30 inches away from the concrete edge. As the plants mature, they will widen. If they are too close, you will constantly be trimming them just to open your car door.
3. Textiles and Curtains: The Resort Vibe
Using outdoor curtains creates a cabana-like atmosphere. This is a fantastic option for renters or homeowners who want flexibility. You can close them for total privacy or tie them back to let the breeze in.
Choosing the Right Fabric
Do not use indoor curtains. They will fade, mold, and rot within weeks. You must use fabric rated for outdoor use, such as Sunbrella or a high-quality solution-dyed acrylic.
Look for “fade-resistant” and “mildew-resistant” labels. The fabric needs to be heavy enough to hang well but light enough to dry quickly after rain.
Installation Mechanics
The hardware is just as critical as the fabric. Use stainless steel cable systems or galvanized pipe rods to prevent rust.
Because carports are wind tunnels, curtains will blow around wildly if not secured. Here is what I do in real projects:
- I sew a weighted hem into the bottom of the curtain (using drapery weights or a galvanized chain).
- I install tie-backs on the support posts so the curtains can be secured during high winds.
- I recommend grommet tops rather than tab tops for easier sliding along the rod.
The Shade Sail Hybrid
Sometimes privacy is needed from above, especially if you have two-story neighbors looking down into your carport.
Installing a triangular or rectangular shade sail at an angle can block these sightlines. It also offers the added benefit of UV protection for your car’s interior.
4. Functional Layouts: Storage as a Barrier
In interior design, we often use furniture to define zones. You can apply this same logic to your carport by using storage units to create a wall.
The Storage Wall
Line one side of the carport with tall, lockable outdoor cabinets. This kills two birds with one stone: you get a massive amount of storage for tools, sports gear, and holiday bins, and you create a solid visual barrier.
For this to look intentional and not like a garage sale, the cabinets must be uniform. Buy a matching set that spans the entire length of the bay.
Measurement Rule: Ensure you have enough depth. A standard car is about 6 to 6.5 feet wide. A carport is usually 10 to 12 feet wide. If you add 24-inch deep cabinets, ensure you still have at least 30 inches of walking clearance between the car and the cabinets.
Wood Storage and Utility Areas
If you have a fireplace, a firewood rack can act as a beautiful, rustic privacy screen. When stacked high with logs, it becomes completely opaque.
Build a sturdy frame using pressure-treated lumber and stack the wood neatly. This adds texture and warmth to the space. Just be mindful of termites; keep the wood rack slightly elevated off the ground and away from the main structure of the house if possible.
5. Mixed Materials: The Custom Designer Look
The most high-end carports rarely use just one material. Mixing textures creates depth and makes the privacy screen look like an architectural feature rather than a barrier.
Wood and Stone
Consider building a low stone or brick wall (about 30 to 36 inches high) and topping it with a wooden slat screen or lattice.
The stone base adds visual weight and durability near the ground where dirt and water splash up. The open wood top keeps the space feeling airy.
Metal and Greenery
Install a wire mesh grid (commonly called hog wire) inside a wooden frame. This looks industrial and modern on its own.
Then, plant climbing ivy or jasmine at the base. Over time, the plants will weave through the wire, creating a “living wall” with a rigid structure. This is much neater than a free-form hedge.
Polycarbonate and Wood
If you need light but want to block the view completely, twin-wall polycarbonate sheets are a secret weapon. These are translucent plastic sheets often used in greenhouses.
Frame them in cedar or stained pine. They let a soft, diffused glow enter the carport, but they are opaque enough that someone standing outside can only see a vague shadow, not your belongings.
Designer’s Note: Handling Wind and Light
One of the biggest lessons I have learned in exterior design is to respect the wind load.
I once designed a privacy wall for a client using solid tongue-and-groove boards. The first heavy storm we had, the wind pressure was so intense it actually warped the support posts.
The Lesson: Never seal a carport completely tight unless you are structurally framing it like a garage. Always leave gaps for air to pass through. If you use solid panels, leave a 2-inch gap at the bottom and top.
Lighting: Privacy screens can make a carport dark. Counteract this by installing sconces on the interior of the privacy posts. Down-lighting creates a beautiful ambiance and makes the space feel safer at night without blinding the neighbors.
Common Mistakes + Fixes
Mistake: Ignoring HOA or City Rules.
Many homeowners build beautiful screens only to receive a letter ordering them to tear it down.
The Fix: Check your setbacks. In many municipalities, you cannot build a permanent vertical structure within 5 to 10 feet of the property line.
Mistake: Using Indoor Paint or Stain.
Carports are harsh environments. Indoor finishes will peel within a year.
The Fix: Use a semi-transparent exterior stain for wood. It penetrates the grain rather than sitting on top, meaning it won’t peel and is easier to re-coat later.
Mistake: Creating a Fortress.
Blocking the view 100% can actually be a security risk. If a thief gets inside, no one can see them.
The Fix: Aim for 70-80% opacity. You want to obscure details, not eliminate visibility entirely.
What I’d Do in a Real Project
If I were consulting on your carport today, here is the checklist I would run through to determine the best design:
- Assess the View: Stand in the carport. Where exactly is the annoying view coming from? You may not need a full wall; perhaps a 6-foot wide panel is enough.
- Check the Floor: Is it concrete, gravel, or dirt? This dictates whether we bolt down post bases or dig holes for concrete footings.
- Measure the Car: Open all car doors. Measure the total width needed. Add 36 inches for walking space. This tells me how thick the privacy wall can be.
- Select the Style: Look at your house siding. If you have vinyl siding, a wood slat wall adds necessary warmth. If you have a brick house, a metal or painted screen might offer better contrast.
Final Checklist: Planning Your Privacy Screen
Before you buy materials, ensure you have ticked these boxes:
- Measurements: Double-check the height. 6 feet is standard for privacy, but 5 feet might be enough if you are sitting in a car.
- Airflow: Have you planned for gaps or vents to reduce wind pressure?
- Maintenance: Are you willing to stain wood every two years? If not, choose aluminum or vinyl.
- Lighting: Have you planned where the wires will run if you add lights to the new wall?
- Permits: Have you called your local building department to ask about “accessory structure” codes?
FAQs
What is the cheapest way to add privacy to a carport?
The most budget-friendly option is usually heavy-duty outdoor curtains or drop cloths mounted on a galvanized pipe rod. Alternatively, tall potted plants can be cost-effective if you choose fast-growing species.
Can I turn my carport into a garage with these ideas?
Adding privacy screens is not the same as converting to a garage. A true garage requires a foundation check, fire-rated walls, electrical code updates, and a permit. Privacy screens are usually considered “fencing” or “landscaping,” which is easier to approve.
How do I secure privacy panels to concrete?
You will need to use a hammer drill and masonry anchors (like wedge anchors or Tapcons). You install a metal post base into the concrete, and then slide your wooden 4×4 post into that base.
Will privacy screens reduce the value of my home?
Generally, no. If done well, they add value by increasing the usable square footage and curb appeal. However, DIY jobs that look flimsy or mismatched can detract from the home’s value.
Conclusion
Transforming your carport from a fishbowl into a private retreat is one of the most satisfying weekend projects you can undertake. It changes the way you interact with your home from the moment you pull into the driveway.
Whether you choose the architectural look of wood slats, the softness of velvet-textured greenery, or the resort feel of curtains, the key is intentionality. Treat the carport like a room, not just a slab of concrete.
By respecting scale, materials, and local codes, you can build a privacy solution that looks like it has always been there—creating a peaceful entry for you and your family every single day.
Picture Gallery


