
Charming Cabin Ceiling Ideas for Cozy Retreats
Introduction
When you walk into a cabin, your eyes naturally drift upward. Whether it is a soaring A-frame peak or a snug, low-slung loft, the ceiling sets the entire tone for the structure. I often tell my clients that the ceiling is the “fifth wall,” yet it is frequently the most neglected surface in renovation projects. A well-designed ceiling can transform a dark, cramped room into a warm, architectural masterpiece.
In my years designing mountain retreats and lakeside cottages, I have seen how the right material choice overhead changes the acoustics, the lighting, and the perceived size of a room. You might be dealing with existing popcorn textures you want to hide, or perhaps you are building from scratch and need to decide between heavy timber trusses and sleek tongue-and-groove paneling. The goal is always the same: to create a space that feels safe, enclosed, and deeply relaxing.
If you are looking for visual inspiration to guide your renovation, be sure to scroll down because I have curated a comprehensive Picture Gallery at the end of the blog post. Before we get to the visuals, let’s dive into the practical design rules, material options, and structural considerations you need to know to get this right.
1. Wood Paneling and Planking Styles
Wood is the quintessential material for cabin ceilings. It provides immediate warmth, texture, and that signature scent of cedar or pine that we associate with vacation homes. However, simply slapping wood boards onto the ceiling is not a design strategy. The width of the board, the direction of the run, and the specific joinery profile matter immensely.
Shiplap vs. Tongue and Groove
Shiplap has become a household term, but true shiplap has a distinct “nickel gap” or L-shaped notch that allows boards to overlap. This creates a strong shadow line between boards. In a cabin, this offers a clean, modern-rustic look. Tongue and groove (T&G), on the other hand, fits tightly together. T&G is generally better for insulation and preventing dust from settling in gaps, which is a practical consideration for cabins that might sit empty for weeks.
Board Direction and Room Scale
The direction you run your ceiling planks will dictate how the room feels. Running boards parallel to the longest wall will make a room feel longer, resembling a bowling alley. I usually prefer running boards perpendicular to the longest wall or across the joists. This visual trick widens the room and makes narrow cabin living spaces feel more expansive.
Designer’s Note: Handling Wood Movement
Real wood expands and contracts with humidity and temperature changes. This is especially volatile in cabins that may not be climate-controlled year-round.
The Lesson: I once worked on a project where the contractor installed T&G pine tight against the walls during a humid summer. By winter, the dry air caused the wood to shrink, revealing gaps and unpainted drywall strips.
The Fix: Always acclimate your wood inside the room for at least 7-10 days before installation. Leave a small expansion gap (about 1/4 inch) at the perimeter of the room, which can be covered by crown molding or trim.
2. Exposed Beams and Trusses
Exposed beams add architectural weight and history to a home. In a cabin, they provide a rhythm to the ceiling that breaks up large expanses of drywall or wood paneling. There is a fine line, however, between charming structure and a heavy, oppressive ceiling.
Structural vs. Faux Box Beams
If you are building new, you can expose the actual structural rafters. However, for most renovations, we use box beams. These are hollow U-shaped structures made from lightweight wood that are installed over existing drywall or paneling. The major advantage of box beams is utility; you can run electrical wiring for chandeliers or ceiling fans inside the hollow beam, solving the common cabin issue of having nowhere to hide wires.
Rules of Proportion
Scale is critical here. A common mistake is using beams that are too small for the room height, making them look like toothpicks.
- Ceilings under 8 feet: Use shallow beams (4 inches deep maximum) or skip them entirely to avoid head-clearance issues.
- Ceilings 9-10 feet: A 6×6 or 6×8 inch beam looks proportional.
- Vaulted Ceilings: You need mass here. 8×8 or even 10×10 beams are necessary to hold their own against the volume of the room.
Common Mistakes + Fixes: The “Ladder” Effect
The Mistake: Installing beams too close together. This creates a busy, ladder-like look that lowers the ceiling visually and makes the room feel cluttered.
The Fix: Space your beams 4 to 6 feet apart on center. If your room is particularly long, wider spacing is usually better. It allows the ceiling material underneath to breathe and reflect light.
3. Painting and Finishes for Low Ceilings
Not every cabin has a cathedral ceiling. Many are cozy, older structures with flat, eight-foot (or lower) clearances. In these spaces, the “wood box” effect—where floors, walls, and ceilings are all stained the same dark color—can feel claustrophobic.
The Power of Whitewash
If you love the grain of wood but hate the darkness, whitewashing is your best friend. This involves watering down white latex paint (usually a 1:1 or 1:2 ratio of water to paint) and brushing it on, then wiping it off. This neutralizes the orange tones in pine while keeping the wood grain visible. It reflects light, making the ceilings feel higher, without losing the rustic texture.
Matte vs. Satin Finishes
For cabin ceilings, I almost exclusively specify flat or matte finishes. Wood ceilings, especially rustic ones, have imperfections. Satin or semi-gloss sheens will catch the light and highlight every dent, uneven joint, or rough patch. A matte finish absorbs light and hides these irregularities, creating a soft, velvety look that feels more high-end.
Two-Tone Approaches
A classic designer trick for adding height is to paint the ceiling planking white (or a very light cream) while keeping the exposed beams in a natural wood stain. This draws the eye upward to the contrast. It provides the airy feeling of a drywall ceiling but retains the architectural interest of the timber structure.
4. Alternative Materials: Metal and Texture
If you want to move away from the traditional wood look, there are durable materials that add immense character. These choices are often great for specific zones, like a kitchen or a mudroom, to differentiate them from the main living area.
Corrugated Metal
For an industrial-rustic vibe, corrugated galvanized metal is a durable option. It reflects light beautifully, which helps brighten dark corners. However, it creates a very specific “barndominium” aesthetic. To keep it from looking like a garage, pair it with warm wood trim and substantial lighting fixtures.
Acoustic Considerations with Metal
Metal reflects sound. In a lively cabin with kids and dogs, a metal ceiling can make a room echo.
What I’d do in a real project: If installing corrugated metal, I always insist on installing a layer of sound-dampening material or rigid foam insulation behind the metal sheets. This reduces the tinny echo and prevents the metal from rattling when doors are slammed.
Pressed Tin
For a vintage or Victorian-era cabin vibe, pressed tin tiles are stunning. They work exceptionally well in kitchens or dining nooks. They are now available in PVC versions that mimic the look of metal but are easier to cut, lighter to install, and immune to rust—a major plus for humid lakeside properties.
5. Lighting Strategies for Cabin Ceilings
You cannot design a ceiling without designing the lighting plan simultaneously. In cabins, which often feature dark walls and floors, the ceiling is your primary reflector of light. If you mess this up, the room will feel like a cave regardless of how many windows you have.
Layering Light Sources
Relying on a single central fixture is the death of ambiance. You need three layers:
- Ambient: This is your general fill light. In vaulted ceilings, recessed cans are often ineffective because they are too far away. Instead, use track lighting mounted on beams or uplighting concealed on top of cabinets to bounce light off the ceiling.
- Task: Pendants over the kitchen island or reading lamps.
- Accent: This highlights the ceiling itself. Consider a chandelier that directs light upward and outward, rather than just down, to illuminate the timber work.
Hanging Heights for High Ceilings
A common error in vaulted rooms is hanging the chandelier too high. It ends up floating in “no man’s land.”
The Rule: For a dining table, the bottom of the fixture should be 30 to 36 inches above the table surface. For a living room, the bottom of the fixture should be at least 7 feet off the floor for clearance, but visually, it needs to connect with the living space, not the rafters. If you have a two-story great room, your chandelier needs to be massive—think 30 to 40 inches in diameter minimum—to hold its own.
Kelvin Temperature
Never use “Daylight” (5000K) bulbs in a cabin. The blue light makes wood look sickly and cold. Stick strictly to 2700K (Warm White) or 3000K (Soft White). This enhances the natural reds and yellows in the wood and stone, creating that cozy fire-lit glow.
Final Checklist: What I’d Do in a Real Project
If I were consulting on your cabin renovation today, this is the exact workflow I would use to ensure the ceiling is a success.
Step 1: Structural Assessment
- Check for water damage or roof leaks before covering anything up.
- Determine if the existing joists can support the weight of real wood beams, or if we need to use faux box beams.
Step 2: Define the Vibe and Scale
- Small/Low room? Go with whitewashed T&G boards running perpendicular to the longest wall.
- Large/Vaulted room? Go with natural stained pine and substantial cross beams.
Step 3: Lighting Pre-Wire
- Map out where the dining table and sofa will go.
- Run wiring for ceiling fans and chandeliers before the planking goes up.
- Add dimmers to every single switch.
Step 4: Material Acclimation
- Buy the wood 2 weeks early.
- Stack it in the room with spacers (stickers) between layers for air flow.
Step 5: Installation and Finish
- Install with blind nailing (nails hidden in the tongue) to reduce the need for wood filler.
- Apply the finish (stain or paint) on the ground before installation if possible. It is much easier to touch up later than to paint overhead.
FAQs
How do I clean high cabin ceilings?
Dust and cobwebs are inevitable, especially on rough-hewn beams. I recommend an extending telescopic pole with a microfiber duster attachment. For rough wood that snags cloths, use a vacuum attachment with a soft bristle brush. You generally only need to do this twice a year.
Is wood paneling more expensive than drywall?
Yes. Material costs for T&G pine are higher than sheetrock, and the labor is more intensive because of the precision cutting required. However, wood is much more durable and doesn’t require the sanding, priming, and painting cycles that drywall does. It is an investment that pays off in longevity and style.
Can I install wood paneling over a popcorn ceiling?
In many cases, yes. This is a great way to encapsulate popcorn texture without the messy scraping process. You will need to locate the ceiling joists through the popcorn and screw furring strips (1×3 wood strips) into the joists. Then, you nail your new wood planks into the furring strips. This lowers the ceiling by about an inch but saves days of messy labor.
Does a wood ceiling make a room darker?
Natural wood absorbs light, so it can darken a room if you don’t compensate. If you have small windows, consider a light stain, a whitewash, or installing plenty of indirect lighting. If you choose a dark walnut stain, ensure your walls are light (cream or white) to balance the visual weight.
Conclusion
Your cabin ceiling is more than just structural protection from the elements; it is the canopy under which your family memories are made. Whether you opt for the dramatic flair of exposed heavy timber trusses or the quiet, clean lines of whitewashed shiplap, the key is intentionality.
Don’t let the “fifth wall” be an afterthought. By considering the scale of your room, the warmth of your lighting, and the texture of your materials, you can create a retreat that feels cohesive and professionally designed. Take your time with the material selection, measure twice, and always prioritize that warm, inviting atmosphere that makes a cabin a home.
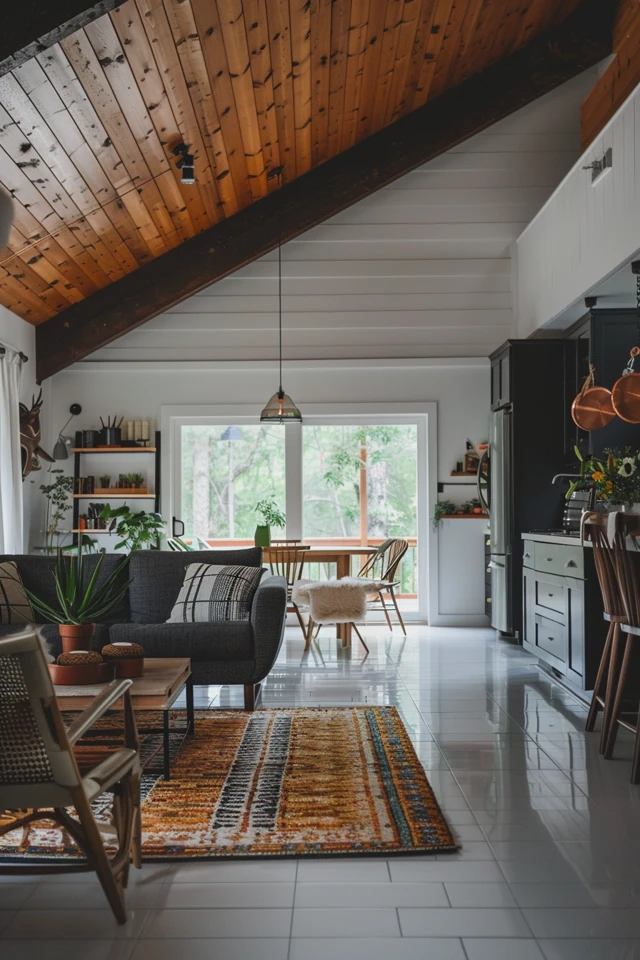
Picture Gallery


