
Title: Charming Minecraft Gazebo Ideas for Your Build
Introduction
Adding a gazebo to your Minecraft world is one of the most effective ways to transform a flat landscape into a curated garden or town square. These structures serve as visual anchors, drawing the eye and providing a designated gathering spot that breaks up the monotony of endless grass blocks. Whether you are building in survival mode or designing a creative masterpiece, the right gazebo balances open-air freedom with architectural structure.
However, getting the proportions right can be tricky, often leading to boxy shapes or roofs that feel too heavy for their supports. If you are looking for visual inspiration, jump to our curated Picture Gallery at the end of the blog post to see these concepts in action. In this guide, I will walk you through the design principles I use to create charming, structurally sound gazebos that elevate your entire build.
At-a-Glance: Key Takeaways
- Scale Matters: Always build using odd numbers (5×5, 7×7, or 9×9) to ensure you have a distinct center block for your roof peak.
- Material Palette: Stick to a “60-30-10” rule for materials: 60% primary block (wood planks), 30% secondary (stone or stripped logs), and 10% accent (fences/lanterns).
- Roof Profile: Avoid simple pyramids; use a mix of stairs and slabs to create a bell curve or A-frame shape for a more elegant silhouette.
- Lighting: Integrate lighting into the structure itself (hanging lanterns or hidden glowstone) to keep the area spawn-proof without spamming torches.
- Grounding: Never place a gazebo directly on grass; always build a foundation or podium to give the structure weight and importance.
What This Style Means (and Who It’s For)
A “charming” gazebo style in Minecraft generally refers to a build that prioritizes texture, depth, and environmental integration over massive scale or industrial lines. This style leans heavily on traditional architectural elements like vaulted roofs, open archways, and organic detailing using leaf blocks and vines. It is the digital equivalent of a cottage-core aesthetic or a classic English garden structure.
This approach is perfect for players who want to add storytelling elements to their world. If you are a survival player who wants a safe spot to fish or craft that isn’t inside a walled bunker, this style is for you. It is also ideal for builders looking to connect different buildings in a village; a gazebo acts as a “transition space” that makes the path from your house to your farm feel intentional and designed.
The Signature Look: Ingredients That Make It Work
To achieve a charming aesthetic, you need to move beyond basic oak planks. The signature look relies on depth and block variation.
The Structural Frame
In real-world design, we talk about “bones.” In Minecraft, this is your frame. Stripped logs (Spruce or Dark Oak) are excellent for this because they offer a clean texture without the visual noise of bark, yet they still look sturdy enough to hold up a roof. Stone Brick walls or Cobblestone walls are also vital for the base of your pillars to prevent the wood from touching the dirt, which mimics real-world rot prevention logic.
The Texture Gradient
A flat wall or floor looks artificial. A charming gazebo uses a gradient or mix. For a stone floor, do not just use Stone Bricks. Mix in Cracked Stone Bricks, Andesite, and Mossy Stone Bricks. This technique, often called “texturing,” adds age and character to the build.
Softened Edges
Minecraft is a world of cubes, but a charming build tries to fight that. Using Trapdoors, Stairs, and Slabs softens the harsh 90-degree angles. Placing a Spruce Trapdoor at the base of a pillar or using upside-down stairs under the roof overhang creates curves and arches that make the structure feel welcoming rather than rigid.
Layout & Proportions (Designer Rules of Thumb)
As a designer, I see many players struggle because they start building without calculating the footprint. In Minecraft, one block is roughly one meter. This means a 3×3 interior is tiny—it feels like a closet. Here are the rules of thumb I use for proper spacing.
The Odd-Number Rule
Always plan your foundation in odd numbers. A 5×5 circle (or square) allows for a single center block. This is crucial for your roof. If you build a 4×4 or 6×6 base, your roof will have a 2-block wide peak, which looks flat and chunky. A 1-block center point allows for a sharp, elegant spire or finial.
Height-to-Width Ratio
A common mistake is making the roof too short. A good rule is that the roof height should be at least equal to the pillar height. If your pillars are 4 blocks tall, your roof should rise at least 4 blocks from the eaves to the peak. This prevents the “mushroom” look where a massive roof sits on tiny legs.
Clearance Zones
Steve (the player) is 2 blocks tall. However, a 2-block high ceiling feels claustrophobic. Your lowest beam or archway should be at least 3 blocks high. This allows you to hang lanterns or chandeliers without banging your head on them.
Step-by-Step: How to Recreate This Look
Here is a workflow for a standard 7×7 circular-style gazebo. This size is versatile enough for an enchanting table or a small seating area.
Step 1: The Foundation
Dig out a 7×7 area. Layout a circle shape (typically a cross with the corners filled in, or a 3-1-3 pattern on each side). Fill this with your flooring material. Raise the foundation one half-slab above the surrounding ground level. This elevation change is critical for definition.
Step 2: The Pillars
Place pillars on the diagonal corners or the cardinal points, depending on your desired openness. For a 7×7 build, pillars usually go on the corners of the “circle.” Build these pillars 4 blocks high using Stripped Spruce Logs or Stone Brick Walls.
Step 3: The Ring Beam
Connect the tops of your pillars with horizontal logs or upside-down stairs. This creates the visual frame that holds the roof. This ring beam defines the interior volume.
Step 4: The Roof Frame
Find your center point. Build a temporary dirt pillar up 4 or 5 blocks from the center. Run slabs or stairs from your ring beam up to this center point. This creates the “ribs” of your roof.
Step 5: Filling and Detailing
Fill in the roof between the ribs using a contrasting material. If the ribs are Cobblestone, make the fill Spruce Planks. Once the roof is on, go back to the pillars. Add fences or trapdoors between them to create railings, leaving one or two sides open for entry.
Budget Breakdown: Low / Mid / Splurge
In Minecraft, “budget” refers to resource scarcity and biome dependence.
Low Budget (Starter Base)
- Materials: Oak Logs, Cobblestone, Oak Stairs.
- Why it works: These materials are available instantly. You can make a lovely gazebo using unstripped logs and basic stone.
- Design Tip: Use fences as pillars instead of full blocks to save wood and keep the structure looking light.
Mid Budget (Established World)
- Materials: Stripped Spruce Wood, Stone Bricks (and variants), Lanterns, Dark Oak Trapdoors.
- Why it works: You have iron for lanterns and stone cutters for brick variants. Stripped wood adds a refined finish that looks more “constructed” and less rustic.
- Design Tip: Incorporate campfire smoke (hidden in the roof) for a chimney effect if the gazebo houses a fire pit.
Splurge (End-Game / Creative)
- Materials: Quartz Pillars, Deepslate Tiles, Copper (waxed/oxidized), Sea Lanterns, End Rods.
- Why it works: High contrast. The white Quartz against dark Deepslate is striking and modern. Copper allows for a unique green roof that mimics real-world patina.
- Design Tip: Use End Rods as lighting fixtures or hanging supports—they offer a sleek, magical look that torches cannot match.
Common Mistakes (and How to Fix Them)
Designer’s Note: The most frequent issue I encounter when fixing builds is “over-detailing.” Players discover trapdoors and buttons and cover every surface with them. This creates visual noise. The eye needs a place to rest.
Mistake 1: The Flat Pyramid Roof
Many players just wrap stairs around and around until they hit the center. This looks like a boring triangle.
The Fix: Vary the slope. Use a pattern of “Stair, Stair, Slab” or “Block, Stair” to change the angle. Flare the bottom out with slabs to give it a bell curve shape.
Mistake 2: Poor Lighting Levels
A dark gazebo is a creeper spawner. Placing torches on the floor is ugly.
The Fix: Hide lighting. Dig a hole under your center table or carpet, place a Glowstone or Sea Lantern, and cover it with a colored Carpet or a Moss Carpet. The light passes through, keeping the area safe but the source invisible.
Mistake 3: Floating Pillars
Wood pillars placed directly on grass look like they are unconnected to the earth.
The Fix: “Key” the build into the ground. Replace the grass block under the pillar with Coarse Dirt, Podzol, or a Stone block. Add bushes or leaf blocks around the base to simulate overgrown landscaping.
Room-by-Room Variations
A gazebo frame can serve many functions depending on the interior layout.
The Enchanting Tower
Use a 7×7 layout. Place the Enchanting Table in the center and arrange bookshelves in the 1-block perimeter required for Level 30. The open-air nature prevents the room from feeling cramped, while the roof protects the books from the rain (aesthetically speaking).
The Fishing Dock
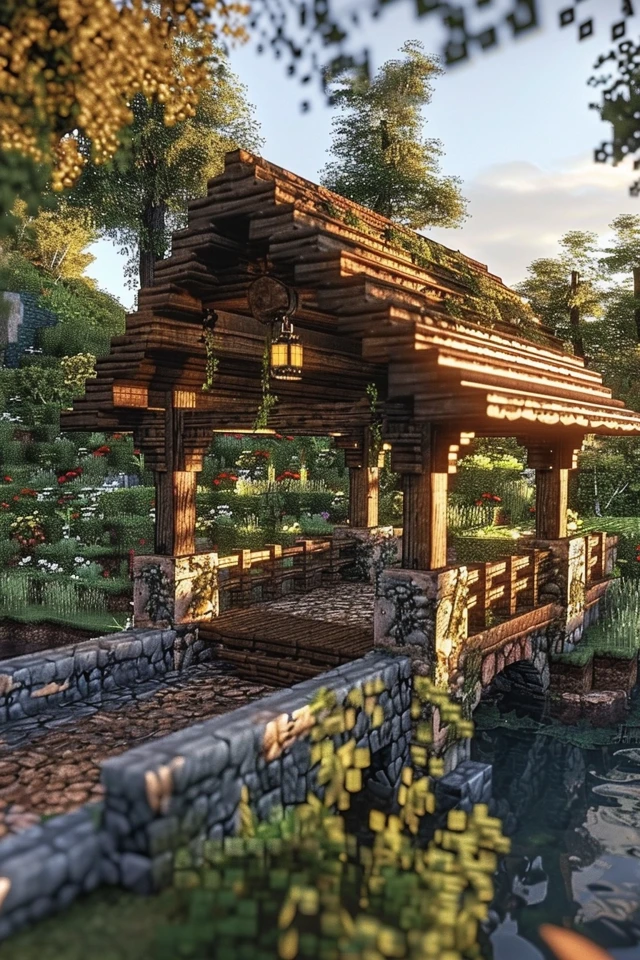
Build the gazebo extending over a body of water. Swap the solid floor for Fence Gates or Trapdoors to let water be seen below. Use barrels as storage for fish and rods. The open sides allow you to cast your line in any direction.
The Nether Hub Outlook
If building in the Nether, use Warped Stem (blue wood) and Blackstone. A gazebo here acts as a safe viewing platform. Ensure the floor is bottom-slabbed to prevent spawns. Use tinted glass panes between pillars to protect against Ghasts while keeping the view.
Finish & Styling Checklist: What I’d Do in a Real Project
Here is my personal checklist to finish a gazebo and make it feel “lived-in.”
- Hanging Flora: Place Glow Berries or Flowering Azalea Leaves hanging from the roof eaves.
- Seating: Use Spruce Stairs with signs on the side to create armchairs. Angle them slightly inward to encourage conversation.
- Texture the Path: Do not let the path just end at the stairs. Blend the path blocks (Dirt Path, Gravel, Coarse Dirt) into the surrounding terrain.
- Centerpiece: Every gazebo needs a focal point. A small flower pot, a lantern on a fence post, or a cake on a table works wonders.
- Banner Art: Use banners hanging from the roof beams to add color and simulate fabric curtains blowing in the wind.
FAQs
What is the best wood combination for a cozy look?
Spruce and Oak are the classic “cozy” combo. Use Stripped Spruce for the frame (dark/warm) and Oak Planks for the floor (lighter/inviting). Avoid Birch unless you are doing a very specific modern or beach theme, as it can look washed out.
How do I stop mobs from spawning on the roof?
If you use Slabs or Stairs for your roof, mobs generally cannot spawn on them. However, ensure there are no full solid blocks on the roof surface. If you have a flat top, place a stone button, carpet, or pressure plate on it to spawn-proof it.
Can I build a gazebo on a diagonal?
Yes, but it is advanced. Diagonal builds require a zigzag foundation. The roof is the hardest part. You will need to rely heavily on slabs to bridge the gaps. It creates a very dynamic look but requires patience to get the symmetry right.
Conclusion
Building a charming gazebo in Minecraft is an exercise in restraint and proportion. By sticking to odd-numbered layouts, choosing a cohesive material palette, and paying attention to how the structure meets the ground, you can create a feature that feels like a professional design element. Remember that the goal is to create a space that invites you to pause and appreciate your world.
Picture Gallery


