
Charming Rustic Walk-In Shower Ideas for Homes
There is something undeniably grounding about starting your day surrounded by natural textures. A rustic walk-in shower transports you from a busy morning routine to a quiet moment that feels more like a cabin retreat or a mountainside spa. The blend of raw materials and modern plumbing creates a sanctuary that is both rugged and refined.
Many homeowners shy away from rustic designs because they fear the space will look dark or dated. However, contemporary rustic design is about balance—pairing rough-hewn stone with sleek glass, or warm wood tones with crisp plumbing fixtures. It is about capturing the essence of the outdoors without sacrificing the functionality of a modern bathroom.
Whether you are planning a full gut renovation or just updating your finishes, this guide will walk you through the practical steps of designing a rustic shower. For incredible visual examples of these concepts, be sure to scroll down to the Picture Gallery at the end of this blog post.
1. Selecting Materials: The Texture Balance
The soul of a rustic shower lies in the materials you choose. In standard bathroom design, we often aim for sleek and glossy surfaces, but rustic design demands texture.
The goal is to introduce “perfect imperfections.” You want materials that feel substantial and organic, rather than manufactured and sterile.
Natural Stone and Its Imitators
Natural stone is the gold standard for this aesthetic. Slate, travertine, and river rock are top choices because they offer distinct color variation and texture.
However, real stone requires maintenance. It is porous and needs regular sealing to prevent mold and soap scum buildup.
If you love the look but hate the maintenance, look for high-definition porcelain tile. Modern porcelain can mimic the cleft of slate or the veins of travertine with incredible accuracy, requires zero sealing, and is often more affordable.
The Wood-Look Solution
Wood in a shower is generally a recipe for disaster due to rot and warping. However, the rustic look heavily relies on timber elements.
The solution is wood-look porcelain tile. I frequently specify this for shower walls or floors to bring in that warm, sauna-like atmosphere without the risk of water damage.
Designer’s Note:
One of the biggest mistakes I see in DIY rustic showers is using large-format tiles on the shower floor. You need traction. If you are using natural stone or tile on the floor, use a mosaic format (2×2 inches or smaller). The high density of grout lines provides the necessary slip resistance for wet feet.
Mixing Metals
Your choice of metal finish will dictate the era of the rustic look.
- Oil-Rubbed Bronze: The traditional choice. It feels aged and warm, pairing perfectly with beige travertine or brown slate.
- Matte Black: A modern farmhouse approach. It creates a high contrast against lighter tiles and looks sharp and industrial.
- Unlacquered Brass: For a “lived-in” luxury feel. This living finish will patina over time, developing spots and darkening, which adds to the charm.
2. Layout and Scale: Function Meets Form
A walk-in shower feels luxurious because of its openness. However, getting the dimensions right is critical to keeping the water in and the cold air out.
If you are removing a tub to build a walk-in shower, you are likely working with a footprint of about 30 inches by 60 inches. This is a standard size, but it can feel narrow for a rustic design that uses heavy textures.
The Doorless Debate
True rustic showers often feature a doorless, walk-in entry. This eliminates the visual barrier of glass and hardware.
To make this work, you need depth. I recommend a minimum shower depth of 42 inches to go doorless, but 60 inches is ideal to prevent splashing onto the bathroom floor.
If your space is smaller, you will need a glass panel or a door. To keep the rustic vibe, consider a framed glass door in black metal or a barn-style sliding glass door with exposed roller hardware.
Space Planning Rules of Thumb
- Elbow Room: The absolute minimum width for a shower is 30 inches per code, but I never design anything narrower than 36 inches. Ideally, aim for 42 inches wide for a comfortable experience.
- Valve Placement: Place your shower valve near the entrance, not directly under the showerhead. You should be able to turn the water on without getting wet.
- Ceiling Height: If you are tiling to the ceiling (which you should for a high-end look), ensure your ceiling is waterproofed. Steam rises, and drywall will eventually fail in a heavy-use shower.
3. Lighting the Cave: Ambience vs. Visibility
Rustic bathrooms can easily become dungeon-like if you aren’t careful. Slate, dark grout, and wood tones absorb light rather than reflecting it.
You cannot rely on a single vanity light across the room to illuminate your shower. You need dedicated task lighting inside the wet zone.
The Temperature Matters
The color of your light (Kelvin rating) changes how your materials look.
- 2700K (Warm White): Cozy, but can make stone look yellow or muddy.
- 3000K (Soft White): The sweet spot. It is crisp enough to show true colors but warm enough to feel relaxing.
- 4000K (Daylight): Avoid this in rustic spaces. It turns a spa atmosphere into a clinical operating room.
Layering Light
I always include a recessed can light rated for wet locations directly over the showering area.
For a true designer touch, consider adding a waterproof LED strip light in a niche or under a floating bench. This creates a soft glow that highlights the texture of the stone walls without blinding you during a late-night shower.
Common Mistake & Fix:
Mistake: Placing a light directly over the center of the shower floor.
Fix: Place the light closer to the back wall (the wall with the most tile/stone feature). This is called “wall grazing.” The light skims down the surface, emphasizing the texture of the rustic stone.
4. Fixtures and Hardware: Industrial Charm
In a rustic shower, the plumbing fixtures are more than just functional tools; they are architectural elements.
You want fixtures that look like they have a history. This is not the place for futuristic, touch-screen digital showers.
Exposed Piping
Exposed pipe shower systems are incredibly popular in rustic designs. These systems mount the hot and cold water pipes on the surface of the wall rather than hiding them behind the tile.
This adds a fantastic industrial-vintage layer to the design. It works exceptionally well against white subway tile or light gray stone.
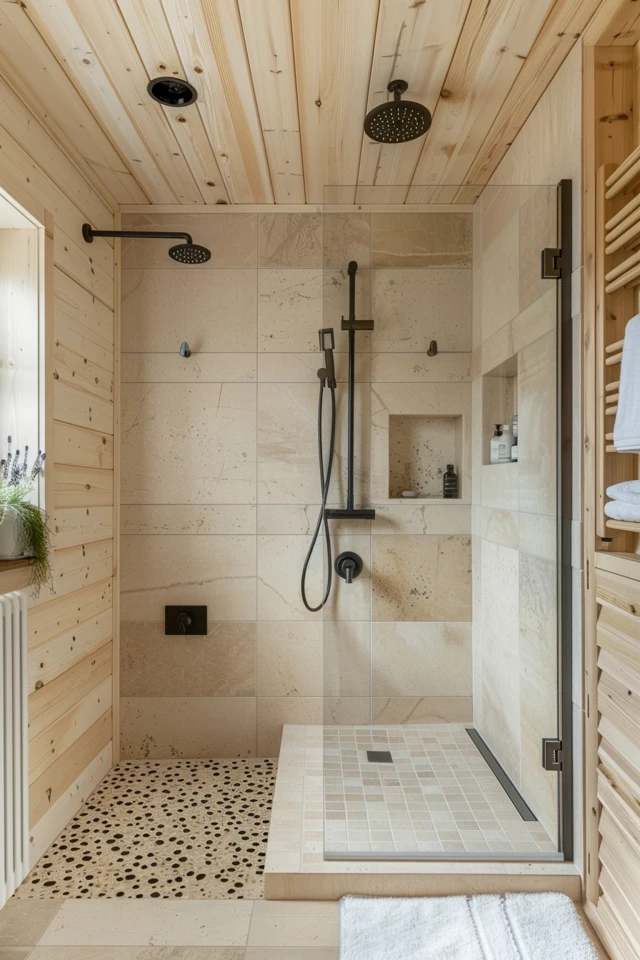
The Shower Head Setup
For the ultimate experience, I recommend a dual setup:
- Rain Head: Mounted from the ceiling or high on the wall. This provides the relaxing, soaking experience.
- Handheld Wand: Mounted on a slide bar. This is non-negotiable for cleaning the shower and for washing pets or muddy feet.
Drain Design
Don’t forget the drain. A standard round chrome drain can look cheap in a beautiful stone floor.
Use a linear drain (trench drain) for a cleaner look. You can even get “tile-in” linear drains where the drain cover is filled with the same stone as the floor, making the plumbing virtually invisible.
5. Storage and Seating: Built-In Features
Rustic design is practical at its core. You need space for shampoo, soap, and a place to rest.
Plastic shower caddies hanging from the pipe will ruin the aesthetic immediately. Storage must be built-in.
The Niche
A recessed niche is standard, but size matters.
Standard pre-fab niches are often 12×12 inches. This is rarely enough space for modern bottles. I prefer a wide, horizontal niche that spans the length of the wall.
Measurements to Know:
- Height: Make the niche at least 14 inches tall to accommodate family-sized pump bottles.
- Placement: Avoid placing niches on exterior walls if you live in a cold climate. The recess removes insulation, which can cause the niche to freeze or tiles to crack.
Seating Options
A bench adds instant luxury and is great for aging in place.
- Built-in Bench: This is a solid structure tiled to match the walls. It is permanent and sturdy. Top it with a solid slab of stone (like granite or quartz) rather than small tiles for comfort.
- Floating Bench: A slab of stone anchored into the wall that floats above the floor. This looks more modern and makes the floor easier to clean.
- Teak Bench: If you don’t have the budget for a built-in, a freestanding teak stool is a perfect rustic addition. The wood warms up the space, and you can remove it when you need more room.
Designer’s Checklist: What I’d Do in a Real Project
If I were designing a rustic shower for a client today, here is the exact formula I would follow to ensure success:
- Floor: 2-inch hexagonal tumbled marble (provides grip and hides dirt).
- Walls: 12×24 inch porcelain tile that mimics slate, installed in a brick pattern.
- Grout: Dark charcoal or epoxy grout. White grout in a rustic shower is a cleaning nightmare.
- Fixtures: Exposed pipe system in a brushed nickel or matte black finish.
- Lighting: One 4-inch recessed wet-rated can light (3000K) grazing the back wall.
- Glass: Frameless glass panel (3/8 inch thick) treated with a hydrophobic coating to repel water spots.
- Accessories: A heavy teak stool and organic cotton towels.
Frequently Asked Questions
How do I clean rough stone in a shower?
Rough stone holds soap scum more than smooth tile. You need a stiff bristle brush and a pH-neutral stone cleaner. Avoid vinegar or acidic cleaners, especially on travertine or marble, as they will etch the stone.
Is a rustic shower expensive to build?
It can be. Natural stone and labor-intensive tile patterns cost more than standard white fiberglass inserts. To save money, use ceramic tile for the walls and save the expensive natural stone for the floor or a feature strip.
Can I have a rustic shower in a small bathroom?
Absolutely. Use lighter colored “rustic” tiles (like a whitewashed wood look or light beige travertine) to keep the room feeling airy. Use a clear glass enclosure to let the eye travel the full depth of the room.
Do I need to waterproof behind the tile?
Yes. Tile and grout are not waterproof; they shed water, but moisture gets through. You must use a waterproofing system (like RedGard, Schluter-Kerdi, or a traditional mud bed with a liner) behind the tile. This is the most important part of the build.
Conclusion
Creating a charming rustic walk-in shower is about more than just picking out brown tiles. It is about layering textures, ensuring ample lighting, and respecting the flow of the room.
By combining the durability of modern materials with the aesthetic of raw stone and wood, you create a space that is timeless. It serves as a daily escape, grounding you before you start your day or helping you decompress at the end of it.
Take your time selecting your materials. Touch them. Ideally, wet them to see how the color changes. With careful planning and the right measurements, you can bring the tranquility of nature right into your home.
Picture Gallery


