
Chic Basement Corner Bar Ideas for Your Home
Transforming a basement corner into a dedicated bar area is one of the most rewarding home improvement projects you can tackle. It turns a dark, underutilized storage area into the social heart of the home. I remember one specific client project where a dusty corner filled with holiday decorations became a stunning moody speakeasy. The change in energy was palpable; suddenly, the homeowners had a destination within their own house.
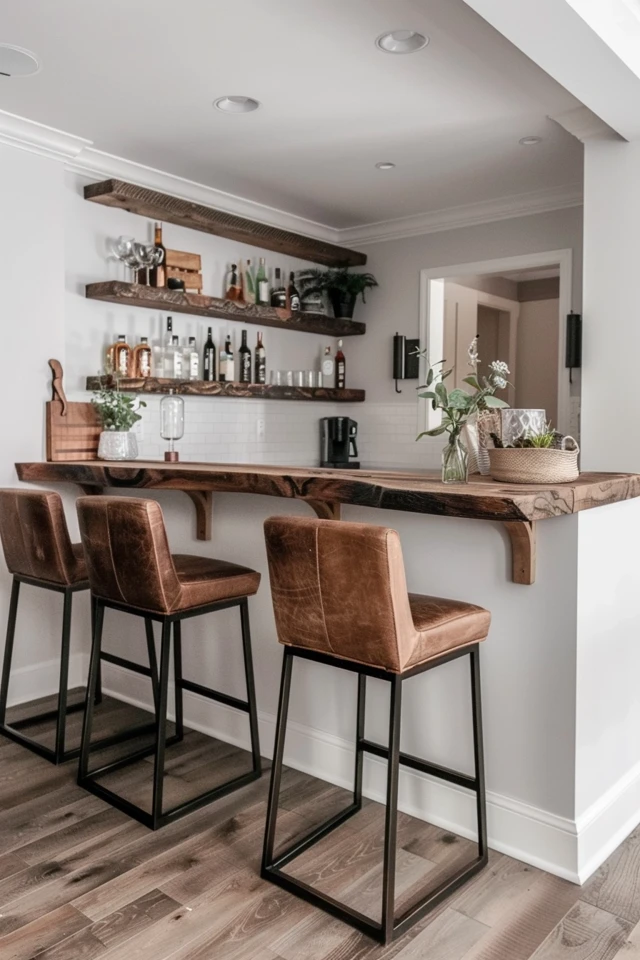
However, designing below grade comes with unique challenges, from low ceiling heights to limited natural light. Be sure to check out our curated Picture Gallery at the end of this blog post for visual inspiration. In this guide, I will walk you through the practical steps, measurements, and design choices needed to create a basement bar that looks high-end and functions perfectly.
Whether you have a massive recreation room or a tight nook under the stairs, these principles apply. We will cover everything from layout logic and lighting hacks to the specific materials that withstand basement humidity.
1. Planning the Layout: Dimensions and Flow
Before you buy a single cabinet, you need to understand the spatial constraints of your corner. In interior design, we often say that a bad layout costs the same to build as a good one, but it costs a lot more to fix later. A corner bar needs to be efficient.
First, determine if you are building a “wet bar” or a “dry bar.” A wet bar includes a sink and requires plumbing, which significantly increases the budget and complexity. If your basement corner is near a bathroom or laundry room, tapping into existing lines is easier. If not, you might need a pump system to move waste water up to the main line.
Once you decide on plumbing, look at your footprint. A standard bar counter depth is 24 inches, similar to a kitchen counter. However, if you are building a bar with seating on one side and a workspace on the other, you need to account for overhangs and walkways.
Designer’s Note: The Golden Rule of Spacing
In a real project, the biggest mistake I see is not leaving enough room for the “bartender.” You need a minimum of 36 inches of clearance between the back bar (cabinetry against the wall) and the front bar (where people sit). If you have the space, 42 inches is ideal. Anything less than 36 inches will feel cramped, especially if you have an open dishwasher or fridge door.
Here are the critical vertical measurements you need to know:
- Standard Bar Height: 42 inches. This pairs with 30-inch barstools.
- Counter Height: 36 inches. This pairs with 24-inch counter stools.
- Bar Overhang: For comfortable seating, you need at least 10 to 12 inches of overhang for knee space.
If your corner is very small, consider an “L-shaped” layout against the walls rather than a peninsula. This opens up the floor space and prevents the room from feeling closed off. You can use a round pub table nearby instead of integrated bar seating to keep the flow dynamic.
2. Mastering Basement Lighting
Lighting is the make-or-break element in a basement. Because you likely don’t have windows in your corner, you have to manufacture the ambiance. A single overhead can light makes a space feel like an interrogation room. You need layers.
Start with your task lighting. This is the light that helps you slice limes or pour drinks. Under-cabinet LED strips are essential here. They are inexpensive, easy to install, and they highlight your backsplash, adding depth to the corner.
Next, address the ambient lighting. If you have a drop ceiling or drywall, recessed cans are standard. However, pay attention to the “color temperature.” For a cozy bar atmosphere, stick to 2700K (warm white) or 3000K (soft white). Avoid 4000K or 5000K bulbs, which look like clinical daylight and will make a basement feel cold and sterile.
Common Mistakes + Fixes
Mistake: Hanging pendants too low.
Fix: In a basement, ceilings are often only 7 or 8 feet high. If you hang a pendant light over the bar, ensure the bottom of the fixture is at least 30 to 32 inches above the counter surface. If your ceilings are lower than 7.5 feet, skip the pendants and use flush mounts or semi-flush fixtures to avoid visual clutter and head-bumping hazards.
Finally, add accent lighting. This is where the “chic” factor comes in. Consider installing glass shelving with integrated LED clips or backlit mirrors. A mirror placed behind the bar reflects the room and the lights, effectively doubling the visual space and brightening the dark corner.
3. Selecting Materials for Durability and Style
Basements have a different microclimate than the rest of the house. They are cooler and prone to higher humidity levels. The materials you choose for your corner bar need to be stable and moisture-resistant.
For flooring, I almost always recommend Luxury Vinyl Plank (LVP) or porcelain tile for basement bars. Hardwood can warp or cup due to the moisture coming up through the concrete slab. LVP creates the warm look of wood but is completely waterproof and much friendlier on the budget.
When choosing countertops, think about maintenance.
- Quartz: The top choice for bars. It is non-porous, meaning spilled red wine or citrus juice won’t stain or etch the surface. It requires zero sealing.
- Granite: Durable and heat resistant, but it requires annual sealing to prevent stains.
- Wood/Butcher Block: This adds incredible warmth and fits a rustic aesthetic, but it requires vigilance. You must seal it with a high-quality marine-grade varnish or Waterlox to prevent water damage around the sink.
What I’d Do in a Real Project
If I were designing a chic basement bar today, I would use a matte-finish quartz in a dark charcoal or soapstone look. It hides fingerprints, looks sophisticated, and is virtually indestructible. I would pair this with brass hardware to add warmth to the dark stone.
For cabinetry, be wary of cheap particle board boxes if your basement has any history of dampness. Plywood construction is more stable. If you are on a tight budget, look for metal cabinetry or open shelving solutions, which are impervious to moisture and create a trendy industrial vibe.
4. Storage and Appliance Integration
A corner bar is small, so every inch of storage matters. You don’t have the luxury of a full kitchen’s worth of cabinets, so you must be selective about what you keep there.
Prioritize an under-counter beverage cooler. This is the workhorse of the basement bar.
Warning: Do not buy a standard mini-fridge intended for a dorm room and shove it into a cabinet. You must buy a “zero-clearance” or “front-venting” beverage center. Standard fridges vent heat out of the back. If you enclose them in cabinetry without ventilation, they will overheat and die quickly.
For glassware, consider glass-front upper cabinets or open floating shelves. This keeps the corner from feeling heavy or boxy. Displaying your glassware and liquor bottles turns your storage into decor.
Mini Checklist for Storage:
- Drawer stack: You need at least one drawer for bottle openers, napkins, and stirrers.
- Trash pull-out: Don’t forget the trash! A small 15-inch pull-out bin keeps the ugly trash can off the floor.
- Liquor risers: If you use deep shelves, use tiered acrylic risers so you can see the labels on the bottles in the back.
If you are a renter or don’t want to commit to built-ins, a freestanding bar cart or a vintage sideboard can serve as an excellent anchor. You can flank it with tall bookcases to simulate the look of built-ins without the construction cost.
5. Styling the Atmosphere
Once the bones are in place, styling brings the “chic” element to life. The basement is the perfect place to take design risks you might be afraid to take in your main living room. Dark, moody colors work exceptionally well in windowless corners because they embrace the lack of light rather than fighting it.
Consider painting the walls and the cabinetry the same color—a technique called “color drenching.” A deep navy, forest green, or charcoal gray creates a cozy, immersive experience.
Texture is Key
Since basements can feel cold and concrete-heavy, you need to introduce softness.
- Rugs: Place a vintage-style runner behind the bar or a plush area rug in the seating area. Ensure it is a low-pile synthetic blend that resists mold.
- Barstools: Choose upholstered stools with backs. Leather or high-performance velvet adds a touch of luxury and comfort. Avoid cold metal stools if you want people to linger.
- Wall Treatments: A brick veneer backsplash, shiplap, or even a bold wallpaper can define the zone. In a corner bar, treat the backsplash as art.
Don’t forget the “jewelry” of the room: the hardware. If you have dark cabinets, unlacquered brass or polished nickel handles will pop. If you have light cabinets, matte black hardware creates a modern, graphic contrast.
Final Checklist: The Designer’s Review
Before you consider your project finished, run through this checklist. These are the small details that separate a DIY look from a professional finish.
- Outlet Placement: Did you install outlets above the counter for a blender or phone charger? Ensure they are GFCI protected if they are within 6 feet of a sink.
- Toe Kick: Did you install a toe kick (the recessed space at the bottom of the cabinet)? Without it, you cannot stand comfortably close to the counter to work.
- Dimmers: Is every light fixture on a dimmer switch? This is non-negotiable for setting the mood.
- Ventilation: If you have a wet bar, is the drain vented properly? A “cheater vent” (air admittance valve) usually works well under the sink if you can’t vent through the roof.
- Flooring Protection: Did you put felt pads on the bottom of your barstools? This protects your LVP or tile from scratches.
FAQs
What is the difference between a wet bar and a dry bar?
A wet bar includes a sink and running water, while a dry bar does not. A wet bar is more functional for washing glasses and preparing mixed drinks, but it is significantly more expensive due to plumbing costs. A dry bar is essentially a cabinetry and counter setup for storage and serving.
Can I use a standard kitchen cabinet for a bar?
Yes, absolutely. Standard kitchen base cabinets are 24 inches deep and 34.5 inches tall (36 inches with countertop). These work perfectly for bars. You can also use “wall cabinets” (which are 12 inches deep) as base cabinets if you have a very narrow space, though you will need to build a custom base for them.
How much space do I need for a corner bar?
At a minimum, you need about 4 feet by 4 feet of floor space for a small L-shaped setup. If you want a sit-down bar with stools, you generally need an area of at least 6 feet by 8 feet to accommodate the bar depth, the stool space, and the walkway behind the stools.
Is a basement bar a good investment?
Yes. While it might not add square footage to your home appraisal, a finished basement with a functional bar is a high-desire feature for buyers. It implies a lifestyle of entertaining and adds significant “wow” factor during open houses.
Conclusion
Creating a chic basement corner bar is about balancing practical constraints with bold design choices. By respecting the measurements, choosing moisture-smart materials, and layering your lighting, you can turn a forgotten nook into the most popular seat in the house.
Don’t be afraid to go dark with your color palette or invest in that beautiful quartz countertop. Since the square footage is small, you can often afford higher-quality finishes than you could in a full-sized kitchen. Take your time planning the layout, ensure your “bartender” has room to move, and enjoy the process of building your personal speakeasy.
Picture Gallery


