
Title: Chic Circular Raised Garden Bed Ideas for Yards
Introduction
There is something inherently calming about curves in a landscape. While modern architecture often relies on sharp angles and rigid grids, nature prefers the organic flow of a circle. In my years of designing outdoor spaces, I have found that introducing circular raised garden beds is the single most effective way to soften the hard lines of a fence or a rectangular patio. It draws the eye immediately, creating a focal point that feels intentional rather than utilitarian.
I recently worked on a project where the homeowner felt their backyard looked too “boxy.” We replaced their rotting rectangular planters with a cluster of three galvanized steel rounds at varying heights. The transformation was instant. The yard felt larger because the lack of corners allowed the eye to travel continuously across the space. If you are looking for visual inspiration, make sure to visit our extensive picture gallery at the end of this blog post.
Beyond aesthetics, circular beds offer surprising functional benefits. They are often more accessible, allowing you to reach the center from any angle without awkward stretching. Whether you are growing culinary herbs, ornamental grasses, or a riot of colorful perennials, the circular form frames your plants like a living bouquet. In this guide, we will explore how to style, place, and build these chic features to elevate your landscape design.
Why Choose Circular Over Rectangular?
When we design interiors, we talk a lot about “flow,” and the same rules apply outdoors. Rectangular beds mirror the shape of the property line, which can reinforce a feeling of confinement in small yards. Circular beds break that grid. They create negative space between the curve of the planter and the straight edge of a lawn or fence, which actually makes a compact garden feel more spacious.
From an ergonomic standpoint, circles are superior for maintenance. In a standard 4-foot by 8-foot rectangular bed, the corners are often “dead zones” where soil compacts and weeds thrive because they are hard to reach with a hoe. With a round bed, typically 3 to 5 feet in diameter, you have a consistent reach radius. You can navigate around the entire perimeter with a wheelbarrow without ever getting snagged on a sharp corner.
Designer’s Note: The “Softening” Effect
I often use circular beds as a transition tool. If you have a harsh concrete patio that drops off abruptly into the grass, placing a large circular planter slightly overlapping that edge blurs the line. It bridges the hardscape and softscape. However, a common mistake is using a single, small circle in the middle of a large lawn. This looks like a “flying saucer” that landed by accident. Always anchor your circles near architecture or group them in clusters to create a sense of place.
Material Selection for Your Aesthetic
The material you choose for your circular bed dictates the entire vibe of the garden. Because you cannot easily build a circle out of standard lumber without complex joinery, you are often nudged toward more interesting, durable materials. Here is how I select materials based on the home’s architectural style.
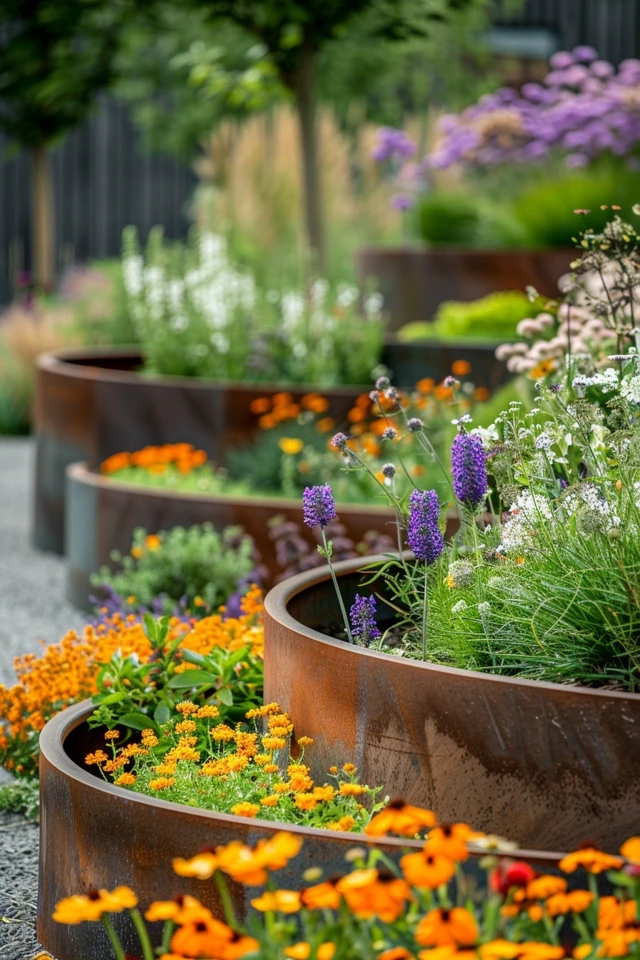
Corten Steel (Weathering Steel)
For modern, industrial, or desert-chic landscapes, Corten steel is the gold standard. It arrives looking like fresh steel but weathers to a protective, rust-colored patina within a few months.
- The Look: Sleek, warm, and architectural. The thin profile (usually 1/8 inch) saves space compared to stone.
- Durability: excellent. It can last decades without rotting.
- Designer Tip: Use a pre-rusted finish if you do not want to wait for the patina. Be careful placing these on light-colored concrete pavers, as the initial runoff can stain the ground during the first rainy season.
Galvanized Stock Tanks
This is the darling of the “modern farmhouse” movement. Originally meant for livestock water troughs, they are affordable and practically indestructible.
- The Look: Bright, reflective, and casual. They look fantastic paired with gravel pathways.
- Modifications: You absolutely must drill drainage holes in the bottom. I recommend drilling at least four to six half-inch holes per tank.
- Heat Factor: Metal heats up. In very hot climates, line the interior walls with a layer of landscape fabric or cardboard to prevent the hot metal from burning the roots of delicate plants.
Woven Willow or Wattle
For cottage gardens or English-style landscapes, woven branches offer incredible texture.
- The Look: Natural, rustic, and soft. It blends seamlessly with greenery.
- Lifespan: This is a temporary material. Expect it to last 3 to 5 years before the wood breaks down. It is best for annuals or vegetable crops where you rotate the soil often.
- Liner: You must use a burlap or landscape fabric liner to keep the soil from washing out through the weave.
Stacked Stone or Brick
This is the most permanent and traditional option. It requires a skilled mason or a very handy DIYer to cut the angles correctly.
- The Look: Timeless, heavy, and substantial. It matches traditional brick homes perfectly.
- Installation: For a dry-stack wall (no mortar), keep the height under 24 inches to ensure stability. If you go higher, you will need a concrete footing and mortar.
Layout, Spacing, and Scale
Placement is where most homeowners get it wrong. A garden bed is furniture for your yard. You wouldn’t place a coffee table five feet away from the sofa, and you shouldn’t place a garden bed in a spot that interrupts the flow of traffic.
The Rule of Three
In design, odd numbers are more pleasing to the eye than even numbers. A cluster of three circular beds is visually stronger than two.
- Vary the Heights: Try one bed at 12 inches high, one at 18 inches, and one at 24 inches. This creates a tiered effect that adds depth to the garden.
- Vary the Diameters: If you are clustering, you can mix a 4-foot diameter tank with two 2-foot diameter tanks.
- Overlap Views: When viewed from your main window, the beds should slightly overlap visually, creating a layered composition rather than a straight line of soldiers.
Clearance and Walkways
You need to move around these beds comfortably.
- Minimum Path Width: Leave at least 30 inches between beds for walking.
- Wheelbarrow Width: If you plan to bring a wheelbarrow or garden cart between them, increase the spacing to 36 or 42 inches.
- Mower Access: If the beds are set in grass, space them far enough apart that your lawnmower deck fits easily. There is nothing more frustrating than having to weed-whack between tight circles because the mower wouldn’t fit.
Sun Mapping
Before you place anything, watch the sun for a day.
- South-Facing: Ideal for vegetables and sun-loving flowers.
- Shadow Casting: Remember that a tall circular bed (like a 30-inch high tank) will cast a shadow. Place shorter beds on the south side of taller beds so the tall ones don’t shade out the small ones.
Soil, Drainage, and Planting Strategies
A raised bed is a container, and container gardening requires different physics than planting in the ground. Because circular beds often have vertical sides, they drain faster and warm up quicker in the spring.
The Soil Recipe
Do not fill your chic circular bed with plain dirt from your yard. It will compact into a brick. You need a fluffy, aerated mix.
- The 60/30/10 Mix: I recommend 60% high-quality topsoil, 30% organic compost (mushroom compost is great), and 10% drainage material like perlite or vermiculite.
- The “Lasagna” Method: To save money on soil, fill the bottom third of deep beds (over 24 inches) with logs, sticks, and dried leaves. This decomposes over time, feeding the soil, and improves drainage. This is often called Hugelkultur.
Planting in the Round
Design the plant layout to be viewed from 360 degrees.
- Centerpoint (The Thriller): Place your tallest architectural plant in the dead center. This could be a Rosemary bush, a dwarf fruit tree, or a structural grass like Miscanthus.
- Middle Ring (The Filler): Surround the center with medium-height mounding plants. Zinnias, kale, or bushy basil work well here.
- Outer Edge (The Spiller): Soften the hard edge of the circle with trailing plants. Nasturtiums, creeping thyme, or sweet potato vines should cascade over the side. This blurs the line between the container and the garden.
Styling and Aesthetics
Once the beds are built and planted, the styling details are what elevate the look from “farm” to “chic sanctuary.”
Hardscaping the Base
Never place a circular bed directly on top of turf grass. The grass will grow up the sides, and the mower will scratch the finish of the bed.
- The Gravel Halo: Dig out a circle that is 6 to 12 inches wider than your bed. Fill this ring with pea gravel or crushed granite. This creates a tidy frame and makes mowing simple.
- Paver Foundations: For heavy stone beds, a level foundation of compacted sand and pavers is essential to prevent the circle from sinking unevenly over time.
Lighting
Lighting brings the circles to life at night.
- Uplighting: Place a small low-voltage spotlight in the gravel halo, aimed up at the side of the planter. This highlights the texture of the material (especially cool on corrugated metal or stone).
- Path Lights: Use path lights with rounded heads to mimic the shape of the beds. Place them in the voids between the circles to illuminate the walkway.
Common Mistakes + Fixes
Mistake: Buying beds that are too small. A 12-inch diameter pot is a pot, not a raised bed.
Fix: Aim for a minimum diameter of 30 inches for a standalone garden bed. This provides enough soil volume to retain moisture during hot summer days.
Mistake: Ignoring irrigation. Round beds are harder to water with square grid sprinklers.
Fix: Install a drip irrigation line. Run the main line up through the bottom of the bed (if open) or over the back edge. Use a drip ring that spirals around the plants for even coverage.
What I’d Do in a Real Project
If I were designing a medium-sized backyard today, here is the exact specification I would use to ensure a high-end look:
1. Material: 14-gauge Corten Steel.
2. Quantity: Three rounds.
3. Dimensions: One 4-foot diameter (18″ high), one 3-foot diameter (24″ high), and one 2-foot diameter (30″ high).
4. Placement: Clustered in a loose triangle shape in a corner of the yard that receives morning sun.
5. Base: A kidney-bean shaped area of 3/8″ crushed grey gravel to unify the three beds.
6. Planting: The largest bed gets a dwarf Japanese Maple (centerpiece). The medium bed gets a mix of purple coneflowers and black-eyed Susans. The tall, narrow bed gets trailing white Bacopa and English Ivy.
Final Checklist
Before you order materials or start digging, run through this quick list to ensure you have covered all the bases.
- Measure Twice: Have you marked the circles on the ground with spray paint to verify the scale?
- Check Access: Can you easily walk between the painted circles?
- Water Source: Is there a hose bib nearby, or do you have a plan for drip irrigation?
- Level Ground: Is the ground relatively flat? If not, do you have tools to level the site?
- Drainage: If using metal tanks, do you have a drill and metal bits for drainage holes?
- Soil Delivery: Have you calculated the cubic yards of soil needed? (Radius x Radius x 3.14 x Height).
FAQs
How deep should a circular raised bed be?
For most vegetables and flowers, 12 to 18 inches is sufficient. If you are planting root vegetables (like carrots) or shrubs, aim for 24 inches. If you want to sit on the edge while gardening, 18 to 24 inches is the ideal seat height.
Are metal raised beds safe for growing food?
Yes. Modern galvanized steel and Corten steel are safe for vegetable gardening. The zinc used in galvanization is a naturally occurring micronutrient. However, avoid using old industrial scraps or painted metal unless you know the history of the paint (to avoid lead).
Do circular beds cost more than rectangular ones?
Generally, yes, if you are buying pre-fabricated kits. Rolling metal or cutting stone into curves requires more manufacturing effort than straight cuts. However, using stock tanks is a very cost-effective “hack” that is often cheaper than building a quality cedar rectangular bed.
How do I keep grass from growing into the bed?
If the bed has an open bottom, place a layer of thick cardboard or heavy-duty landscape fabric at the very bottom before adding soil. This smothers the grass below. The weight of the soil will keep it suppressed.
Conclusion
Circular raised garden beds are more than just a trend; they are a design solution that brings softness, flow, and improved ergonomics to your yard. By stepping away from the rigid rectangles that dominate most landscapes, you create a space that feels more organic and welcoming.
Whether you opt for the rusty warmth of Corten steel or the rustic charm of woven willow, the key is to pay attention to scale, spacing, and the “floor” beneath the beds. Remember to group them in clusters for maximum impact and invest in quality soil to keep your plants thriving. With the right planning, these curves will become the favorite feature of your outdoor home.
Picture Gallery


