
Title: Chic Outdoor Toilet Ideas for Pool Area Oasis
Introduction
There is one specific moment every pool owner dreads. It is seeing a trail of wet, muddy footprints leading from the patio door, across the living room rug, and into the main hallway bathroom. It damages hardwood, creates slip hazards, and disrupts the flow of indoor-outdoor living.
Creating a dedicated outdoor toilet or “pool bath” is the ultimate solution to this problem. However, this space does not have to look like a utility closet or a temporary structure. It should be an extension of your landscape design, offering a spa-like retreat that guests actually enjoy using.
In this guide, we will cover everything from strategic layout planning to selecting materials that withstand the elements. For a dose of visual inspiration, don’t miss the curated Picture Gallery at the end of this blog post.
1. Strategic Placement and Layout Flow
The success of a pool toilet relies entirely on location. If it is too far from the water, children will not use it. If it is too close to the lounging area, privacy becomes an issue.
I always recommend placing the structure within 20 to 30 feet of the pool edge. This distance is manageable for quick trips but allows for visual separation. You want to avoid placing the door directly facing the main social gathering spots or the dining table.
If you are working with an existing structure, consider the “sight lines” from the pool loungers. Can you screen the entrance with landscaping? A simple trellis or a staggered entry wall can solve privacy concerns without requiring a door lock.
Minimum Space Requirements
You do not need massive square footage for a functional pool bath. Here are the minimum comfortable dimensions I use for client projects:
- Toilet and Sink only: 3 feet by 5 feet (15 square feet) is tight but functional. 4 feet by 6 feet is standard.
- Toilet, Sink, and Changing Area: Aim for at least 30 to 40 square feet. You need room to swing elbows while changing out of a wet swimsuit.
- Full Wet Room (Toilet, Sink, Shower): 5 feet by 8 feet (40 square feet) is the sweet spot.
The “Wet Path” Rule
Always plan the path from the pool to the toilet door. This path must be slip-resistant and heat-resistant.
Avoid dark slate tiles on this walkway, as they scorch bare feet in summer. Light-colored travertine or textured concrete pavers are superior choices.
Designer’s Note:
One project I worked on had the pool bath located around a corner that required walking through a patch of grass. It was a disaster. Grass clippings ended up all over the bathroom floor instantly. We had to retroactively install stepping stones. Always connect the pool deck to the bathroom with a solid surface.
2. Material Selection: Durability Meets Style
Indoor bathrooms have climate control; outdoor toilets do not. The materials you choose must handle humidity, direct UV exposure, and potentially freezing temperatures depending on your climate.
Flooring Essentials
Your number one priority here is slip resistance. When tile is wet, it becomes dangerous. Look for tiles with a dynamic coefficient of friction (DCOF) rating of 0.42 or higher.
I often specify textured porcelain tile for these spaces. It mimics natural stone but is non-porous and easy to bleach down. Another excellent option is honed natural stone, but it requires annual sealing.
Wall Treatments
Drywall is rarely a good idea for an outdoor-accessible bathroom. The humidity fluctuates too wildly, leading to mold and peeling tape seams.
Instead, consider these robust alternatives:
- Tadelakt or Micro-cement: This provides a seamless, waterproof, plaster-like finish that feels very Mediterranean and chic.
- Shiplap (PVC or Cedar): Use marine-grade woods or synthetic alternatives that look like wood but won’t rot. Install them vertically to draw the eye up.
- Full-height Tile: Tiling from floor to ceiling is the most hygienic option. It allows you to hose down the entire room if necessary.
Fixtures and Hardware
Standard chrome fixtures will pit and rust outdoors, especially in saltwater pool environments. You need marine-grade materials.
I recommend unlacquered brass or 316-grade stainless steel. Unlacquered brass will develop a patina over time, turning a beautiful verdigris color that looks organic and intentional.
Common Mistake & Fix:
Mistake: Using standard indoor cabinetry for the vanity.
Fix: Moisture will blow out particle board vanities in a single season. Use a floating pedestal sink (stone or concrete) or a teak vanity. Teak is naturally oil-rich and resists water rot.
3. Ventilation and Climate Control
Because these spaces are often small and enclosed, heat buildup is a major issue. A hot, stuffy outdoor toilet is an unpleasant experience.
Natural Airflow
If privacy allows, install a window high on the wall (clerestory window). This lets hot air escape and brings in natural light without compromising privacy.
Louvered doors are another classic solution. They allow air to pass through the door even when it is locked. This prevents that damp, musty smell common in pool houses.
Mechanical Ventilation
Even with a window, a strong exhaust fan is non-negotiable. You want to evacuate humidity rapidly to prevent mold growth on the ceiling.
Look for a fan with a humidity sensor. It will turn on automatically when moisture is detected and turn off when the air is dry. This is perfect for when guests leave wet towels inside.
Winterization Considerations
If you live in a zone with freezing winters, you must plan for winterization. The plumbing lines need to be insulated, and you ideally want a shut-off valve inside the main house so you can drain the outdoor lines in November.
What I’d Do in a Real Project:
For a luxury touch, I install a small wall-mounted oscillating fan in the corner. It keeps the air moving on stagnant August afternoons. It’s a small detail that guests appreciate immensely.
4. Chic Styling: creating the “Oasis” Vibe
Functionality is the baseline, but style is what makes it an “oasis.” Since this is a small space, you can afford to take big risks with design that might feel overwhelming in a main house.
Embrace Bold Wallpaper (Vinyl Only)
There are incredible outdoor-rated vinyl wallpapers available now. They can withstand moisture and temperature swings. A tropical leaf print or a bold geometric pattern can turn a small water closet into a jewel box.
The Vanity as a Focal Point
Since you don’t need massive storage for an outdoor bath (just extra toilet paper and soap), ditch the bulky cabinet.
I love using integrated concrete sinks. They look sculptural and modern. Pair a charcoal concrete sink with brass wall-mounted faucets for a look that screams “luxury resort.”
Mirror Placement
Do not settle for a small medicine cabinet. Go big. A floor-to-ceiling mirror behind the vanity can double the visual depth of a tiny room.
Make sure the mirror reflects something beautiful. Ideally, it should reflect the texture of the back wall or a view of the garden if the door is open.
Lighting Layers
Lighting makes or breaks the evening atmosphere. You need two layers:
- Task Lighting: Sconces flanking the mirror at eye level (roughly 60 to 66 inches from the floor). This prevents unflattering shadows on the face.
- Ambient Lighting: A small recessed light in the shower area or a soft LED strip under a floating vanity creates a glow that serves as a nightlight.
5. Privacy Screening and Landscaping Integration
The transition between the pool deck and the bathroom door should be soft and organic. You do not want the toilet to look like a phone booth dropped on the lawn.
Green Walls and Trellises
Use landscaping to “hide” the structure. A trellis with climbing jasmine not only softens the architectural lines but also adds a beautiful scent.
Bamboo is another excellent choice for screening. It grows fast and creates a dense, whispering wall that adds an auditory element to the spa vibe.
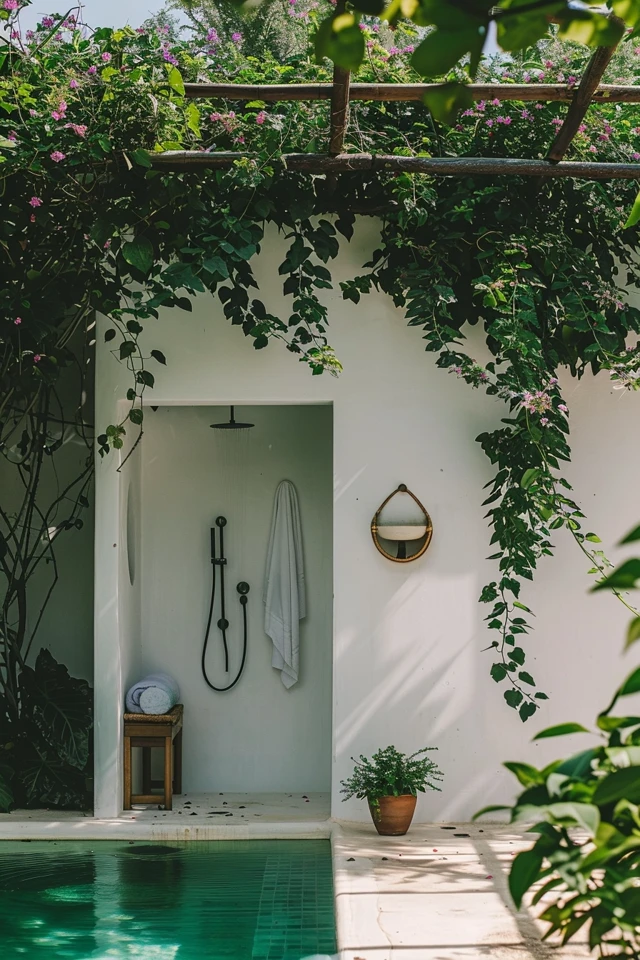
Outdoor Showers as a Buffer
A great layout trick is to place an outdoor shower on the exterior wall of the toilet structure. This creates a “wet zone” buffer.
Guests can rinse off chlorine before using the toilet or going inside. Surround this area with river rocks for drainage and planting pots for privacy.
The Privacy Screen Check
Stand in the pool and look at the proposed door location. If the door opens, what do you see?
If the sightline goes directly to the toilet, you need to change the door swing or add a privacy wall. A freestanding wall about 4 feet in front of the door allows for airflow but blocks the view.
Designer’s Note:
I always advise clients to install a “vacant/occupied” lock indicator hardware. It eliminates that awkward handle jiggle and makes guests feel much more secure in an outdoor setting.
6. Accessories and Practical Details
The difference between a good design and a great one is often in the accessories. These items need to be practical for wet environments.
The Towel Situation
You cannot have enough hooks. Guests will bring wet towels with them. Install a row of sturdy hooks at varying heights—some for adults, some lower for kids.
Avoid ring holders; towels slip off them too easily. Simple, deep pegs are best.
Waste Management
Do not use an open wastebasket. Outdoor areas attract insects. Use a sleek, pedal-operated bin with a tight-sealing lid. Stainless steel or plastic is best; wicker will mold.
Rug Selection
Skip the cotton bath mats. They will stay soggy forever.
Use a PET fiber rug (made from recycled plastic bottles) or a flatweave polypropylene rug. They look exactly like wool or jute but are completely waterproof and mold-resistant. You can pressure wash them when they get dirty.
Soap and Amenities
Use wall-mounted dispensers for soap and lotion. Loose bottles get knocked over and broken on hard tile floors.
Choose scents that complement the outdoors—eucalyptus, mint, or citrus. Avoid overly sweet vanilla scents that might attract bees and wasps.
Final Checklist: The Pool Bath Essentials
Before you break ground or finalize your decor, run through this checklist to ensure you haven’t missed a critical functional detail.
- Slip Test: Have you tested your floor tile sample with water?
- Drainage: Is there a floor drain in the center of the room for easy hose-down cleaning?
- Storage: Is there a waterproof spot to store extra toilet paper where it won’t get damp?
- Lighting: Are your light fixtures rated for damp or wet locations?
- Hooks: Do you have at least 4 heavy-duty hooks for wet towels?
- Ventilation: Do you have a plan for exhausting humid air?
- Privacy: Does the door swing direction protect privacy even if the door is slightly ajar?
- Trash: Do you have a lidded trash can to keep pests out?
FAQs
Does an outdoor toilet add value to my home?
Yes, absolutely. A permitted, plumbed outdoor half-bath is a significant value add, especially in warmer climates where outdoor living is a primary selling point. It effectively adds square footage to your functional living space.
How much does it cost to build a pool toilet?
Costs vary wildly based on existing plumbing. If you have to trench sewer lines 50 feet through concrete, it will be expensive. Generally, expect a range of $15,000 to $35,000 for a standalone structure with high-end finishes. Converting an existing shed is significantly cheaper.
Can I use a composting toilet to save on plumbing costs?
You can, and modern composting toilets are quite sleek. However, for a “chic oasis” vibe, a flush toilet is far superior. Composting toilets require maintenance that most homeowners eventually find tedious. If you want a true luxury feel, invest in the sewer connection or a septic tie-in.
What is the best color palette for a pool bath?
I recommend keeping it light and airy to avoid a “cave” feeling. Whites, creams, and sandy beiges work well. Accents of cool blues or greens connect the space to the pool water and garden. Avoid dark colors on the floor, as they show calcium deposits from drying water droplets.
Conclusion
Designing a chic outdoor toilet is about balancing the rugged durability required for exterior exposure with the soft, welcoming aesthetics of a high-end spa. By prioritizing slip-resistant materials, ensuring proper ventilation, and layering in thoughtful details like privacy landscaping and ample hooks, you solve the “wet feet” problem forever.
Your pool area will transition from a fun backyard feature to a fully cohesive living space. The investment in a dedicated bathroom protects your main home’s interiors and elevates the guest experience significantly.
Picture Gallery


