
Chic Stone and Shiplap Fireplace Ideas for Homes
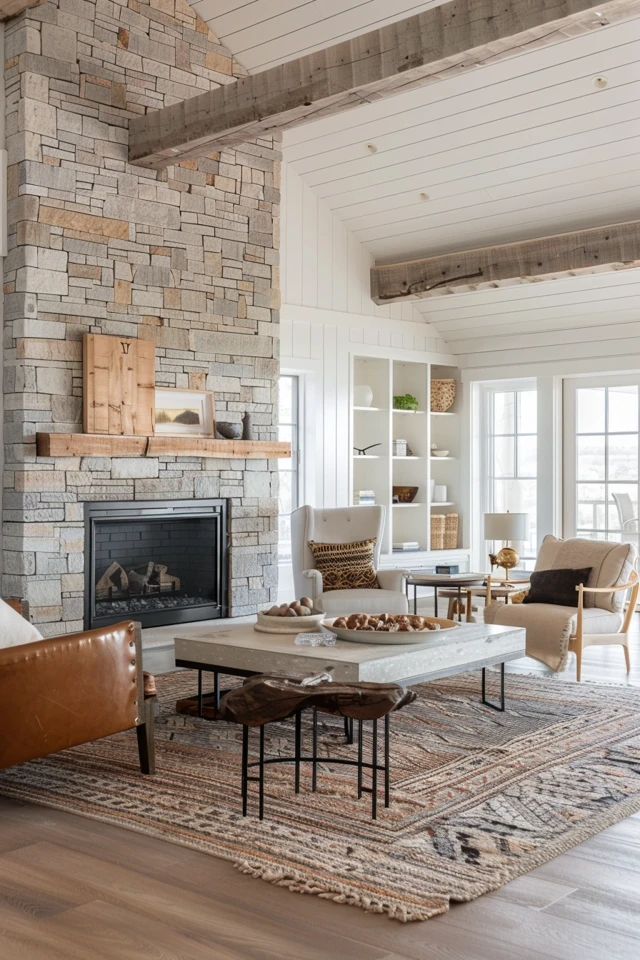
The combination of stone and shiplap is one of the most enduring design duos I use in residential projects. It perfectly balances the rustic, heavy texture of natural masonry with the clean, linear lines of woodworking. This pairing works because it creates visual tension that keeps the eye interested without overwhelming the space.
I remember my first project using this mix; the client was terrified the stone would look too “lodge-like” and the shiplap too “nautical.” By carefully selecting the scale of the stone and the paint sheen of the wood, we created a transitional masterpiece that felt timeless. If you want to skip the reading and see the finished looks, check out the Picture Gallery at the end of this blog post.
Whether you are renovating a 1990s builder-grade living room or designing a custom build, this guide will help you navigate the technical details. We will cover measurements, material selection, and the practical constraints of living with these finishes.
1. Establishing the Layout and Proportions
The first step in designing your fireplace wall is determining the ratio between stone and shiplap. A common mistake is splitting the materials 50/50, which can make the wall look disjointed or stacked like a layer cake.
I prefer a “Rule of Thirds” approach. Dedicate the bottom third of the vertical space to the stone surround and the hearth, leaving the upper two-thirds for the shiplap. This draws the eye upward and makes standard eight-foot ceilings feel significantly higher.
If you have vaulted ceilings, you can extend the stone higher, perhaps up to the mantle line at 60 inches. This grounds the fireplace and creates a solid architectural focal point. The shiplap then acts as a lighter, airy backdrop for the upper volume of the room.
For the hearth itself, consider a floating stone bench or a flush hearth installed level with your flooring. A raised hearth typically sits 18 inches off the floor, which provides extra seating for guests during parties.
2. Choosing the Right Stone Profile
“Stone” is a broad term, and the profile you choose dictates the entire vibe of the room. For a modern farmhouse look, I usually specify a “ledge stone” or “stacked stone” profile. These pieces are rectangular and fit tightly together, often without visible grout.
If your goal is a coastal or organic modern aesthetic, look for “fieldstone” or irregular river rock. These rounder shapes soften the sharp horizontal lines of the shiplap. However, be aware that irregular stones require a skilled mason to install correctly to avoid large, ugly mortar gaps.
Manufactured stone veneer is a practical choice for renovations because it is lightweight. It does not require a brick ledge or reinforced floor joists, which saves thousands in structural work. High-quality veneers from brands like Eldorado Stone or Cultured Stone are virtually indistinguishable from real rock.
When selecting color, always bring a sample box into your actual room. Stone reads differently depending on your natural light exposure. A “cool gray” stone can turn surprisingly blue in a north-facing room, clashing with warm wood floors.
3. Mastering the Shiplap Details
True shiplap has a rabbet joint that allows the boards to overlap, creating a tight seal. However, most interiors today use “nickel gap” boards. These are tongue-and-groove boards specifically milled to leave a consistent 1/8-inch gap between planks.
The size of the gap matters. A true nickel gap is sharp and modern. A wider quarter-inch gap feels more rustic and historic. For most living rooms, I stick to the nickel gap to keep the dust accumulation minimal.
Board width is another crucial design decision. Standard shiplap boards are usually 5 to 6 inches wide. If you have a large, two-story wall, those narrow boards can look busy and cluttered.
For grand spaces or high ceilings, step up to an 8-inch or even 10-inch board width. This scales the texture to the room size. It creates a calming, expansive feel rather than a busy striped pattern.
4. Integration with Technology and Mantles
One of the biggest challenges in modern fireplace design is the television. If you plan to mount a TV over the fireplace, the shiplap provides an excellent way to hide wires.
During the framing stage, install a “smurf tube” or conduit behind the shiplap. This runs from behind the TV down to a side cabinet where your cable box and game consoles live. This keeps your beautiful woodwork free of dangling black cords.
Your mantle acts as a heat shield for the TV. Most codes and TV manufacturers require a specific clearance to prevent heat damage to electronics. A solid wood beam mantle typically needs to be at least 12 inches below the bottom of the TV.
For the mantle material, I love using reclaimed rough-sawn oak to bridge the gap between the stone and the painted shiplap. The wood tone introduces warmth. If you want a sleeker look, a cast concrete mantle offers a contemporary, industrial edge.
5. Paint, Stain, and Finishes
The finish you apply to the shiplap will determine how durable and cleanable the surface is. I almost never recommend a flat or matte paint finish for fireplace shiplap.
Soot, dust, and heat can mar the surface over time. A satin or eggshell finish is much easier to wipe down. It also reflects just enough light to highlight the groove lines, emphasizing the texture.
For the stone, you generally leave it natural. However, if you are updating an existing, outdated red brick fireplace, you can whitewash it before adding the shiplap above. This is a budget-friendly way to get the look without demolition.
Coordinate your paint color with the stone’s undertones. If your stone has warm beige flecks, choose a creamy white like Benjamin Moore’s “White Dove.” If the stone is a cool slate gray, a crisp white like “Chantilly Lace” or “Decorator’s White” will look cleaner.
Designer’s Note: The Hearth Cap Mistake
Here is a lesson I learned the hard way on a project in Upstate New York. We installed a beautiful raised stone hearth, but we forgot to account for the “hearth cap” (the flat stone slab you sit on) overhang.
The mason installed the vertical stone veneer first, bringing it flush to the edge of the framing. When we put the cap on, it barely had any overhang, making it look cheap and unfinished.
Always ensure your hearth cap overhangs the vertical stone riser by at least one inch, ideally 1.5 inches. This creates a shadow line that hides imperfections. It also prevents heels from scuffing the vertical stone when people sit on the hearth.
Common Mistakes + Fixes
Mistake: Improper Lighting Placement
Homeowners often rely solely on recessed cans in the ceiling. This creates harsh shadows on the stone texture, making it look jagged and scary at night.
Fix: Install wall sconces on the shiplap section or a picture light above art. If possible, add an LED grazing light in the ceiling specifically aimed to wash down the front of the stone.
Mistake: Ignoring Combustible Clearances
Shiplap is wood, and wood burns. Bringing shiplap right down to the firebox opening is a code violation in almost every jurisdiction.
Fix: You must have a non-combustible material (the stone) surrounding the firebox opening. The National Fire Protection Association (NFPA) usually mandates at least 6 to 12 inches of non-combustible space, depending on the firebox size.
Mistake: Wrong Rug Size
A fireplace makes the room feel cozy, but a small rug ruins the scale. A 5×8 rug floating in front of a grand fireplace looks like a postage stamp.
Fix: Ensure the rug is wide enough to extend past the ends of the hearth. In an average living room, a 9×12 rug is usually the baseline to anchor the furniture to the fireplace focal point.
What I’d Do in a Real Project (Mini Checklist)
If I were designing a family living room with an 8-foot ceiling today, this is the exact specification list I would use to ensure success:
Material: Cultured Stone “Pro-Fit Terrain” in a light gray/taupe blend (easy installation, consistent shape).
Shiplap: 7-inch primed nickel gap boards made of MDF (smoother paint finish than pine).
Mantle: 6×6 solid White Oak beam, stained in “Minwax Weathered Oak,” set 54 inches from the floor.
Paint: Sherwin Williams “Alabaster” in Satin finish for the shiplap.
Hearth: A single slab of bluestone or limestone (no grout lines to clean) installed flush with the floor for safety.
TV Prep: A recessed media box installed behind the TV mount to allow the screen to sit flush against the shiplap.
Final Checklist for Your Project
Before you buy materials or hire a contractor, run through this list to make sure you have covered your bases.
1. Check Local Codes: Verify the required distance between your firebox opening and combustible materials (mantle and shiplap).
2. Measure Your Ceiling: Confirm if you need 6-inch or 8-inch boards to avoid slivers at the top.
3. Select Stone First: Pick the stone before the paint. It is easier to match paint to a rock than rock to a paint.
4. Plan Electrical: decide where outlets, cable hookups, and sconce junction boxes need to be before shiplap installation.
5. Order Samples: Get a physical sample of the stone and a painted board sample in the room to check color during day and night.
6. Determine Edge Treatment: Decide how the shiplap ends on the left and right. Will you use a corner trim piece or miter the edges?
FAQs
Can I install shiplap directly over existing drywall?
Yes, you generally can. Locate the studs behind the drywall and nail into them. However, if the drywall creates a depth issue with your existing window or door trim, you may need to remove the drywall first or add extension jams to your trim.
Is stone veneer cheaper than real stone?
The material cost is often similar, but the installation labor for veneer is significantly lower. Real stone requires a masonry ledge and takes much longer to lay. Veneer is lighter and faster, making it the budget-friendly choice for most interior retrofits.
How do I clean rough stone indoors?
Use a vacuum with a soft brush attachment to remove dust and spiderwebs from the crevices. For soot marks, use a mixture of warm water and a mild dish soap with a stiff nylon brush. Avoid wire brushes, as they can scratch the stone surface.
Can I use this look in a rental?
For renters, I recommend using peel-and-stick shiplap wallpaper or removable wood planks. For the “stone” element, there are high-quality faux stone panels made of high-density polyurethane that can be screwed into the wall and removed later.
Conclusion
Combining stone and shiplap creates a fireplace that feels both grounded and elegant. It bridges the gap between the rugged outdoors and the refined indoors, making it suitable for almost any architectural style.
Remember that the success of this look lies in the proportions. Avoid splitting the wall perfectly in half, and pay close attention to the scale of your materials relative to your ceiling height. Whether you choose a dramatic slate or a soft limestone, the contrast with the crisp painted wood will serve as a stunning anchor for your home.
Take your time selecting the right stone profile and always prioritize safety clearances. With careful planning, this is a renovation that adds significant value and comfort to your living space.
Picture Gallery


