
Chic Wet Bar Backsplash Ideas to Impress
The wet bar is often the “jewelry box” of the home. Because it is a smaller, distinct zone separate from the main kitchen, it offers a unique opportunity to take design risks. You can use darker colors, moodier lighting, and more expensive materials that might be cost-prohibitive in a larger space.
However, a wet bar has specific functional needs that differ from a standard kitchen or a powder room. You are dealing with alcohol, citrus acids from garnishes, and glassware storage, all in a compact footprint. The backsplash isn’t just a splash guard; it is the focal point that ties the cabinetry and shelving together.
If you are just looking for visual inspiration, you can scroll down to the Picture Gallery at the end of the blog post. Otherwise, keep reading for a professional breakdown of materials, measurements, and installation tips to get this space right.
1. Defining the Aesthetic: Material Selection
When selecting materials for a wet bar, I often encourage clients to step outside their comfort zone. Since the square footage is low, you can splurge on high-end materials without breaking the bank. The goal is to create a destination, not just a storage area.
Antique Mirror
Using an antique mirror is one of my favorite tricks for small, windowless alcoves. It reflects light, making the bar feel twice as deep, and adds a vintage, speakeasy vibe immediately. Unlike a standard clear mirror, the “antiqued” or “foxed” finish hides splashes and streaks much better.
Solid Stone Slabs
If your budget allows, running the countertop material up the wall is the epitome of luxury. This creates a seamless, clean look that is very easy to wipe down. If you choose a natural stone with heavy veining, like Calacatta marble or a dramatic quartzite, ensure the fabricator practices “vein matching” where the counter meets the wall for a continuous flow.
Metallic Finishes
A wet bar is the perfect place to introduce metal tiles. Brass, copper, or stainless steel mosaics can add warmth and reflect your accent lighting. Be aware that real unlacquered brass will patina and darken over time when exposed to splashes. If you want it to stay shiny, look for sealed metal or porcelain tiles with a metallic glaze.
Handmade Zellige or Ceramic
For a more organic, textural look, handmade tiles are excellent. They have irregular surfaces that catch the light beautifully. However, be mindful of the grout lines. In a wet bar, red wine spills are a real threat, so you will want to seal porous grout heavily or choose a darker grout color that won’t show stains.
2. Getting the Scale and Layout Right
In interior design, scale is everything. A common error DIYers make is choosing a tile format that is too large for the backsplash height, resulting in awkward cuts. You want the tile to look intentional, not like a leftover remnant.
Height Standards
The standard distance between a countertop and the bottom of upper cabinets is 18 inches. However, in a wet bar, we often adjust this. If you have a bar sink with a high-arc faucet, you need to ensure you have clearance. I often push the upper cabinets or shelves to 20 or 21 inches high in bar areas to allow for taller bottles and glassware display on the counter.
Ceiling-Height Impact
If you have open shelving instead of closed cabinets, I highly recommend tiling all the way to the ceiling. Stopping the tile partway up the wall creates a visual horizontal line that cuts the room in half and makes the ceiling feel lower. Taking the tile to the crown molding draws the eye up and makes the space feel grand.
Managing Outlets
Nothing ruins a chic backsplash like a stark white plastic outlet cover in the middle of a beautiful dark tile.
- The Fix: Use “Plugmold” strips tucked up underneath the upper cabinets so the backsplash remains uninterrupted.
- The Alternative: If you must have wall outlets, use Lutron or similar brands to color-match the receptacles and faceplates to your tile. If you are using a mirror backsplash, they make mirrored outlet covers specifically for this purpose.
3. Lighting Integration for Drama
Lighting changes how your backsplash material is perceived. In a wet bar, we are usually aiming for “moody” rather than “task-oriented” brightness. The way you light the backsplash can highlight texture or flatten it.
Grazing vs. Washing
If you choose a highly textured stone, like a split-face slate or a rough brick, you want to position your downlights or under-cabinet lights closer to the wall. This is called “grazing.” The light skims down the surface, creating dramatic shadows and highlighting the relief of the stone.
Managing Glare on Glossy Surfaces
If you select a high-gloss glass tile or polished metal, be careful with under-cabinet LED tape lights. If the LEDs are not in a diffuser channel, you will see the individual “dots” of light reflected in the backsplash, which looks cheap. Always use a milky diffuser lens on your LED channels to create a soft, solid bar of light.
Color Temperature
For a wet bar, I recommend a color temperature of 2700K or 3000K. Anything higher (like 4000K or 5000K) will look blue and clinical, more like a dentist’s office than a lounge. Warm light makes gold and wood tones glow and makes the backsplash feel inviting.
4. Durability and “The Acid Test”
A wet bar is a work zone. You are slicing lemons and limes, pouring red wine, and dealing with ice melt. The material you choose must be able to withstand acidic attacks and moisture.
The Problem with Marble
I love marble, but it is calcium-based. If a squirt of lime juice hits a honed marble backsplash and isn’t wiped up immediately, it will “etch.” Etching isn’t a stain; it is a chemical burn that leaves a dull mark. If you are a perfectionist, skip real marble and opt for a porcelain look-alike or a dense quartzite. If you embrace the “patina” of a well-loved home, real marble is fine, but seal it annually.
Grout Considerations
In a kitchen, grease is the enemy. In a wet bar, it is liquids. I typically recommend using an epoxy grout or a high-quality sealant for bar backsplashes. Epoxy grout is waterproof and stain-resistant. It is harder to install (your installer might charge slightly more), but it ensures that a splash of Merlot won’t permanently color your white grout lines pink.
Glass Rinsers
If you are installing a glass rinser (those push-down sprayers found in commercial bars), be aware that they generate a lot of mist. Ensure the backsplash material directly behind the sink is impervious to water. A mirror or solid slab is safer here than a porous brick or wallpaper.
5. Rental and Budget-Friendly Options
You do not need to own the home or have a massive renovation budget to upgrade a wet bar. Because the square footage is usually under 30 square feet, small changes make a big impact.
Peel-and-Stick Options
Technology has improved significantly here. Look for “gel” tiles or composite stone peel-and-stick options rather than flat vinyl stickers. The gel varieties have actual dimension and sheen, making them look like real glass or ceramic. They are perfect for covering up an ugly existing laminate backsplash.
Beadboard and Shiplap
Wood paneling is a very affordable DIY option. It adds texture and architectural interest.
- Pro Tip: Since this is a wet area, use high-quality exterior grade paint or marine paint. This ensures that splashes can be wiped off without the wood swelling or the paint peeling.
The Paint Upgrade
If you have existing ceramic tiles that are dated but intact, you can paint them using a specialized tile epoxy paint. While I wouldn’t recommend this for a high-traffic family shower, a wet bar backsplash gets much less physical abrasion, so painted tile holds up surprisingly well.
Designer’s Note: The “End Point” Dilemma
One of the most common issues I see in DIY projects is not knowing where to end the backsplash. This happens when a wet bar counter ends, but the wall continues.
The Rule: Generally, the backsplash should end exactly where the countertop ends. Do not extend it a few inches past the counter “just because.”
The Fix: Use a Schluter strip (a metal edging profile) to create a clean, crisp line at the edge of the tile. Alternatively, buy the “bullnose” or finished edge pieces that match your tile collection. Leaving a raw, cut tile edge exposed looks unfinished and collects dust.
Common Mistakes + Fixes
Mistake: Buying tile without checking the thickness.
The Fix: Some handmade tiles or natural stones can be up to 3/4″ thick. If your faucet is installed too close to the wall, a thick backsplash might prevent the faucet handle from turning fully back. Always measure the distance from your faucet center to the wall before buying tile.
Mistake: Ignoring the side splashes.
The Fix: If your wet bar is in a niche (walls on three sides), you generally should tile the back wall and the side walls up to the front edge of the cabinet. If you only tile the back, the sides can look neglected and are vulnerable to water damage.
Mistake: Starting the tile layout from the edge.
The Fix: Always center your layout. Find the center point of the sink or the focal point of the bar, and start your tile pattern there. This ensures that the cut pieces at both ends of the wall are even sizes. You want symmetry.
Final Checklist: What I’d Do in a Real Project
If I were designing your wet bar today, this is the exact workflow I would follow to ensure success:
1. Function First
Check the faucet clearance. I need to know how much space is behind the sink handle before selecting a material thickness.
2. Order Samples
Never buy online without seeing it in the room. I would tape the tile sample to the wall and look at it during the day and at night with the bar lights on.
3. Plan the Edges
I would decide how the tile ends before installation begins. Will we use a metal Schluter strip, a pencil liner, or a mitered edge? I would have these pieces on site for the installer.
4. Layout Dry Run
I would have the installer lay out the tiles on the floor or counter first. This allows us to blend color variations in natural stone and avoid clumping dark or light tiles together.
5. Seal Immediately
If using natural stone or crackle-glaze ceramic, I would ensure it is sealed before grouting to prevent grout haze, and again after grouting for water resistance.
FAQs
Do I need a backsplash if I have a “dry bar”?
Technically no, because there is no water source. However, a dry bar is still a beverage station. You will still have coffee spills, wine drops, or bottle rings. I always recommend a durable surface behind the counter, even if it is just a high-gloss scrubbable paint or a durable wallpaper.
Can I use wallpaper as a backsplash?
Yes, but with caution. Vinyl wallpaper is best as it is wipeable. If you love a delicate paper, I recommend installing a clear glass panel over it for the first 18 inches. This preserves the look but bulletproofs it against moisture.
How much extra tile should I buy?
For a standard backsplash, the rule of thumb is 10% to 15% extra for “waste and cuts.” If you are doing a complex pattern like Herringbone or Chevron, bump that up to 20% extra because every cut at the wall creates waste that cannot be reused.
Conclusion
A wet bar backsplash is one of the most fun design elements to tackle in a home. It is a contained space that allows for high drama and luxury materials without the massive square footage costs of a full kitchen renovation.
Whether you choose a moody antique mirror, a vibrant geometric tile, or a classic stone slab, the key is to balance the visual “wow” factor with the practical realities of a wet zone. Pay attention to your lighting, watch your edges, and don’t be afraid to go bold.
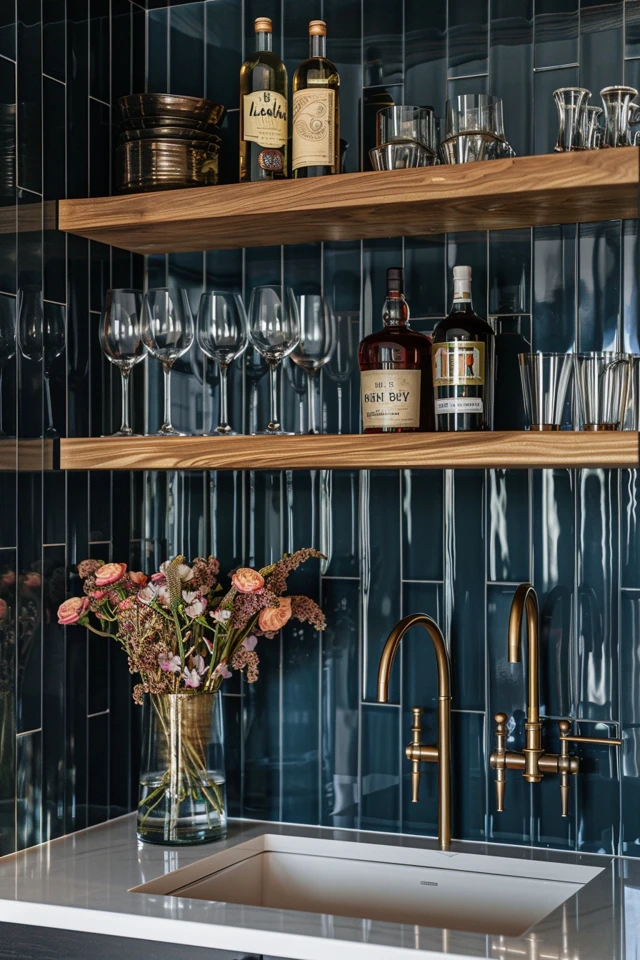
Picture Gallery


