
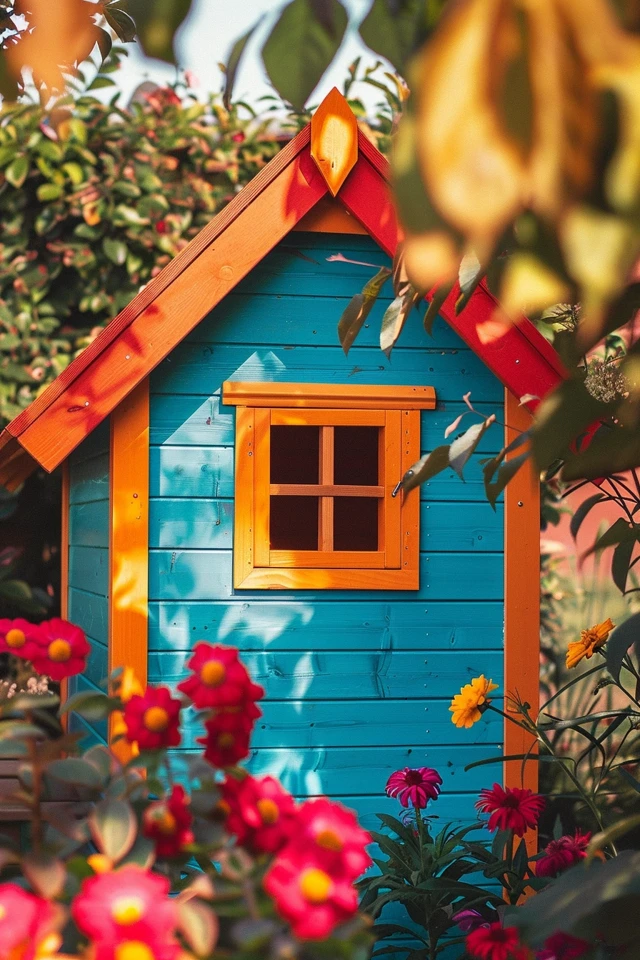
Are you looking to add some vibrant colors and creativity to your children’s playhouse? Painting a wooden playhouse not only protects it from the elements but also provides an opportunity for DIY fun and imaginative play. In this article, I will share some exciting wooden playhouse paint ideas, outdoor playhouse color schemes, and children’s playhouse decorating tips to help you create a vibrant and inviting play space for your little ones.
When it comes to painting a wooden playhouse, involving your kids in the process not only enhances their creativity but also teaches them responsibility. Start by applying painters tape to all edges and distribute the paint into trays for easy access. Begin by brushing the edges and window frames with a small brush, then move on to the larger wall areas using a larger flat brush to follow the grain of the wood for a smooth finish. If necessary, apply a second coat for additional coverage and durability.
Don’t forget to let your kids add their personal touch to the playhouse by adding their own unique marks or designs. This will make the playhouse even more special and meaningful to them. Make sure to paint any trims or special designs with a smaller brush for precision and attention to detail. To achieve a sharp and eye-popping look, consider painting the decorations with two layers of paint.
Ready to transform your wooden playhouse into a colorful dream? Let’s dive into some amazing playhouse paint ideas and inspiration!
Key Takeaways:
- Involve your kids in the painting process to enhance their creativity and responsibility.
- Use painters tape and distribute paint into trays for easy access.
- Start by brushing the edges and window frames, then move on to the larger wall areas.
- Apply a second coat for better coverage and durability if needed.
- Let your kids add their unique marks or designs to the playhouse for a personal touch.

Choosing the Right Playhouse and Assembling
When it comes to creating the perfect play space for your children, choosing the right playhouse is key. Consider your budget, available space, and desired theme to find the ideal wooden playhouse for your backyard. Make sure to measure the area where you plan to place the playhouse so that it fits comfortably.
Once you’ve selected the perfect playhouse, it’s time to assemble it. Follow the provided instructions carefully, ensuring that all the pieces fit together correctly. Before adding the roof, take the opportunity to paint both the interior and exterior of the playhouse. This DIY playhouse makeover will not only add a personal touch but also provide protection for the wood.
Assembling a playhouse requires patience and attention to detail. Take your time and use the right tools to ensure a smooth assembly process.
When placing the playhouse in your outdoor space, consider factors such as sunlight exposure and the type of wood. Position it in an area that receives the right amount of shade and sunlight throughout the day. If the playhouse is made of natural wood, apply a waterproof stain and sealer to protect it from the elements.
As you choose the colors for your playhouse, think about the overall theme you want to create. Do you envision a whimsical cottage or a vibrant pirate hideout? Choose colors that match your desired playhouse decor and create a cohesive look.
Remember, this playhouse is a space for creativity and imagination to run wild. Let your child’s personality shine through and involve them in the choosing and assembling process. Together, you can create a DIY playhouse that will be the centerpiece of outdoor playtime.

And Now, Let’s Take a Look at Some Inspiring Playhouse Makeovers:
Whether you’re starting with a brand new wooden playhouse or giving your existing play space a fresh look, these inspiring playhouse makeovers will spark your creativity. From painted exteriors to whimsical decor, these DIY projects showcase the endless possibilities for transforming a playhouse into a magical retreat for your little ones.
- Bright and colorful: Paint the exterior in bold shades to create an eye-catching playhouse that stands out in your backyard.
- Themed playhouses: Design a playhouse that reflects your child’s interests, such as a princess castle or a safari-themed adventure.
- Multifunctional spaces: Customize the interior to include a mini kitchen, reading nook, or even a small slide for added fun.
With some creativity and a little bit of DIY magic, you can transform a simple wooden playhouse into a whimsical and personalized space that will provide endless hours of fun and imagination for your children.
Decorating the Playhouse
The fun part of a playhouse makeover is decorating it to create a whimsical and colorful space. When it comes to playhouse decor, the possibilities are endless! You can use a mix of items you already have and find affordable decor at stores like Hobby Lobby and Target to bring your vision to life.
To create a playful atmosphere, it’s best to keep the decor minimal. This will allow plenty of room for play and imagination. Consider hanging curtains to add a touch of coziness and privacy. Small crates can be used for storage, making it easy for your child to keep their toys organized.
Bring the outdoors inside by incorporating plants and flowers. Not only will they add a pop of color, but they will also create a refreshing and inviting atmosphere. You can also use themed accessories like pretend food and fairy lights to enhance the magical ambiance.
Personalize the playhouse by adding custom signs and banners that reflect your child’s personality and interests. Let your imagination and your child’s preferences guide the decor choices to make the playhouse truly unique and magical. With the right playhouse decor and accessories, your little one’s play space will become a world of endless imagination and fun!
