
Covered Patio Ceiling Ideas to Transform Your Space
Introduction
When homeowners renovate their outdoor spaces, they often fixate on the flooring, furniture, and landscaping. The ceiling of a covered patio, often referred to as the “outdoor fifth wall,” is frequently an afterthought left clad in basic vinyl siding or unfinished plywood. However, treating your patio ceiling with the same design intent as your living room ceiling is the single most effective way to elevate the space from a basic shelter to a luxurious outdoor room.
I have seen countless projects where a beautiful stone floor was overshadowed by a dirty, cobweb-filled ceiling that offered no visual interest. By changing the texture, color, or material above your head, you change the acoustics, the lighting quality, and the perceived height of the space. For those seeking immediate inspiration, a comprehensive picture gallery is included at the end of this blog post.
In this guide, I will walk you through the most durable and aesthetically pleasing ceiling options I use in my own design projects. We will cover material selection, critical measurements for lighting and fans, and the maintenance realities of different finishes. Whether you are dealing with a small rental balcony or a sprawling pavilion, these principles apply.
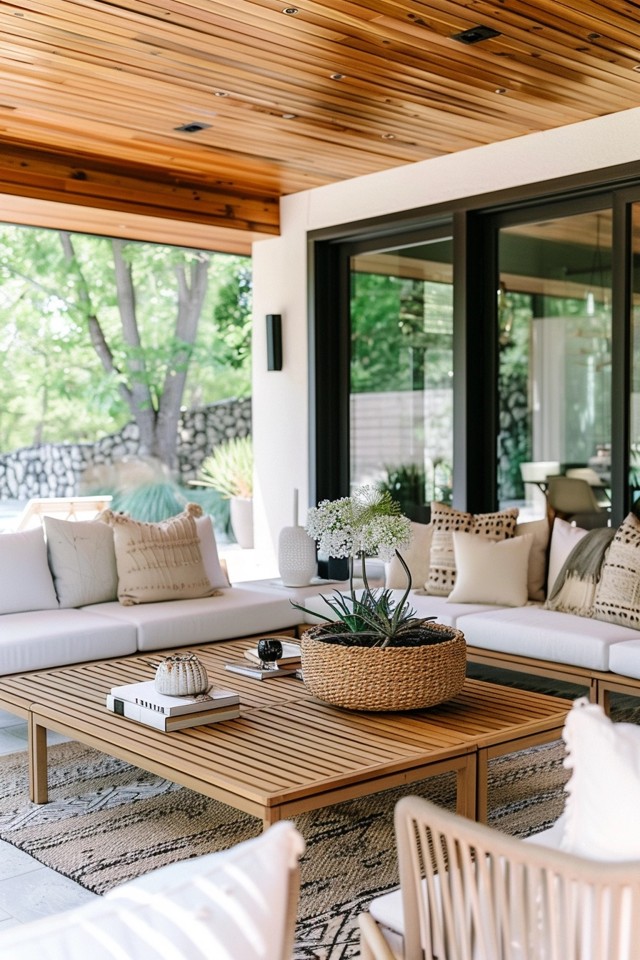
1. The Warmth of Natural Wood Tongue-and-Groove
Natural wood is the gold standard for patio ceilings because it instantly adds warmth and texture that breaks up the hardness of concrete or stone pavers. The most common application is tongue-and-groove (T&G) paneling, which slots together to hide nails and allow for slight movement.
Choosing the Right Species
When selecting wood for an exterior ceiling, rot resistance is your top priority, even if the area is fully covered. Humidity and blowing rain will eventually affect the wood.
- Western Red Cedar: This is my go-to recommendation. It contains natural oils that repel insects and resist rot. It takes stain beautifully and has a rich, variegated grain.
- Cypress: A fantastic alternative to cedar, especially in the South. It is naturally water-resistant and tends to have a more uniform, yellow-toned color before staining.
- Pine (stained or sealed): This is the budget-friendly option. If you use pine, it must be sealed on all six sides (front, back, and edges) before installation to prevent warping.
Installation Direction and Scale
The direction you run the planks changes the visual dimensions of the patio.
- Run perpendicular to the house: This draws the eye outward toward the yard or view, making the space feel deeper.
- Run parallel to the house: This reinforces the width of the patio and is often easier to install if your joists run perpendicular to the house wall.
Designer’s Note: The Expansion Gap
Real wood expands and contracts with humidity changes. A major failure point I see in DIY projects is installing the boards too tightly together.
- The Rule: Leave a 1/8-inch to 1/4-inch gap around the perimeter where the wood meets the wall or beam. Cover this gap with a piece of trim or molding. If you jam the wood tight against the wall, it will buckle during a humid summer.
2. Exposed Beams and Trusses
If you have a vaulted ceiling or want to create the illusion of structural history, exposed beams are a powerful design tool. They add rhythm and architectural weight to the overhead space.
Real vs. Faux Beams
In many renovations, the existing roof structure is just simple 2×4 trusses that aren’t meant to be seen. In this case, we use box beams.
- Box Beams: These are hollow U-shaped structures made from 1-inch thick boards. They are lightweight and, crucially, allow you to run electrical wiring for fans and chandeliers inside the “beam” without using unsightly conduit.
- Solid Timber: If you are building new, you can spec heavy timber trusses. However, remember that solid wet timber will check (crack) as it dries. This is rustic and normal, but it surprises some clients.
Spacing and Scale
Getting the scale right is more important than the material itself. A common mistake is using beams that are too skinny for the ceiling height.
- Height Rule: If your ceiling is 10 feet or higher, your beams should be at least 6 inches wide and 6 to 8 inches deep. Anything smaller looks like a toothpick.
- Spacing Rule: Space beams 4 to 6 feet apart on center. If they are closer than 4 feet, the ceiling feels cluttered and heavy. If they are further than 8 feet, they look disconnected.
Common Mistakes + Fixes
Mistake: Staining the beams and the ceiling planks the exact same dark color.
Fix: Create contrast. If you have dark walnut beams, keep the ceiling planks natural or painted white. If you have a dark ceiling, paint the beams a crisp white or light gray. This contrast highlights the architecture.
3. Beadboard and the “Haint Blue” Tradition
Beadboard offers a classic, cottage, or coastal aesthetic that is cleaner and more refined than rustic planks. It consists of narrow vertical planks with a small indentation (the “bead”) between each board.
Material Choices: Wood vs. PVC
For painted ceilings, I almost exclusively specify cellular PVC beadboard rather than wood.
- PVC Benefits: It is impervious to moisture, will never rot, and paint adheres to it exceptionally well. It looks identical to wood once painted.
- Sheet vs. Plank: You can buy beadboard in 4×8 sheets (faster to install) or individual planks. Planks look more authentic because the seams are hidden in the grooves. Sheets often show visible seams where they join.
The “Haint Blue” Ceiling
In the Southern United States, painting porch ceilings a soft, pale blue is a centuries-old tradition.
- The Lore: Originally intended to ward off spirits (“haints”), it is also rumored to deter wasps and spiders, who allegedly mistake the color for the sky.
- The Design Impact: Lore aside, a light blue ceiling visually extends the sky, making the porch feel taller and airier.
- Color Pick: Look for blue-greens rather than baby blues. A color with a slight gray or green undertone looks more sophisticated than a nursery blue.
Finish Sheen
Do not use flat paint outdoors on the ceiling.
- My Recommendation: Use a Satin or Semi-Gloss exterior paint. The slight sheen reflects light, helping to brighten the patio, and is much easier to wipe down when removing pollen or dust.
4. Industrial and Contemporary Materials
For modern homes or urban lofts, wood and beadboard might feel too traditional. Industrial materials can offer durability and a sleek, minimalist aesthetic.
Corrugated Metal
Galvanized corrugated metal sheets are inexpensive and incredibly durable. They reflect light, which helps brighten deep patios.
- Acoustics Warning: Metal creates an echo. If you host loud dinner parties, this might make conversation difficult.
- Rain Noise: Rain hitting a metal roof is loud. Ensure there is insulation or a plywood substrate between the roof decking and the metal ceiling to dampen the sound.
Composite Decking
You can use the same composite boards used for flooring on the ceiling. This creates a “wrapping” effect that blurs the lines between floor, wall, and ceiling.
- Fastening: Composite is heavy. You must screw it into the joists securely. Hidden fastener systems are essential here because visible screw holes in composite on a ceiling look messy.
- Color: Choose a composite that mimics warm teak or walnut to offset the coldness of concrete or metal furniture.
Fiber Cement Panels
Large-format fiber cement panels (like Hardie board) can be installed with intentional gaps (reveals) between them.
- The Look: This creates a geometric, grid-like pattern that looks very high-end and architectural.
- Durability: These panels are fire-resistant and rot-proof, making them ideal for areas with fire pits or outdoor kitchens.
5. Lighting and Airflow: Functional Integration
A ceiling is only as good as the infrastructure it hides. Lighting and airflow are the two primary functional requirements for a covered patio.
Recessed Lighting (Cans)
If you use recessed lights, layout is key to avoiding shadows.
- Placement: Place lights 18 to 24 inches away from the house wall to wash the wall with light without creating harsh scallops on the siding.
- Rating: You must use “Damp Rated” trims if the area is covered, or “Wet Rated” if driving rain can reach the ceiling.
- Color Temperature: Stick to 2700K (warm) or 3000K (neutral). Do not use 4000K or 5000K (daylight) outdoors; it looks like a gas station at night and attracts more bugs.
Ceiling Fans
A fan is non-negotiable for pest control (mosquitoes are weak fliers) and comfort.
- Sizing Guide:
- Room size up to 144 sq ft (12×12): Use a 42-50 inch fan.
- Room size up to 225 sq ft (15×15): Use a 52-60 inch fan.
- Larger spaces: Use two fans or one large industrial-style fan (72+ inches).
- Material: Look for ABS plastic blades that look like wood. Real wood blades will droop over time in humidity.
Statement Fixtures
If you have a high ceiling (9 feet or more), a chandelier or pendant light anchors the seating area.
- Height Rule: The bottom of the fixture should be at least 7 feet off the floor so tall guests don’t bump their heads. Over a dining table, it can be lower (30-36 inches above the table surface).
- Wind Stability: Avoid lightweight fixtures on chains that will swing violently in the wind. Use fixtures with rigid stems or heavy frames.
Final Checklist: What I’d Do in a Real Project
If I were designing your patio today, this is the workflow I would follow to ensure success.
1. Assess the Structure
Check the existing joists. Are they 16 inches on center or 24 inches? If they are 24 inches, you may need to add blocking (“furring strips”) to prevent sagging, especially for PVC or composite materials.
2. Solve the Water Issue
Ensure the roof above does not leak. A ceiling traps moisture. If the roof leaks, the water will sit on top of your beautiful wood ceiling and rot it from the inside out.
3. Plan Electrical First
Map out exactly where the fan and lights go before buying a single board. Rough-in the wiring and install the junction boxes. Remember to reinforce the box for the fan with a brace that can support the vibration.
4. Pre-Finish the Material
Stain or paint your wood before you install it. Trying to stain a ceiling while standing on a ladder results in drips on your face and uneven coverage. You can do a final touch-up coat after installation.
5. Install with Stainless Steel
Use stainless steel nails or screws. Standard galvanized fasteners can eventually corrode and leave black streaks (bleeding) on the wood, especially with Cedar or Oak.
6. Seal the Ends
If you cut a board, dab the cut end with sealer/stain before installing it. This end grain is a straw that sucks up moisture; sealing it is vital for longevity.
FAQs
Q: Can I just paint the plywood that is already there?
A: Yes, but with caveats. You need to use a high-quality exterior primer first. Cover the seams between plywood sheets with batten strips (1×2 wood strips) to create a paneled look. If you just paint the flat plywood, the seams will crack and look unfinished.
Q: How much does a wood ceiling cost compared to vinyl?
A: A natural cedar ceiling will cost 3 to 4 times more than vinyl soffit material. However, the return on investment regarding aesthetics and home value is significantly higher. Pine is a middle-ground option, costing about half as much as cedar but requiring more maintenance.
Q: How do I keep birds from nesting in the rafters?
A: If you have an open truss design, this is a challenge. The best defense is a ceiling fan running on low, which discourages birds. Alternatively, you can install invisible netting high up in the trusses, though this is difficult to do aesthetically. Closing the ceiling with T&G or beadboard eliminates this problem entirely.
Q: Is it safe to mount a swing or hanging chair from the ceiling?
A: Only if you block it correctly. You cannot screw a swing into the decorative ceiling planks. You must locate the structural joist above the planks and drive a heavy-duty lag bolt directly into the center of that joist.
Conclusion
Transforming your covered patio ceiling is one of the highest-impact projects you can undertake for your home’s exterior. It draws the eye upward, makes the space feel finished, and creates a true outdoor room rather than just a slab of concrete with a roof.
Whether you choose the rustic charm of exposed trusses, the coastal elegance of blue beadboard, or the warmth of natural cedar, the key is proper preparation and scale. Pay attention to your lighting placement, respect the properties of the materials you choose, and always design with moisture resistance in mind. By treating the “fifth wall” with care, you create a space that invites you to stay, relax, and look up.
Picture Gallery


