
Cozy Backyard Hot Tub Privacy Ideas Unveiled
Imagine stepping out of your back door on a crisp evening, the steam from your hot tub rising into the cool air like an invitation. You want to sink into the warmth and let the world melt away, but there is one problem: the neighbor’s second-story window overlooks your patio. Without a sense of seclusion, your private retreat feels like a public stage, and the relaxation you crave remains just out of reach.
Transforming a backyard hot tub into a private sanctuary is about more than just putting up a fence; it is about creating an intentional “outdoor room” that balances aesthetics with functionality. In this guide, we will explore professional design strategies to shield your soak from prying eyes while enhancing the beauty of your landscape. We will cover everything from structural solutions to soft landscaping, ensuring your spa remains the cozy haven you deserve.
At-a-Glance: Key Takeaways
- Sightline Strategy: Privacy is most effective when you target the specific angles of intrusion rather than walling off the entire yard.
- Material Harmony: Use materials that complement your home’s architecture, such as cedar for traditional looks or black aluminum for modern aesthetics.
- The Three-Foot Rule: Always maintain at least 36 inches of clearance around the hot tub’s equipment panel for future maintenance.
- Layered Lighting: Combine overhead string lights with low-level path lighting to create depth without making the area feel like a fishbowl at night.
- Zonal Design: Think of the hot tub area as a “wet zone” that requires moisture-resistant materials and slip-resistant flooring.
What This Style Means (and Who It’s For)
The “Cozy Hot Tub Sanctuary” style is a design philosophy that treats the hot tub as the centerpiece of an outdoor living suite. It is not just an appliance sitting on a concrete slab; it is a destination integrated into the garden. This approach is for homeowners who value wellness and want their backyard to function as an extension of their interior living space.
This style works exceptionally well for urban dwellers with close neighbors, suburban families looking for a quiet escape, and even renters who need non-permanent privacy solutions. By focusing on “human-scale” design—meaning structures that feel protective rather than imposing—we create a space that feels intimate. If you feel exposed when you’re in your swimwear or simply want to block out the visual noise of the neighborhood, these ideas are tailored for you.
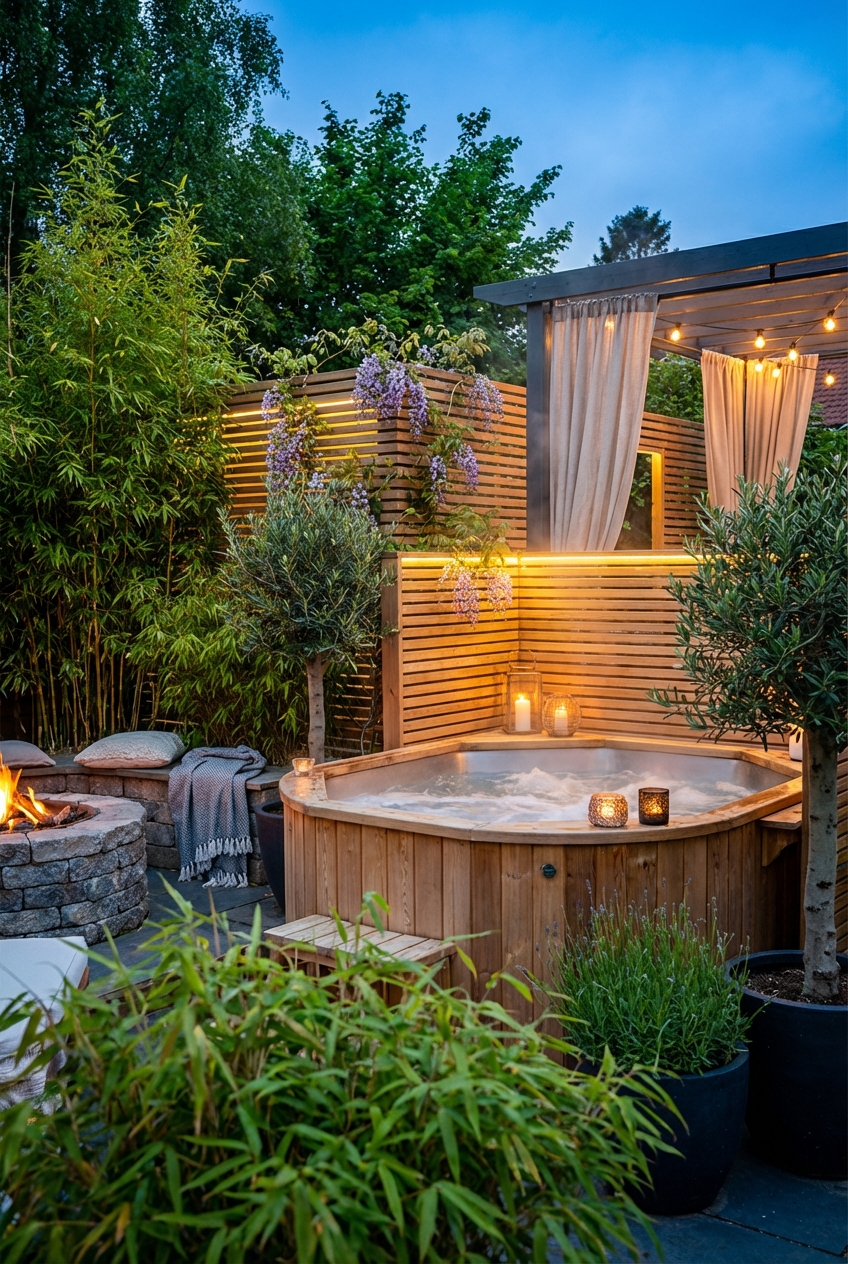
The Signature Look: Ingredients That Make It Work
To achieve a professional, high-end look, you must layer different textures and heights. A single flat fence often feels cold and industrial, but a multi-dimensional approach feels like a luxury resort. Here are the core ingredients of a well-designed privacy setup:
- Vertical Elements: These include pergolas, trellises, and privacy screens that draw the eye upward and provide the primary shield.
- Softscaping: Tall grasses, columnar evergreens, or climbing vines soften the hard edges of the hot tub and the structures surrounding it.
- Textured Flooring: Transitioning from grass to a stone deck or composite platform defines the space as a specific “room.”
- Acoustic Buffers: Water features or rustling plants like bamboo help drown out neighborhood noise, reinforcing the sense of privacy.
- Ambient Glow: Warm-toned lighting (2700K color temperature) makes the space feel inviting and secure after the sun goes down.
Layout & Proportions (Designer Rules of Thumb)
As a designer, I always start with the math. If the proportions are off, the space will feel either claustrophobic or cavernous. When planning your hot tub layout, follow these professional standards:
The 72-Inch Sightline Rule: Most privacy issues occur from a standing height or a neighbor’s second story. Sit in your hot tub (or a chair at the same height) and have someone stand where the neighbor might see you. For effective privacy, your screen needs to be at least 72 inches (6 feet) tall, but it should be placed as close to the tub as safety allows to maximize the “shadow” of privacy it casts.
The Clearance Zone: You must leave 3 feet of open space around the side of the tub that houses the mechanical components. Nothing is worse than building a beautiful custom stone wall only to have a technician tell you it has to be demolished to fix a pump leak. For the other three sides, a 12-to-18-inch gap is sufficient for cleaning and airflow.
Screen Proportions: If you are using a privacy screen, it should ideally be 1.5 times the width of the hot tub. If your tub is 7 feet wide, your screen should be at least 10.5 feet wide to prevent “side-peeking” from different angles in the yard. This creates a visual backdrop that frames the tub beautifully.
Designer’s Note: One of the biggest mistakes I see is homeowners installing a solid, 8-foot-high wall right against the tub. This traps humidity, leads to mold growth on the wood, and makes the bather feel like they are in a box. I recommend using “breathable” privacy—slatted wood with 0.5-inch gaps or laser-cut metal panels. This allows breeze to move through while still blocking the view.
Step-by-Step: How to Recreate This Look
Follow these steps to build your own private oasis from the ground up. This process ensures you don’t skip the crucial preparation phase.
- Conduct a “Privacy Audit”: Sit in your tub (or a chair in the tub’s future location) at various times of day. Note exactly where you feel most exposed. Is it the neighbor’s deck? The street lamp? The sidewalk? Target these specific “leaks” first.
- Establish the Foundation: Ensure your hot tub sits on a level, reinforced surface. If you are building a privacy structure around it, ensure the footings for your posts are outside the “crush zone” of the tub’s weight. A 500-gallon hot tub weighs about 5,000 pounds when full; you don’t want your privacy wall leaning into it.
- Install the Vertical Frame: Set 4×4 or 6×6 pressure-treated posts for your screen or pergola. If you are a renter, look into weighted planter boxes with integrated trellis panels that don’t require digging.
- Layer in the Infills: Attach your privacy material to the frame. For a modern look, use horizontal cedar slats with a 1/2-inch gap. For a cottage feel, use a lattice with a climbing rose or clematis.
- Add “Soft” Privacy: Plant tall, narrow evergreens (like Skyrocket Junipers) at the corners of your structure. This blends the man-made wall into the natural landscape.
- Integrate Lighting and Hooks: Add heavy-duty robe hooks to the inside of your privacy wall. Install dimmable LED strip lights under the top rail of the screen to provide a “down-wash” of light that doesn’t spill into the neighbor’s yard.
Budget Breakdown: Low / Mid / Splurge
Privacy doesn’t have to cost a fortune, but the more you spend, the more permanent and integrated the solution feels.
The Low Budget ($200 – $600):
This tier focuses on DIY and temporary solutions. Use outdoor-rated curtains made of solution-dyed acrylic (like Sunbrella) hung on galvanized plumbing pipes. Alternatively, use pre-made pressure-treated lattice panels from a local hardware store, painted to match your home’s trim. Large potted plants like clumping bamboo can also provide immediate, mobile privacy.
The Mid Budget ($1,500 – $4,500):
This allows for permanent structures. Think a custom-built cedar slat wall or a pre-fabricated aluminum pergola with manual louvers. You might also include a small stone paver path leading to the tub and professional-grade landscape lighting. At this level, you are looking at materials that will last 10-15 years with minimal maintenance.
The Splurge ($8,000+):
This is the “resort at home” level. This includes a custom-designed timber frame pavilion with a standing seam metal roof, motorized privacy screens that drop down at the touch of a button, and integrated masonry walls with a water feature. At this price point, the hot tub is often recessed into a multi-level deck, and the privacy solutions are built into the architecture of the house itself.
Common Mistakes (and How to Fix Them)
Even with the best intentions, certain pitfalls can ruin the hot tub experience. Here is how to avoid them:
- The Mistake: Choosing the wrong wood. Many people use standard pine for privacy screens. Pine rots quickly when exposed to constant steam and splashing chemicals.
The Fix: Use Cedar, Redwood, or Ipe. These woods contain natural oils that resist rot and insects. If using composite, ensure it is rated for ground contact. - The Mistake: Blocking the breeze. A solid wall can create a “heat pocket” in the summer, making the soak uncomfortable.
The Fix: Use louvers or angled slats. These block the sightline from above but allow air to flow through horizontally. - The Mistake: Forgetting the towel “dry zone.” There is nothing worse than stepping out of a hot tub and realizing your towel is soaked because it was hanging too close to the tub or exposed to rain.
The Fix: Build a small “cubby” or add a decorative cabinet on the interior side of your privacy wall that stays dry. - The Mistake: Over-planting. Planting trees that drop sap, needles, or heavy blossoms directly over the tub.
The Fix: Stick to “clean” plants. Avoid pines, weeping willows, or fruit-bearing trees. Stick to ornamental grasses or broad-leafed evergreens like Boxwood or Holly.
Room-by-Room Variations
Depending on where your hot tub is located, your privacy needs will change. Here is how to adapt the “outdoor room” concept to different backyard zones.
The Deck-Integrated Tub:
If your tub is on a raised deck, your primary concern is the neighbors next door. Use a “half-wall” approach. Build a solid railing 42 inches high, and then add 24 inches of frosted glass or acrylic panels on top. This maintains your view of the horizon while seated but blocks the view of your body from the side.
The Corner Garden Retreat:
If the tub is tucked in a corner of the yard, use the “L-shape” strategy. You only need two walls of privacy. I love using a mix of materials here—one wall of dark-stained wood and another made of a “living wall” with succulents or ferns. This makes the corner feel like a hidden grotto.
The Open Patio Oasis:
On a flat, open patio, you need “islands” of privacy. Use oversized rectangular planters (at least 36 inches long and 30 inches high) with 4-foot tall grass planted inside. This creates a 6.5-foot tall portable wall that defines the space without requiring a building permit.
What I’d Do in a Real Project: Mini Checklist
If I were designing your backyard today, this is the checklist I would follow to ensure professional results:
- Verify the weight-bearing capacity of the surface (especially for decks).
- Check local HOA and city codes for height restrictions on “accessory structures.”
- Order “Marine Grade” hardware (stainless steel screws) to prevent black rust streaks on your privacy walls.
- Install a physical barrier, like a small gravel border, between the hot tub and any grass to keep clippings out of the water.
- Place the “access side” of the tub toward the least-visible part of the yard so the cabinet panel is easy to reach but hidden.
- Add a “hospitality touch”: a 12-inch wide ledge on top of the privacy wall to act as a spot for drinks, phones, or candles.
Finish & Styling Checklist
Once the structures are up, it is the styling that creates the “cozy” factor. Use this checklist to finish the space:
- Stain/Paint: Use a semi-transparent stain to let the wood grain show through, which feels more organic than solid paint.
- Texture: Add an outdoor rug in a neutral “sisal” look. Ensure it is made of 100% polypropylene so it doesn’t mold.
- Seating: Place a small weather-resistant bench near the tub for those who want to “cool off” without leaving the private area.
- Scent: Plant jasmine or lavender nearby. The steam from the tub will help carry the scent, enhancing the sensory experience.
- Sound: If your tub doesn’t have built-in speakers, hide a small, waterproof Bluetooth speaker behind a planter to play soft ambient music or “brown noise” to mask traffic.
FAQs
Do I need a building permit for a privacy screen?
In most US municipalities, a “fence” or “screen” under 6 or 7 feet does not require a permit. However, if you add a roof (making it a gazebo or pergola), you likely will. Always check with your local building department first.
How do I stop my privacy curtains from blowing in the wind?
This is a common frustration. I recommend sewing “fishing weights” or heavy-duty washers into the bottom hem of the curtains. You can also use a “tie-back” system anchored to the floor or the hot tub cabinet itself when the wind picks up.
What is the best material for a privacy screen if I live in a very humid climate?
Avoid wood if you want zero maintenance. Instead, look for laser-cut aluminum panels or high-density polyethylene (HDPE) screens. These will never rot, warp, or require staining, and they can handle the constant moisture of a hot tub environment.
Will a privacy screen make my backyard feel smaller?
If you use a solid, dark wall, yes. To prevent this, use “visual transparency.” Slatted screens or screens with patterns allow the eye to see through to the garden beyond, which maintains the sense of space while still obscuring the view of the person in the tub.
Conclusion
Creating a cozy, private backyard hot tub area is one of the best investments you can make for your home and your mental well-being. By moving away from the idea of the hot tub as a standalone unit and instead treating it as the anchor of a designed “outdoor room,” you turn a simple soak into a daily retreat.
Whether you choose the soft elegance of outdoor drapery, the architectural strength of a cedar slat wall, or the natural beauty of a living green screen, the goal remains the same: to create a space where you feel safe, secluded, and entirely at home. Focus on the sightlines, respect the mechanical needs of the tub, and layer in the textures that speak to your personal style. With these professional rules of thumb in hand, your backyard is ready to become the sanctuary you’ve always imagined.


