
Cozy Rustic Fire Pit Ideas for Outdoor Charm
There is something deeply primal and comforting about gathering around a flickering flame as the sun dips below the horizon. A well-designed fire pit does more than just provide heat; it acts as a magnetic North for your backyard, drawing friends and family together for shared stories and roasted marshmallows.
In this guide, we will explore how to infuse your outdoor space with rustic charm through thoughtful fire pit design. Whether you are working with a sprawling countryside estate or a compact suburban patio, the principles of texture, scale, and natural materials can transform a simple backyard into a sanctuary.
At-a-Glance: Key Takeaways
- Safety First: Always maintain a minimum 10-foot clearance from structures and low-hanging branches.
- Material Choice: Natural stone, weathered steel, and reclaimed wood are the pillars of the rustic aesthetic.
- Layout Matters: Ensure a 3-foot “traffic zone” behind seating to prevent people from feeling trapped.
- Lighting: Layer your lighting with low-voltage landscape lights and warm string lights to complement the fire’s glow.
- Functionality: Consider drainage and wind patterns before finalizing your fire pit location.
What This Style Means (and Who It’s For)
The rustic fire pit style is defined by its connection to the earth. It is not about perfect lines or polished surfaces; instead, it celebrates the beauty of imperfection, age, and organic textures. This look prioritizes comfort and durability over high-gloss modernism.
This approach is perfect for homeowners who want their outdoor space to feel like a natural extension of the landscape. If you enjoy the tactile feel of rough-hewn stone, the patina of rusted metal, and the earthy scent of a wood fire, this style is for you. It is particularly well-suited for families with pets and children, as the rugged materials are forgiving and tend to look better as they age.
Rustic design is also highly adaptable. It can lean toward a “Mountain Lodge” vibe with heavy timbers and large boulders, or a “Coastal Farmhouse” feel with whitewashed stones and driftwood accents. The goal is to create a space that feels gathered rather than “purchased as a set.”
The Signature Look: Ingredients That Make It Work
To achieve a truly cohesive rustic look, you need to layer specific textures and materials. Think of your fire pit area as a composition of heavy, medium, and light elements.
1. Natural Stone Foundations
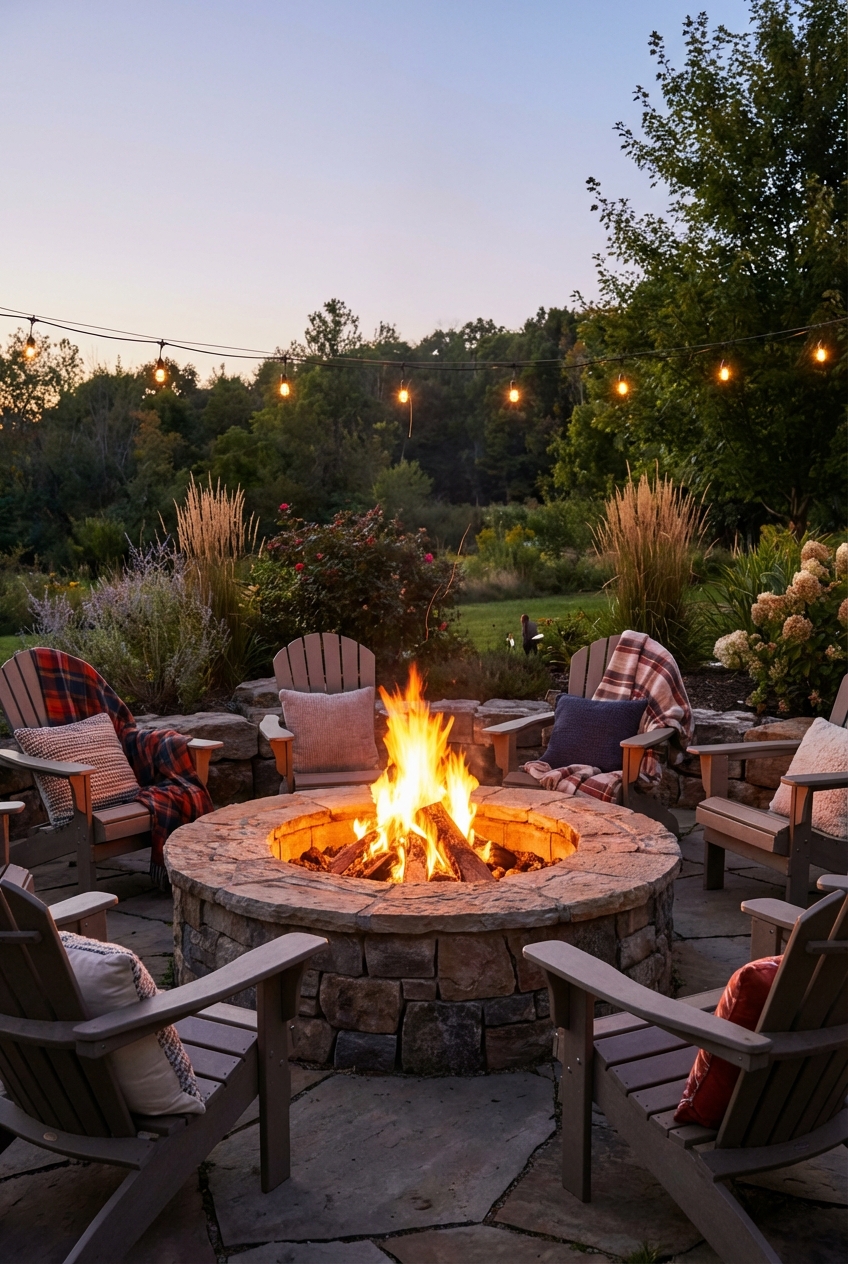
Avoid perfectly uniform pavers if you want a rustic feel. Instead, opt for flagstone, fieldstone, or river rock. Irregular shapes create a sense of history, as if the fire pit has been there for decades. Using local stone also ensures the feature feels grounded in its environment.
2. Weathered Metals
Corten steel is a favorite in professional landscape design for rustic projects. It develops a protective layer of rust over time that looks beautiful against green foliage. Cast iron is another excellent choice, providing a heavy, substantial feel that screams “old-world charm.”
3. Natural Wood Elements
Incorporate wood through seating or peripheral structures. Cedar, redwood, or reclaimed barn wood are excellent choices. Whether it is a stack of seasoned logs acting as a visual backdrop or heavy timber benches, wood softens the hardness of the stone and metal.
4. Tactile Textiles
The “cozy” part of the equation comes from what you add to the hardscaping. Think heavy wool blankets in buffalo check or herringbone patterns, outdoor pillows in linen-look fabrics, and perhaps a weather-resistant jute rug to define the seating area. These elements invite guests to linger longer.
Layout & Proportions (Designer Rules of Thumb)
As a designer, the biggest mistake I see is a lack of attention to scale. A tiny fire pit in a massive yard looks like an afterthought, while an oversized pit on a small patio can feel dangerous and claustrophobic.
The Fire Pit Diameter
For a standard social circle, a fire pit should be between 36 and 48 inches in diameter. This size is large enough to produce significant heat but small enough that guests can still talk to each other across the flames without shouting. If you are building a custom masonry pit, the walls should be roughly 6 to 12 inches thick for stability and to provide a place to rest a foot or a drink (if using a gas insert).
Seating Distance
The “sweet spot” for seating is usually 24 to 30 inches from the edge of the fire pit. This allows enough room for legs to stretch out without getting uncomfortably hot. Total clearance for the entire “room” should be at least 12 to 14 feet in diameter to accommodate the pit, the chairs, and a walkway behind the chairs.
Height Considerations
The height of your fire pit should relate to your seating. If you are using low-profile Adirondack chairs, a pit height of 12 to 14 inches is ideal. If you have standard-height garden chairs or built-in benches, aim for 18 to 20 inches. A lower pit allows the heat to radiate toward your legs and feet, which is where you feel the cold most.
Designer’s Note: Always check your local wind patterns. I once designed a beautiful stone pit on a bluff, only to realize the prevailing winds blew smoke directly into the client’s kitchen every time they opened the back door. Use a simple ribbon on a stake to track the wind for a few days before you commit to a permanent location.
Step-by-Step: How to Recreate This Look
If you are looking to build a rustic fire pit area from scratch, follow these steps to ensure a professional finish that lasts for years.
- Select the Site: Choose a level spot at least 10–20 feet away from any structures, overhanging trees, or flammable fences. Ensure there are no underground utility lines in the area.
- Mark the Perimeter: Use a stake and a string to draw two circles. The inner circle is for the pit itself, and the outer circle marks the seating area. For a standard setup, make the outer circle 14 feet wide.
- Excavate and Level: Remove the grass and about 4-6 inches of soil within the seating area. For the fire pit itself, dig down an additional 6 inches to create a drainage base.
- Install Drainage: Fill the bottom of the fire pit hole with 4 inches of crushed gravel or “road base.” This prevents water from pooling in your pit, which can lead to cracked stone or difficult-to-light fires.
- Lay the Foundation: If you are using a metal ring or a pre-cast kit, set it on the leveled gravel. If you are using natural stone, start with your largest, flattest stones at the base. Use heat-resistant masonry adhesive if you are stacking stones higher than 12 inches.
- Create the Seating Floor: To keep the rustic vibe, fill the excavated seating area with pea gravel, decomposed granite, or irregular flagstone with thyme or moss planted in the gaps. Avoid poured concrete, as it feels too sterile for this look.
- Add the Surroundings: Place your seating. Adirondack chairs are the gold standard for rustic charm because their sloped backs are perfect for staring into a fire.
- Style the Space: Add a weatherproof trunk nearby to store blankets, a dedicated metal bucket for ash disposal, and a decorative rack for firewood.
Budget Breakdown: Low / Mid / Splurge
The beauty of a rustic fire pit is that it can be achieved at almost any price point, provided you focus on natural textures.
Low Budget ($150 – $500)
Focus on a portable steel fire bowl with a rustic patina. Use simple pressure-treated wood stumps as side tables and affordable wooden folding chairs. Define the space with a few bags of pea gravel from a local hardware store. Most of your budget will go toward the fire pit unit itself and a few cozy blankets.
Mid Budget ($1,500 – $4,000)
At this level, you can transition to a permanent installation. This includes a professional-grade steel liner surrounded by stacked fieldstone. You can invest in high-quality poly-lumber Adirondack chairs (which look like wood but last longer) and a professional landscape fabric and gravel base. You might also add some low-voltage LED “pathway” lights around the perimeter.
Splurge ($7,500 – $15,000+)
A high-end rustic retreat often involves a custom-built masonry fire pit with a natural gas or propane starter for convenience. This budget allows for a large flagstone patio with mortar joints, built-in stone semi-circle benches with custom outdoor cushions, and professional landscaping including boulders, mature trees for privacy, and integrated “moonlighting” in the trees above.
Common Mistakes (and How to Fix Them)
Mistake: Using the Wrong Stone
The Fix: Never use river rocks or wet stones from a creek bed to build the interior of your fire pit. These stones can trap moisture inside; when heated, the moisture turns to steam and can cause the rock to explode. Always use fire-rated bricks (firebricks) to line the interior, then face the exterior with your decorative rustic stone.
Mistake: Poor Drainage
The Fix: Many people build a “bowl” in the ground that turns into a pond after the first rain. If you are building a permanent pit, ensure the center has a layer of coarse gravel that extends below the frost line, or install a small PVC drain pipe that leads away from the pit if you are building on a slope.
Mistake: Ignoring “Leg Room”
The Fix: People often buy chairs that are too large for the patio they have built. When the chairs are pulled back to a comfortable distance, the back legs often fall off the edge of the gravel or stone. Always size your patio 2 feet wider than you think you need to ensure all four legs of every chair stay on level ground.
Mistake: Over-Lighting
The Fix: The fire should be the star of the show. If you have bright floodlights hitting the area, you lose the “cozy” atmosphere. Use “warm white” bulbs (2700K or lower) and keep the light sources low to the ground or tucked away in tree canopies to mimic moonlight.
Room-by-Room Variations
Even though we are outdoors, we can think of fire pit areas as different “room types” based on their location and intended use.
The “Woodland Nook”
This is a small, intimate setup tucked into a corner of the yard, perhaps surrounded by ferns or tall grass. Use a small, 24-inch fire bowl and just two chairs. This is meant for quiet conversation or solo reading. Use bark mulch as the flooring to blend seamlessly into the trees.
The “Entertainer’s Plaza”
Located directly off the main back deck or patio, this is a larger-scale installation. It often features a square fire pit (which feels slightly more organized) and multiple seating zones. You might have a built-in bench on one side and movable chairs on the other to accommodate groups of 8 to 12 people.
The “Lakeside Hearth”
If you are lucky enough to be near water, the rustic look should lean into “driftwood” tones. Use pale grey stones and weathered cedar. The seating should be oriented to catch both the view of the water and the warmth of the fire. In these areas, wind protection is key, so consider a sunken fire pit design where the seating is slightly lower than the surrounding grade.
Finish & Styling Checklist
Before you invite the neighbors over, run through this checklist to ensure the space is fully “dressed.”
- Fuel Supply: A rustic metal hoop or a wooden crate filled with dry, seasoned hardwood (oak, maple, or birch). Avoid “green” wood, which creates excessive smoke.
- Side Tables: At least one small table for every two chairs. A petrified wood stump or a simple metal tripod table works well for holding drinks and s’mores supplies.
- Soft Goods: A basket of rolled-up blankets. Choose materials like wool or heavy-duty acrylic that can handle a bit of wood smoke.
- Safety Tools: A long-handled poker and a set of embers tongs. These should be made of heavy wrought iron to match the rustic theme.
- Extinguisher: A stylish but functional way to douse the fire. A dedicated “fire bucket” filled with sand can look very rustic while being a vital safety feature.
- Ambiance: A few oversized lanterns with LED candles can provide soft light in the transition areas between the house and the fire pit.
What I’d Do in a Real Project: Mini Checklist
If I were designing a rustic fire pit for a client today, here is my “non-negotiable” punch list:
- I would specify Pennsylvania Blue Stone (irregular cut) for the patio floor for its incredible color depth.
- I would use a Corten steel fire insert to ensure the internal structure never rots or cracks.
- I would mix chair types—perhaps four heavy Adirondacks and two low-slung wicker lounge chairs—to make the space feel less “matched.”
- I would plant fragrant herbs like rosemary or lavender near the seating area; when people brush against them, the scent adds to the sensory experience.
- I would install a dimmer switch on any nearby house or string lights to ensure the fire remains the primary light source.
FAQs
Is a wood-burning or gas fire pit better for a rustic look?
Wood-burning is the most “authentic” rustic experience because of the sound and smell. However, gas fire pits are much cleaner and can be turned on instantly. You can make a gas pit look rustic by using “lava rock” or ceramic “logs” that mimic real wood, housed within a natural stone structure.
How do I prevent my fire pit from rusting?
If you don’t want the rusted look of Corten steel, look for pits with a high-temperature powder coating or stainless steel interiors. For the exterior, using a fitted weather cover when the pit is not in use is the best way to prolong its life.
Can I put a fire pit on a wooden deck?
I generally advise against it for a truly rustic (wood-burning) setup due to the risk of embers. If you must, you need a gas-powered pit and a “deck protector” or heat shield underneath it. Always check the manufacturer’s specifications and your local fire code.
What is the best wood for a backyard fire?
Hardwoods like Oak, Hickory, and Ash are best. They burn longer and hotter with less smoke. Avoid softwoods like Pine or Fir for social gatherings, as they “pop” and throw sparks, which can be dangerous for guests and their clothing.
How do I clean my fire pit?
For a wood-burning pit, wait 24 hours for ashes to cool completely before scooping them into a metal bucket. Occasionally scrub the stone or metal with a stiff brush and water to remove soot buildup. Never pour cold water onto a hot fire pit, as the thermal shock can crack the stone or metal.
Conclusion
Creating a cozy rustic fire pit is about more than just digging a hole and lighting a match. It is about crafting an environment that feels grounded, safe, and deeply inviting. By focusing on natural materials like fieldstone and weathered wood, and paying close attention to the proportions of your seating and the flow of your “outdoor room,” you create a destination that adds immense value to your lifestyle.
Remember that the best rustic spaces are those that feel lived-in. Don’t worry if the stone gets a little soot on it or if the metal starts to develop a deep bronze patina. These are the marks of a space that is doing its job: bringing people together to enjoy the simple, timeless pleasure of a fire under the stars. With the right layout, a bit of planning for drainage and safety, and a few well-chosen textiles, your backyard will soon become everyone’s favorite place to be.


