
Cozy Small Shed Bar Ideas for Your Backyard
Transforming a humble garden shed into a backyard bar is one of the most rewarding projects you can undertake. It extends your living space, provides a designated entertainment zone, and keeps the mess of a party out of your main kitchen. Whether you call it a “pub shed” or a “she-shed,” the goal is creating an escape right outside your back door.
However, designing a functional bar in a 10×12 or 8×10 footprint requires strict attention to scale and flow. You cannot simply shrink a standard kitchen design and expect it to work in an unconditioned outbuilding. If you are looking for visual inspiration, check out the Picture Gallery at the end of the blog post.
In this guide, I will walk you through the structural layouts, material choices, and styling tricks that make a small shed feel like a high-end lounge. We will cover everything from the critical pass-through window to the exact measurements required for comfortable seating.
1. Planning the Layout and Structural Flow
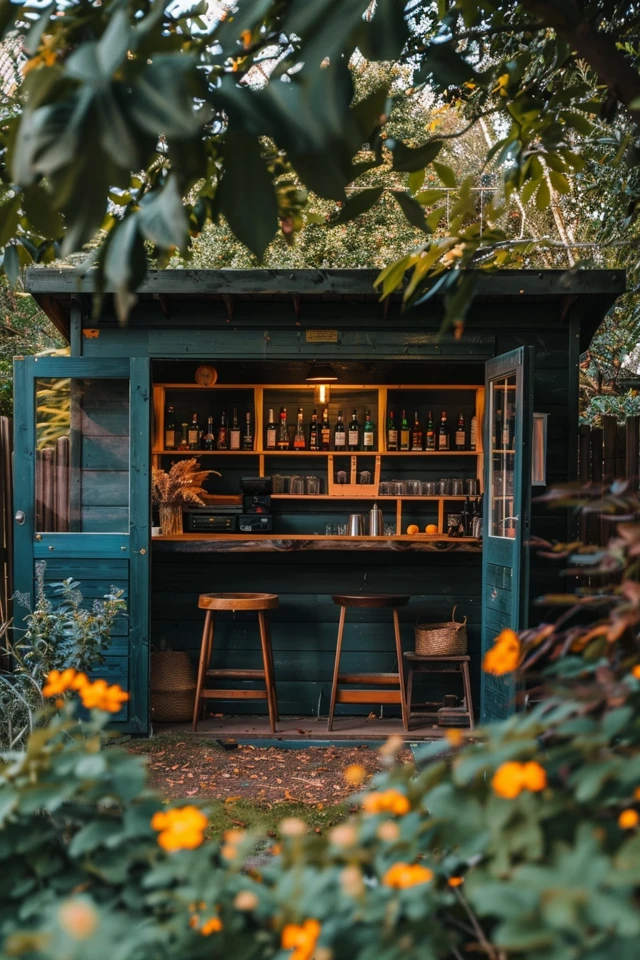
Before you buy a single barstool, you must establish the floor plan. In a small shed, every inch counts, and a poor layout will make the space feel claustrophobic rather than cozy. The most successful shed bars usually follow one of two layouts: the L-shape or the Galley.
For an 8×10 shed, I almost always recommend an L-shaped bar tucked into a corner. This leaves the center of the room open for circulation or a small bistro table. If you have a larger 10×12 or 12×16 structure, a Galley layout (a back bar against the wall and a serving island in front) offers the most professional feel.
You also need to consider the “service aisle.” This is the space behind the bar where the bartender stands. In a residential setting, you can get away with a tighter squeeze than a commercial bar. I recommend a minimum width of 30 to 36 inches. Anything less than 30 inches makes it difficult to bend down to reach a mini-fridge or lower shelving.
Designer’s Note: The Door Swing
One of the most frequent oversight issues I see in DIY shed conversions is the door swing. If your shed door swings inward, it consumes valuable floor space.
- The Fix: Rehang the door to swing outward.
- The Upgrade: Replace standard doors with French doors or a sliding barn door system to maximize internal usable square footage.
2. The Pass-Through Window: Connecting Indoors and Out
The feature that truly elevates a shed from a “storage unit with a table” to a “destination bar” is the pass-through window. Cutting a hole in the side of the shed and adding a flip-up or sliding window creates an immediate connection to the rest of the yard. It allows guests to grab a drink without crowding inside the small structure.
When designing this, height is critical. Standard bar height is between 40 and 42 inches from the ground. Your exterior shelf needs to match this height for compatibility with standard barstools. If you place the counter at table height (30 inches), standard barstools will not fit, and standing guests will have to stoop to pick up their drinks.
You must also consider the overhang. For comfortable seating on the exterior side, the counter should overhang the shed wall by at least 12 to 15 inches. This provides enough clearance for knees so guests aren’t banging their legs against the siding. Support this overhang with heavy-duty, exterior-rated brackets spaced every 16 to 24 inches.
Common Mistakes + Fixes
- Mistake: Using untreated wood for the exterior bar ledge.
- Fix: Use naturally rot-resistant woods like Cedar, Teak, or White Oak sealed with marine-grade varnish. Alternatively, a quartz remnant is durable, but ensure it is covered in winter as thermal shock can crack stone.
- Mistake: Installing the window too high.
- Fix: Measure from the finished floor height, not the subfloor. If you plan to add thick flooring later, account for that rise.
3. Interior Finishes and Insulation Strategies
Unless you live in a perpetually mild climate, you need to address insulation. A metal or thin wood shed will become an oven in the summer and a freezer in the winter without it. Insulation also provides sound dampening, which your neighbors will appreciate during late-night gatherings.
I recommend using Rockwool insulation between the studs rather than standard fiberglass. Rockwool is hydrophobic (repels water) and fire-resistant, which is safer for a structure that might house electronics and alcohol. Once insulated, you need to choose wall treatments that can withstand temperature fluctuations.
Standard drywall is risky in a shed that isn’t climate-controlled 24/7. It attracts mold and creates dust. Instead, opt for shiplap, beadboard, or exterior-grade plywood paneling. These materials expand and contract with the weather without cracking at the seams. For a moody, speakeasy vibe, paint the walls and ceiling in dark tones like charcoal, navy, or forest green.
Flooring for High Traffic
Flooring in a shed bar needs to be nearly indestructible. You will track in mud, grass, and inevitably spill drinks.
- Top Pick: Luxury Vinyl Plank (LVP). It is waterproof, easy to install, and mimics the look of real hardwood. Look for a wear layer of at least 12 mil or higher.
- Runner Up: Epoxy coating. If you have a concrete slab foundation, a flake epoxy floor is commercial-grade durable and can be hosed down.
- Avoid: Laminate flooring (swells with moisture) or carpet (traps smells and mold).
4. Lighting: Setting the Mood
Lighting can make or break the atmosphere of a small space. A single overhead bulb will make your bar feel like an interrogation room. You need to layer your lighting to create warmth and depth.
In a small shed, you want to utilize vertical space. Wall sconces are your best friend. Place them on either side of the back bar shelving to highlight your bottle collection. If you are wiring the shed for electricity, put everything on dimmer switches. The ability to lower the lights as the evening progresses is essential for that “cozy” factor.
If you are running a simple extension cord rather than hardwiring the shed, you can still achieve great results. Use high-quality LED strip lights under the bar counter or behind shelves. Portable, rechargeable table lamps are also trending in design right now; they offer a wireless way to add a warm glow to the bar top.
The Kelvin Rule
Pay attention to the color temperature of your bulbs. For a bar setting, you want “Warm White” bulbs, typically between 2200K and 2700K. Anything above 3000K will look blue and clinical, killing the relaxed vibe immediately.
5. Storage Solutions and Furniture Selection
In a 100-square-foot space, clutter is the enemy. Your storage needs to be vertical and shallow. Standard kitchen cabinets are 24 inches deep, which is often too bulky for a shed bar.
I recommend using upper wall cabinets as base cabinets. Upper cabinets are typically 12 inches deep. If you raise them up on a 4-inch toe-kick platform and top them with a counter, you get a narrow profile bar that saves a foot of floor space compared to standard cabinetry. This is a massive game-changer for flow.
For shelving, use open floating shelves with a lip or rail. This prevents bottles from vibrating off the edge if the door slams shut. Space your shelves at least 14 to 16 inches apart vertically to accommodate tall liquor bottles and wine decanters.
Furniture Constraints
When choosing stools, measure the footprint. Avoid wide, sprawling legs that become tripping hazards.
- Backless Stools: These can be tucked completely under the bar overhang when not in use, keeping the walkways clear.
- Swivel Stools: These allow guests to turn and talk to people elsewhere in the shed without scooting the chair back and forth, which saves floor wear.
What I’d Do in a Real Project: Mini Checklist
If I were designing a shed bar for a client today, here is the exact sequence and spec list I would follow:
- Preparation: Level the shed. If the structure isn’t level, drinks will slide, and doors won’t latch.
- The Bar Top: I would source a live-edge slab of Walnut or Acacia. It adds instant character and warmth that manufactured materials can’t match.
- The Fridge: I would install a glass-front beverage cooler rather than a solid door mini-fridge. Seeing the drinks adds to the visual appeal. Ensure you leave 2 inches of clearance on all sides for ventilation.
- The Walls: Dark paint (Sherwin Williams Iron Ore or similar) on walls and ceiling to blur the boundaries of the room, making it feel larger and more intimate.
- The Decor: A large mirror behind the bar. This is the oldest trick in the book, but it works. It reflects light and makes the room feel twice as deep.
Final Checklist: Before You Host
Use this checklist to ensure your shed is ready for prime time.
- Safety Check: Is the path to the shed well-lit? Solar path lights are an easy fix.
- Power: Do you have enough outlets for the blender, fridge, and phone chargers?
- Climate Control: Do you have a small fan for summer or a safe, electric radiator for winter?
- Pest Control: Have you sealed gaps around pipes and wires with steel wool and foam to keep mice out?
- Glassware: Do you have acrylic or polycarbonate “glassware” for outdoor safety?
- Music: Is there a designated spot for a Bluetooth speaker that improves acoustics?
Frequently Asked Questions
Do I need a permit to build a shed bar?
This depends entirely on your local municipality and the size of the structure. Generally, sheds under a certain square footage (often 100 or 120 sq. ft.) do not require a building permit. However, if you are running electrical lines or plumbing to the shed, that almost always requires a trade permit and inspection. Always check with your local building department first.
How do I handle plumbing without running expensive pipes?
Most shed bars are “dry bars,” meaning they don’t have a sink with running water. To manage this, we use a two-bin system. One bin is for clean ice, and a separate tub is used to bus dirty glasses, which are brought back to the main house for washing. If you must have a sink, consider a camping-style foot pump sink or a simple gray water system if local codes allow.
Can I put a TV in an uninsulated shed?
Electronics generally hate moisture and extreme temperature swings. If your shed is not climate-controlled, bring the TV inside during the winter or extended periods of non-use. If you mount it permanently, buy an outdoor-rated TV cover to protect it from dust and humidity when not in use.
What is the best way to secure the shed?
Since you are storing alcohol and potentially expensive electronics, security is vital. Install a deadbolt rather than a simple padlock. Motion-sensor floodlights on the exterior are a great deterrent. Smart locks are also excellent as they allow you to check if the door is locked from your phone.
Conclusion
Creating a cozy small shed bar is about balancing imagination with strict practicality. It requires you to look at a small, often overlooked structure and see the potential for connection and relaxation. By focusing on the right scale for your furniture, ensuring the flow works for both the bartender and the guest, and selecting materials that can survive the seasons, you can build a professional-grade hangout in your own backyard.
Remember that the best designs evolve. Start with the “bones”—the insulation, the flooring, and the bar counter. You can always upgrade the lighting, add better stools, or expand your liquor collection over time. The most important step is opening that door and inviting your first guest in.
Picture Gallery


