
Creating a Multi-Level Backyard: Design Ideas and Considerations
A sloping yard often feels like a curse to homeowners dreaming of a flat, expansive lawn for soccer games or easy mowing. However, in the world of landscape and exterior design, elevation changes are actually a gift in disguise. They allow us to create distinct “outdoor rooms” that flat yards simply cannot emulate without massive construction costs.
I recently worked with a client who purchased a home specifically for the view, only to realize the backyard dropped off so steeply that it felt unusable. By terracing the slope into three distinct zones—a dining deck, a lounge area, and a lower garden—we tripled their usable square footage. If you are looking for visual inspiration, feel free to skip ahead to the Picture Gallery at the end of this blog post.
Designing a multi-level backyard requires a shift in perspective. You are not just planting grass; you are engineering space. This guide will walk you through the structural necessities, the zoning logic, and the aesthetic choices that turn a hill into a sanctuary.
Phase 1: Assessing the Terrain and Engineering
Before we pick out patio furniture or pavers, we have to talk about gravity and water. The biggest mistake DIY enthusiasts make with multi-level yards is underestimating the engineering required to hold the earth back.
If your vertical drop is significant, you are likely dealing with retaining walls. As a general rule of thumb, most municipalities allow retaining walls up to three or four feet high without a structural engineer’s stamp. Anything higher usually requires professional permitting and calculations to ensure the wall doesn’t collapse under the weight of wet soil.
Drainage is the unglamorous hero of this design. When you create flat terraces on a slope, you disrupt the natural flow of rainwater. If you build a retaining wall without “weep holes” or a French drain behind it, hydrostatic pressure builds up. This can push your beautiful new stone wall over in a single wet season.
Designer’s Note:
I once saw a project where a homeowner built a beautiful sunken fire pit area but forgot to install a drain in the center. The first heavy summer rain turned their lounge area into a muddy swimming pool. Always plan where the water goes before you pour a single drop of concrete.
Phase 2: Zoning Your Levels for Function
The beauty of a multi-level yard is the natural separation of activities. In an open-plan interior, we use rugs to define zones; outdoors, we use elevation. The most successful layouts follow a hierarchy of convenience.
The top level, usually the one connected to the house, should be your high-traffic zone. This is where the outdoor kitchen and dining table belong. You do not want to be carrying platters of food or trays of drinks down a flight of stairs every time you want to eat outside.
The middle or lower levels are perfect for “destination” zones. These are areas you go to when you want to relax and stay put for a while. Think fire pits, deep seating lounge areas, or a hot tub. The physical act of walking down steps signals a mental shift toward relaxation.
Common Mistakes and Fixes
Mistake: Making the levels too small.
Fix: A terrace needs to be functional, not just a landing pad. For a dining area, you need at least 36 inches of clearance behind every chair for guests to slide out comfortably. If you are placing a fire pit, you need 3 to 4 feet of circulation space between the edge of the pit and the seating.
Mistake: Blocking the view.
Fix: When designing railings for upper decks, consider cable rails or tempered glass. These materials provide safety without creating a visual barrier to the lower levels or the landscape beyond.
Phase 3: Navigating Transitions and Stairs
Stairs are the arteries of your multi-level backyard. They need to be safe, wide, and inviting. In interior design, stairs can be steep to save space, but outdoors, we want a more languid, relaxed pace.
I always recommend an “outdoor scale” for steps. While indoor risers (the vertical part) are usually around 7.5 inches, outdoor risers feel better at 6 inches or even 5.5 inches. To compensate, the tread (the part you step on) should be deeper—at least 12 to 14 inches. This creates a gentle descent that feels luxurious rather than utilitarian.
If you have the space, break up long flights of stairs with landings. A run of more than 8 or 9 steps can feel daunting. A landing allows the eye to rest and provides a spot to place a decorative planter or a bench.
Material Consistency
Your transition materials should tell a story. You have two main options here:
- Seamless Continuity: Use the same paving material (e.g., bluestone or travertine) on every level and on the stair treads. This makes the space feel larger and more cohesive.
- Deliberate Contrast: Use wood or composite decking for the upper level to connect with the interior flooring, and switch to stone or pavers for the lower, “earthier” levels. This emphasizes the transition from architecture to nature.
Phase 4: Softscaping and Planting Strategies
Plants are essential for softening the hard edges of retaining walls and stairs. In a multi-level garden, you have the unique opportunity to play with verticality.
On the tops of retaining walls, use “spiller” plants. Species like Creeping Jenny, trailing rosemary, or ivy can cascade over the edge of the stone. This breaks up the visual mass of the wall and makes the masonry look settled and aged.
For the lower levels, be careful with tree placement. A common error is planting a tree on a lower terrace that eventually grows tall enough to block the view from the upper terrace. Research the mature canopy height of every tree you plant.
What I’d do in a real project:
I often use terraced planting beds as the safety barrier instead of railings, where code allows. If the drop between levels is less than 30 inches, you typically don’t need a guardrail. A wide planter box with dense shrubs can serve as a visual edge that keeps people safe without looking like a cage.
Phase 5: Lighting for Drama and Safety
Lighting is critical in a multi-level backyard for two reasons: ambiance and liability. You cannot have guests navigating changes in elevation in the dark.
Step Lighting:
Every change in grade requires illumination. You can use recessed riser lights, which are subtle and modern, or under-cap lights that sit beneath the lip of a stone step. The goal is to cast light down onto the tread, not up into the eye.
Zone Lighting:
Treat each level like a separate room with its own dimming controls. You might want the dining area bright while the lower fire pit area is moody and dim.
Uplighting:
Use spotlights at the base of trees or against stone retaining walls. Grazing a textured stone wall with light from below highlights the material and adds depth to the yard at night.
Phase 6: Furniture Layout and Scale
Furnishing a multi-level yard requires a keen eye for scale. Because terraces are often defined by immovable retaining walls, you don’t have the luxury of “scooting” the sofa back a few feet if things feel tight.
Measure Twice, Buy Once:
Before buying outdoor furniture, map out the space with painter’s tape on the patio. Ensure you have clear walking paths. A primary walkway should be 36 to 48 inches wide. A secondary path between a sofa and a coffee table should be 18 inches.
Visual Weight:
On upper decks, which often have railings, choose furniture with open frames or lower backs. Heavy, solid furniture can make a raised deck feel claustrophobic. On lower, ground-level patios, you can use heavier, solid teak or woven wicker pieces that feel grounded and substantial.
The Rug Rule:
Yes, you should use outdoor rugs. They help define the seating area within the stone terrace. The rule is the same as indoors: the front legs of all key furniture pieces should sit on the rug. This anchors the furniture and prevents the “floating” look.
Phase 7: Practical Considerations for Renters and Small Budgets
Not everyone can afford to bulldoze a hill and pour concrete retaining walls. If you are renting or working with a tight budget, you can still achieve a multi-level look.
The Deck Platform:
Building a floating wood deck over a sloping section of the yard is often cheaper than excavating and building retaining walls. It requires less earthmoving and provides an instant flat surface.
Gravel Terraces:
Instead of expensive stone pavers, use timber borders to create terraced boxes and fill them with crushed granite or pea gravel. This provides excellent drainage and a chic, European garden aesthetic at a fraction of the cost of poured concrete.
Potted Gardens:
Create height differences with planters. Group tall pots with short pots to mimic the look of a tiered garden. This adds vertical interest without any permanent construction.
Final Checklist: The “Pro” Approach
If I were consulting on your backyard today, this is the checklist I would run through before finalizing the design:
- Check the Code: Have you verified the maximum retaining wall height and railing requirements with your local building department?
- Water Management: Do you have a clear plan for where runoff from the upper patio goes? (Hint: It shouldn’t be onto the lower patio).
- Maintenance Access: Can you get a lawnmower or wheelbarrow to the lower level? If not, replace the grass with hardscape or low-maintenance ground cover.
- Sight Lines: Stand in your living room and look out. Do the railings or retaining walls block your view? Adjust heights accordingly.
- Power Supply: Have you run conduits for lighting, outdoor outlets, and irrigation before pouring concrete? Retrofitting is expensive.
FAQs
Does a multi-level backyard cost more than a flat one?
Generally, yes. The labor involved in excavation, moving soil, and building structural retaining walls adds significantly to the budget. However, it also adds significant value by turning unusable slopes into premium square footage.
What is the best material for retaining walls?
For a modern look, smooth-finish poured concrete or corten steel is popular. For a traditional look, natural stacked stone or segmental concrete blocks are standard. Corten steel is a personal favorite because it is thin, saving valuable floor space, and requires no maintenance.
Can I DIY a multi-level backyard?
You can DIY the planting and perhaps small timber steps. However, grading land and building walls over three feet high involves serious safety risks and physics. I strongly recommend hiring a pro for the “hard” infrastructure (walls and drainage) and saving the DIY energy for the planting and styling.
How do I maintain a sloped yard?
Minimize lawn on difficult slopes. Mowing on an incline is dangerous and annoying. Use ground covers like pachysandra, vinca, or ornamental grasses that only need to be cut back once a year.
Conclusion
Creating a multi-level backyard is one of the most rewarding projects in landscape design. It turns a “problem” yard into a series of discoveries. By carving out distinct zones for dining, lounging, and playing, you make your outdoor space feel significantly larger and more dynamic.
Remember that the success of the design lies in the boring details: the drainage, the riser heights, and the circulation paths. Once the structure is solid, the fun part—selecting the plush cushions, the mood lighting, and the lush greenery—becomes easy. Embrace the slope, and you might find that your tiered backyard becomes the most used room in your home.
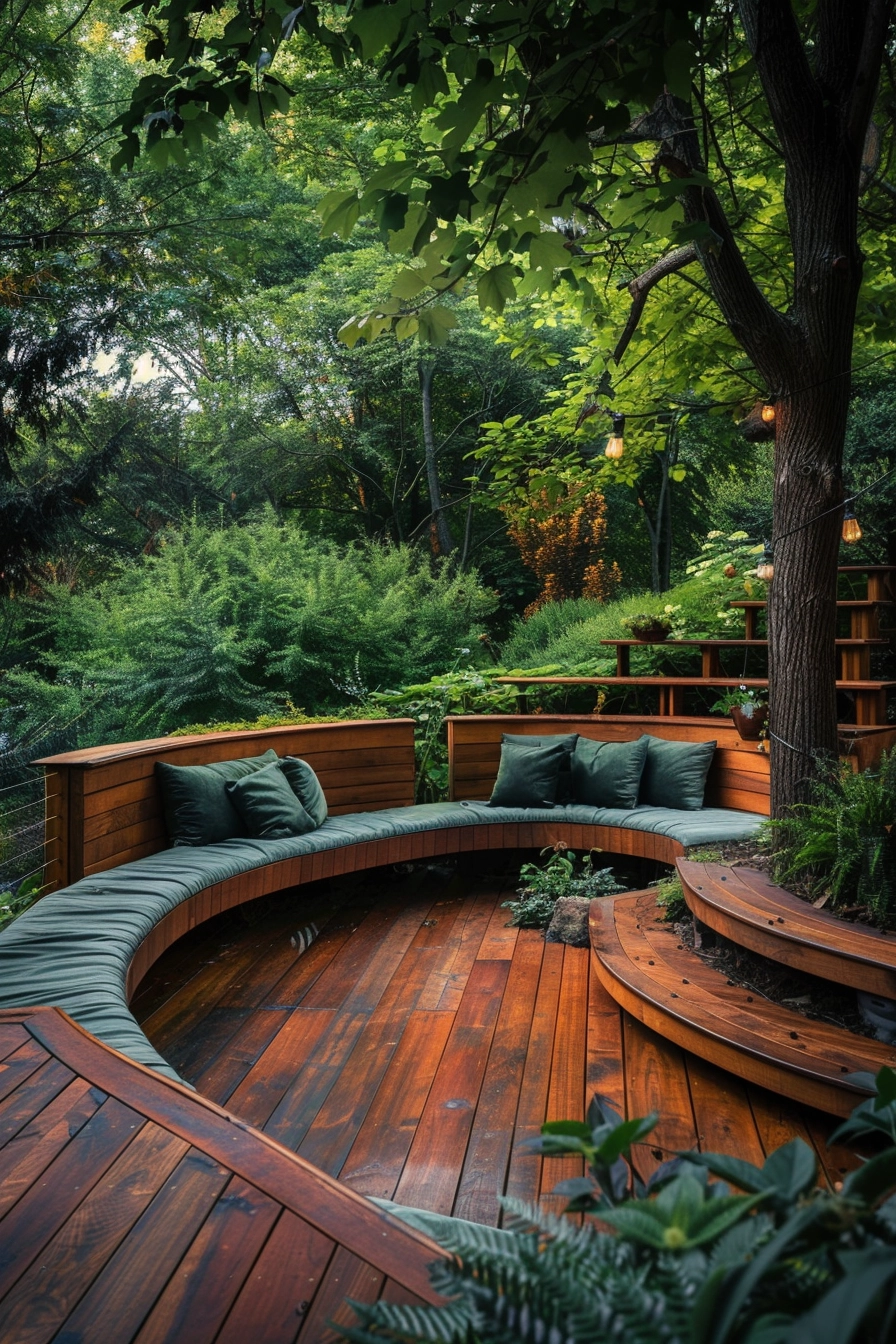
Picture Gallery


