
Creative Back Bar Shelving Ideas for Your Space
A well-designed home bar is often the centerpiece of a living area or basement lounge. It is where hospitality happens, conversations start, and the day officially winds down. While the counter gets all the action, the back bar shelving provides the visual drama and functionality.
Whether you are working with a sprawling basement wall or a tight living room niche, the principles of good shelving remain the same. It comes down to a balance of structural integrity, lighting, and curated styling. To spark your imagination, I have curated a comprehensive Picture Gallery at the end of this blog post with real-world examples.
Let’s dive into the mechanics and aesthetics of creating a back bar that looks like it belongs in a high-end boutique hotel.
1. Structural Considerations: Floating vs. Brackets
Before you buy lumber or order glass, you must address the weight. Liquor bottles are deceptively heavy. A standard 750ml bottle weighs roughly 3 pounds, meaning a fully stocked 3-foot shelf can easily hold 50 to 60 pounds of glass and liquid.
The Floating Shelf Aesthetic
Floating shelves offer a clean, modern look that makes the room feel larger. However, true floating shelves require significant structural planning. You cannot simply use drywall anchors for a back bar.
To execute this safely, you generally need “floating rod” brackets that are drilled directly into the wall studs. If you are doing a new build or a major renovation, I always recommend “blocking” the wall before drywall goes up. This involves adding solid wood between the studs, allowing you to mount shelves anywhere without hunting for stud locations later.
Visible Brackets and Systems
If opening up walls isn’t an option, visible brackets are a safer and often more stylish choice. Industrial piping fits rustic or steampunk aesthetics, while sleek brass angles suit mid-century modern designs.
Designer’s Note:
When using visible brackets, ensure the vertical spacing accommodates your tallest bottles. Most standard spirits fit within 12 to 13 inches of vertical clearance. However, if you plan to display top-shelf tequilas or wines standing up, aim for 15 to 18 inches of clearance. Nothing is worse than building a beautiful unit and realizing the Grey Goose bottle doesn’t fit.
2. Material Selection and Finishes
The material you choose for your shelving sets the tone for the entire room. In a kitchen, we often match the cabinetry, but a home bar allows for more dramatic departures.
Glass Shelving
Glass is the go-to for a “light” look. It allows light to pass through from the top down, illuminating every bottle in the collection.
Thickness matters: Never use glass thinner than 3/8-inch for a bar. For spans wider than 24 inches, upgrade to 1/2-inch tempered glass to prevent sagging or shattering.
Cleaning: Glass shows dust and fingerprints instantly. If you hate dusting, this might not be for you.
Wood and Timber
Wood brings warmth and acoustic dampening. For a moody, speakeasy vibe, look for dark stains like walnut or espresso. If your room is airy and coastal, white oak or ash are excellent choices.
Sealing: Alcohol strips varnish. Ensure your wood shelves are sealed with a high-performance polyurethane or a conversion varnish. Wax finishes look great but will spot immediately if vodka drips on them.
Metal and Mixed Media
One of my favorite contemporary looks is thin-profile steel shelving. Powder-coated black steel provides a graphic, sharp silhouette.
Mixing materials creates high-end appeal. Consider a wood shelf with a metal “gallery rail” (a small fence-like hardware piece on the front edge). This is a classic nautical detail that prevents bottles from sliding off and adds a jewelry-like finish.
3. Lighting: The Secret Ingredient
You can build the most expensive millwork in the world, but without proper lighting, it will look flat. In a bar setting, lighting isn’t just about visibility; it is about sparkle. Liquid in glass bottles interacts beautifully with light, creating a glowing effect that draws the eye.
Undershelf LED Channels
The gold standard for back bar shelving is recessed LED tape light. This involves routing a channel into the bottom (or back) of a wood shelf so the light strip sits flush.
The Diffuser: Always use a milky plastic diffuser cover over the LED tape. Without it, you will see “dots” of light reflected in your glossy bottles, which looks cheap.Color Temperature: For a home bar, avoid “Daylight” (5000K) bulbs. They look like a hospital and make amber liquors look sickly. Stick to 2700K (warm white) or 3000K (soft white). This warmth complements the amber hues of whiskey and cognac.
Backlighting and Translucent Materials
For a dramatic, commercial-bar look, consider a translucent backsplash like onyx or quartz with backlighting. Alternatively, you can place LED strips behind a frosted glass panel. This silhouettes the bottles, emphasizing their shapes rather than their labels.
Common Lighting Mistakes + Fixes
Mistake: Relying solely on overhead recessed cans.
Fix: Overhead cans cast shadows under the shelves, leaving lower bottles in the dark. Always layer your lighting. If hardwiring shelves isn’t possible, use rechargeable puck lights that mount magnetically.
Mistake: Glare on the mirror.
Fix: If you have a mirrored backsplash, position lights at the front of the shelf pointing in, or use opaque diffusers. Direct light hitting a mirror creates blinding hotspots.
4. The Art of Styling Your Shelves
Functional storage is important, but a back bar is also a display case. We want it to look curated, not like a cluttered liquor store.
The Pyramid Principle
Avoid lining bottles up like soldiers in a single row. Instead, group them. Create clusters of 3 or 5 items. Use varying heights to create a triangular visual shape.
For example, place a tall bottle of scotch next to a shorter decanter and a small stack of coasters. This guides the eye up and down, creating visual interest.
Mixing in Non-Bar Items
A shelf full of only glass bottles can feel cold and repetitive. Break up the monotony with organic textures.
Greenery: A trailing pothos plant softens the hard edges of glass and wood.Books: Stack a few cocktail recipe books horizontally to act as risers for a special bottle or a bowl of citrus.
Art: Lean small framed prints against the back of the shelf. This adds depth and personality.
Glassware Management
Displaying glassware is practical, but dust is the enemy. Store your everyday wine glasses upside down if you don’t use them often, or keep them in a closed cabinet below.
Reserve the open shelving for unique, sculptural glassware. Crystal decanters, copper mule mugs, or colorful tiki glasses act as decor even when empty.
5. Renter-Friendly and Small Space Solutions
Not everyone can tear open walls to install blocking for heavy shelves. If you are renting or working with a small apartment nook, you can still achieve a high-end look.
The Tension Pole System
Mid-century modern tension pole shelving units (like the Cado system) are fantastic for renters. They wedge between the floor and ceiling, requiring minimal to no drilling. They are modular, allowing you to adjust shelf heights for different bottle sizes.
The Bookcase Hack
Buy a sturdy, high-quality bookcase and “hack” it. Line the back panel with peel-and-stick wallpaper or a mirrored acrylic sheet. Swap out the standard hardware for heavy brass knobs. Add battery-operated LED strips. Suddenly, a basic unit looks like custom built-in cabinetry.
Vertical Wall Mounted Racks
In tight spaces, depth is the issue. Standard shelves stick out 10 to 12 inches. Instead, look for wall-mounted wine racks that hold bottles parallel to the wall. These only protrude about 4 inches into the room, making them perfect for narrow passageways or dining nooks.
What I’d Do in a Real Project: A Checklist
If I were designing a custom back bar for a client today, here is the exact mental checklist I would run through to ensure success.
Check the Depth: I aim for a shelf depth of 10 to 12 inches. Anything deeper creates a “dead zone” in the back where things get lost.
Verify the Electrical: Before drywall, I ensure there is a switched outlet or low-voltage wire run to the shelf location for lighting.
Measure the Reach: I never place the highest active shelf more than 72 inches off the floor. Unless the client is very tall, anything higher is purely decorative.
Finish Coordination: I check that the metal on the shelf brackets matches or complements the faucet at the wet bar and the cabinet hardware below.
Safety Rail: If the bar is in a high-traffic area, I insist on a gallery rail for the shelves to prevent accidental bumps from becoming disasters.
Mirror Plan: If using a mirror backing, I order “antique” or “smoked” mirror. Standard clear mirror can be too intense and reflects every smudge.
Common Mistakes + Fixes
Here are the specific pitfalls I see homeowners encounter when DIY-ing their bar shelves, and how to correct them.
Mistake: Ignoring Spacing for Tools
People measure for bottles but forget about cocktail shakers and tall mixing glasses.
Fix: Designate one shelf section with extra height (18 inches) specifically for tall tools and magnums.
Mistake: Overloading the Center
Placing all the heavy bottles in the middle of a wood shelf causes bowing over time.
Fix: Distribute weight evenly. Place heavy decanters near the brackets or support points, not in the dead center of the span.
Mistake: Using Rough Wood
Using reclaimed barn wood without sanding it perfectly.
Fix: Bar shelves need to be wipeable. Sticky liqueurs will bond to rough wood dust. Ensure the surface is planed smooth and sealed heavily.
FAQs
How much space should be between bar shelves?
For standard liquor bottles, 12 to 14 inches is sufficient. However, if you have tall wine bottles or decanters, aim for 15 to 18 inches. It is often best to have the bottom shelf taller (18 inches) for tall items, and upper shelves shorter (12 inches) for standard glassware.
What is the best depth for a liquor shelf?
The ideal depth is 10 to 12 inches. A standard wine bottle is about 3 to 3.5 inches in diameter. A 10-inch shelf allows you to store bottles two or three deep without the back row becoming inaccessible.
Can I use floating shelves for a bar?
Yes, but they must be heavy-duty. Use brackets that tie into wall studs. Avoid “decorative” floating shelves sold at big-box stores that are only rated for 10 or 15 pounds. You need a system rated for 50+ pounds per linear foot.
How do I light shelves without wires?
Use rechargeable LED puck lights or bars with motion sensors. Many now come in “warm white” temperatures and attach via magnetic strips, making them easy to remove for charging.
Conclusion
Designing the shelving for your back bar is about more than just storage; it is about creating a mood. By paying attention to the structural requirements, choosing materials that reflect your style, and layering in proper lighting, you transform a simple wall into a focal point.
Remember that this is a space for enjoyment. It should be durable enough to handle a spill, accessible enough to make mixing a drink easy, and beautiful enough to spark conversation. Take your time planning the measurements and lighting—the effort pays off every time you pour a drink.
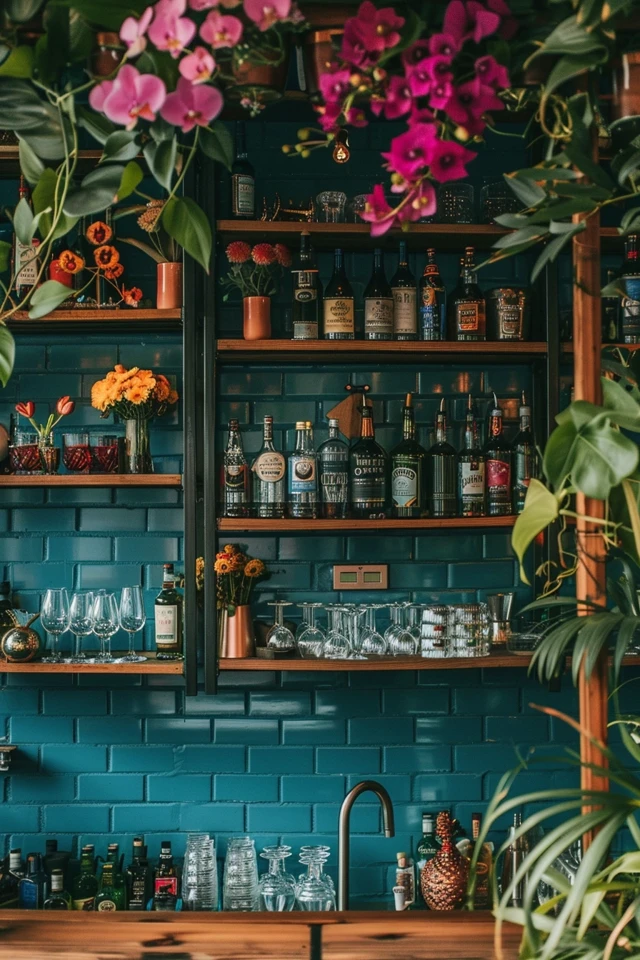
Picture Gallery


