
Creative Bar Ceiling Ideas to Elevate Your Space
When designing a home bar, most homeowners focus intensely on the cabinetry, the countertop material, and the backsplash. These are the elements directly in your line of sight, so it makes sense to prioritize them. However, in my years as an interior designer, I have found that the difference between a “nice corner” and a “destination space” often comes down to the fifth wall: the ceiling.
Treating the ceiling distinguishes the bar area from the rest of the room, especially in open-concept floor plans or finished basements. It creates a visual canopy that signals to the brain that you have entered a zone of relaxation and entertainment. Whether you are working with a cozy basement nook or a dedicated room, the ceiling offers a massive canvas to add drama without occupying valuable floor space.
If you are looking for visual inspiration, please note that the Picture Gallery is located at the end of this blog post.
1. Exposed Beams and Rustic Textures
Adding beams to a ceiling is one of the most effective ways to add warmth and architectural weight to a bar. In a home bar setting, this often mimics the feel of a traditional pub or a vineyard tasting room. The linear quality of beams also helps visually widen or lengthen a small space depending on how you orient them.
If you have high ceilings (9 feet or above), you can afford to use deep, dark-stained timbers. These lower the visual scale of the room, making a large space feel intimate and cozy, which is exactly the vibe you want for evening drinks. If your ceilings are standard 8-foot height, I recommend low-profile box beams painted white or a light natural wood tone to add texture without compressing the room.
Real Wood vs. Faux Box Beams
In renovation projects, we rarely install solid structural timber purely for aesthetics because of the immense weight. Instead, we use hollow box beams.
- Weight: Box beams are light enough to anchor into drywall with heavy-duty toggles if you cannot hit a joist perfectly.
- Utility: The hollow center is a lifesaver for bar design. You can run electrical wiring for pendant lights or spot lighting inside the beam without tearing up the actual ceiling.
- Customization: You can size them exactly to your room scale.
Pro Rule of Thumb: Spacing
A common mistake is spacing beams too close together, which makes the ceiling look cluttered.
For a standard room, space your beams 4 to 6 feet apart on center. If the beams are purely decorative and thin (less than 4 inches wide), you can tighten that spacing to 24 or 30 inches for a cottage look. Always ensure the beams run perpendicular to the longest wall if you want to make a narrow bar feel wider.
2. The Jewelry Box Effect: Wallpaper and Lacquer
If your home bar is a small alcove, a closet conversion, or a butler’s pantry, architectural additions like beams might be too bulky. This is where we rely on finishes to do the heavy lifting. Treating the ceiling as a “jewelry box” involves using high-impact colors or patterns to draw the eye upward.
Wallpapering the Ceiling
Wallpaper is fantastic for bars because it introduces pattern without the risk of spills or scuffs that you get with wallpapered walls.
- Geometric Patterns: Use grids or Art Deco geometrics to organize the chaos of bottles and glassware below.
- Textures: Grasscloth or metallic-flecked papers reflect ambient light, creating a moody glow in the evening.
- Direction: If you use a striped or directional pattern, run it toward the focal point (usually the main shelving unit) to lead the eye.
High-Gloss Lacquer
Paint is the most budget-friendly option, but the finish matters more than the color. For a bar, I love using a high-gloss or lacquered finish on the ceiling.
This creates a mirror-like effect that bounces light from your pendants or lamps. It makes low ceilings feel infinitely higher because the reflection blurs the boundary of the surface. However, be warned: high gloss highlights every imperfection. You need a Level 5 drywall finish (perfectly smooth) before applying gloss, or it will look rippled.
3. Architectural Coffering and Molding Grids
Coffered ceilings evoke the feeling of a classic cigar lounge or a high-end hotel bar. This grid of sunken panels adds instant luxury and depth. While traditional coffering is expensive and labor-intensive, you can achieve a similar look with flat molding applied in a grid pattern.
Defining the Zone
In an open-concept living area where the bar is just one part of a larger room, a coffered ceiling section effectively zones the space. You do not have to coffer the entire living room. You can drop the ceiling slightly over just the bar area and apply the grid there. This creates a “room within a room.”
Scale and Dimensions
Getting the scale right is critical for coffers.
- Depth: For ceilings under 9 feet, keep the beam depth shallow—about 2 to 3 inches. Deep coffers on a low ceiling feel oppressive.
- Grid Size: The squares (or rectangles) should be large enough to not look busy. A grid of 3-foot by 3-foot boxes is a safe starting point for most residential spaces.
- Trim Width: The “beams” creating the grid should be at least 4 to 6 inches wide. Anything narrower looks like picture frame molding rather than structure.
Acoustic Benefits
Hard surfaces like glass bottles, stone counters, and hardwood floors make bars noisy. Coffered ceilings help break up sound waves. If you want to get technical, you can install acoustic felt or cork inside the recessed panels of the coffer before painting them. This significantly dampens the clatter of cocktail shakers and conversation.
4. Metallic Finishes: Tin and Copper
Nothing says “speakeasy” quite like a pressed tin ceiling. This material has been a staple in pubs for over a century because it is durable, fire-resistant, and visually intricate. Today, we have access to both authentic metal sheets and lightweight faux-tin tiles made of PVC or fiberboard.
Choosing the Finish
The finish you choose dictates the era of the design.
- Bright Copper or Brass: These warm metals glow beautifully under dim lighting. They pair well with navy or hunter green cabinetry.
- Matte Black or Pewter: These create a more industrial, modern aesthetic. They are great for hiding dark corners in a basement bar.
- Distressed White: This suits a farmhouse or coastal aesthetic, offering texture without the heavy shine.
Installation Realities
If you choose real metal, be aware that it can interfere with WiFi signals if your router is located directly above the bar.
For installation, “nail-up” tiles require a plywood substrate, meaning you have to plywood the ceiling first. “Drop-in” tiles work with a suspended grid system, which is common in basements. If you use a drop-in grid, buy decorative grid tape or paint the grid rails to match the metallic tile so the skeleton doesn’t show.
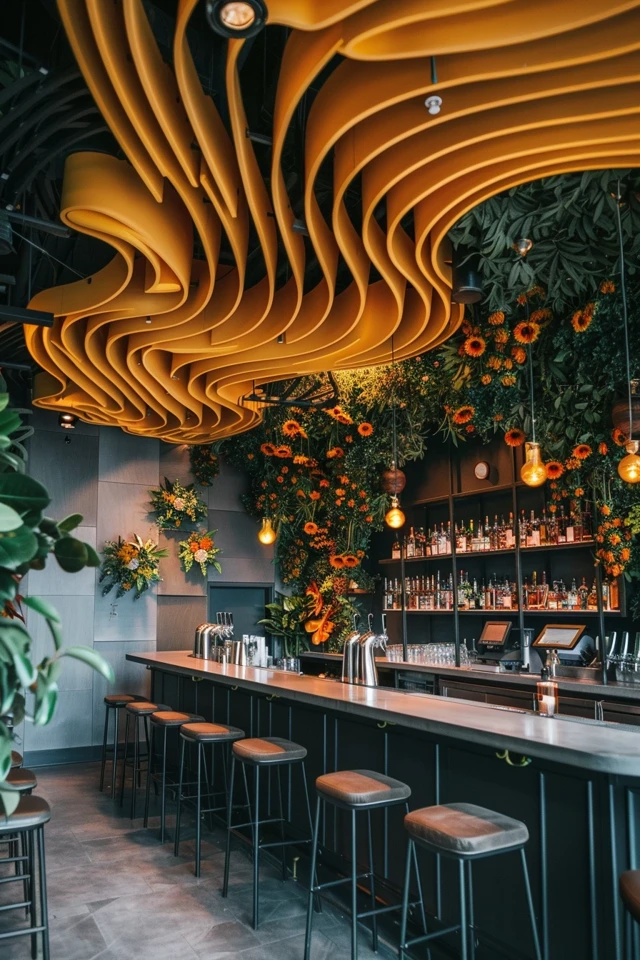
5. Suspended Features and Wood Slats
For a modern, organic look, suspended wood slats or trellises are trending heavily. This involves hanging linear wood pieces with gaps in between, allowing you to see through to the dark-painted ceiling above. This adds depth and hides unsightly basement utilities like pipes or ductwork without requiring a full drywall drop.
Lighting Integration
The best part of a slat ceiling is the lighting potential. You can install linear LED channels between the slats for a futuristic, seamless look. Alternatively, you can hang black track lighting above the slats so the light shines through the gaps, creating dramatic shadows and highlighting the bar top.
Measurements for Suspended Ceilings
If you are dropping a feature ceiling over a bar:
- Clearance: Ensure the lowest point of the feature is at least 80 to 84 inches above the floor.
- Bar Clearance: If the feature is only directly over the bar counter (like a floating cloud), it can sit lower, but keep it at least 30 to 36 inches above the countertop surface so it doesn’t obstruct views.
Designer’s Note: The Lighting Lesson
In one of my first commercial projects, we designed a stunning black ceiling for a bar. It looked sleek during the day. However, once we turned the lights on for the evening service, we realized we had a problem. We had used only recessed downlights (can lights). Because the ceiling was black, it absorbed all the bounce light. The downlights created harsh, unflattering shadows on guests’ faces—everyone looked like they had dark circles under their eyes.
The Lesson: If you choose a dark or busy ceiling for your bar, you cannot rely on ceiling cans alone. You must layer your lighting.
- Eye Level: Add sconces or table lamps to illuminate faces.
- Bar Level: Use pendants or under-cabinet strip lighting to light the work surface.
- Ceiling Level: Use the ceiling fixture for ambient glow or architectural interest, not as the sole light source.
Common Mistakes + Fixes
Mistake: Ignoring the “Fifth Wall” Color Clash
Many people paint the bar walls a moody color but leave the ceiling stark white. This creates a harsh contrast line that draws the eye to the corner, making the room feel shorter.
Fix: Paint the ceiling the same color as the walls (color drenching) or a shade slightly lighter. This blurs the edges and makes the space feel enveloping.
Mistake: Over-scaling Light Fixtures
Homeowners often buy massive pendants that look great in a showroom but overwhelm a home bar.
Fix: As a rule of thumb, the diameter of a pendant light should be about one-half to two-thirds the width of the bar counter. If your bar is 24 inches deep, your pendants should be 12 to 16 inches wide maximum.
Mistake: Forgetting Maintenance
Intricate coffers or rough reclaimed wood beams are dust magnets. In a bar, dust is the enemy of clean glassware.
Fix: Choose finishes that are wipeable. If you use rough wood, seal it with a clear matte polyurethane so it doesn’t shed splinters or hold onto dust bunnies.
What I’d Do in a Real Project: A Mini Checklist
If I were designing a bar for a client today, here is the exact mental order of operations I would follow regarding the ceiling:
- Check the Height: Measure floor to ceiling. If it is under 8 feet, I immediately rule out dark beams or drop ceilings. I pivot to wallpaper or high-gloss paint.
- Locate Utilities: Are there HVAC ducts or pipes? If yes, I plan a suspended slat system or hollow box beams to hide them intentionally.
- Define the Vibe: Is it a sports bar (needs acoustic control = felt or cork tiles) or a cocktail lounge (needs mood = tin or lacquer)?
- Plan Lighting Locations: I mark exactly where the pendants will hang before selecting the ceiling material. You do not want to drill through a metal tile in the wrong spot.
- Select Material: I order samples. I hold the ceiling sample up vertically (not flat on a table) to see how light hits it.
Final Checklist for Execution
Before you commit to your bar ceiling renovation, ensure you have ticked these boxes:
- Structural Integrity: If hanging heavy beams or a suspended trellis, have you located the joists? Do you have the correct anchors?
- Electrical Rough-In: Have you run the wires for pendants before closing up or finishing the ceiling?
- Finish Durability: Is the material resistant to humidity? (Basement bars can be damp).
- Dimmability: Are your ceiling lights on a dimmer switch? This is non-negotiable for bar atmosphere.
- Visual Balance: Does the ceiling compete with the backsplash? If the backsplash is crazy patterned tile, keep the ceiling texture subtle.
FAQs
What is the best ceiling color for a basement bar?
While white brightens, it often highlights how low a basement ceiling is. I prefer medium-tone grays, navys, or forest greens. Darker colors recede visually, often making the low ceiling “disappear” rather than feeling like a lid on a box.
Can I install a tin ceiling over a popcorn ceiling?
Technically yes, but it is difficult to get a flat surface for nail-up tiles. The best method is to install thin furring strips (wood lath) into the joists right over the popcorn, and then nail the tin tiles to the furring strips. This saves you the mess of scraping the popcorn.
How low should pendant lights hang over a bar?
The bottom of the pendant should be 30 to 36 inches above the countertop. This allows clear sightlines for people sitting or standing at the bar while still providing task lighting.
Is wallpaper on a bathroom or bar ceiling durable?
Yes, provided you have proper ventilation. In a bar area, humidity isn’t usually as high as a bathroom, so standard wallpaper is fine. If you are worried, apply a coat of clear decorators varnish over the paper to seal the seams.
Conclusion
Your home bar is a place for escape and enjoyment, and the design should reflect that. By treating the ceiling as a key design element, you elevate the experience from “drinking at home” to “having a night out.” Whether you choose the rustic charm of exposed beams, the glamour of high-gloss lacquer, or the vintage appeal of pressed tin, the effort you put into the overhead space will pay dividends in atmosphere.
Start by assessing your ceiling height and existing lighting, then choose a material that solves a problem—be it acoustics, aesthetics, or zoning. With the right plan, your ceiling can become the most talked-about feature of your home.
Picture Gallery


