
Creative Bathroom Accent Wall Tile Ideas
Introduction
Designing a bathroom often feels like a high-stakes puzzle where functionality fights with aesthetics. You have plumbing constraints, moisture issues, and usually a fairly small footprint to work with. In my years of design work, I have found that a tile accent wall is the single most effective way to inject personality into a sterile bathroom without blowing the entire renovation budget.
It creates a deliberate focal point that draws the eye away from less glamorous elements, like the toilet or a standard tub. Whether you are looking to create a spa-like retreat with natural stone or a moody powder room with glossy ceramics, the right wall treatment changes the entire architecture of the room.
However, selecting the tile is only half the battle; layout, grout color, and lighting are just as critical to the final look. For a huge dose of inspiration before you start demolishing, check out the full Picture Gallery at the end of this post.
1. Identifying the Right Wall for Impact
The first rule of accent walls is choosing the right canvas. Not every wall deserves to be a feature, and picking the wrong one can make a small bathroom feel chaotic rather than curated. In a standard interior design assessment, we look for the wall that you see immediately upon entering the room.
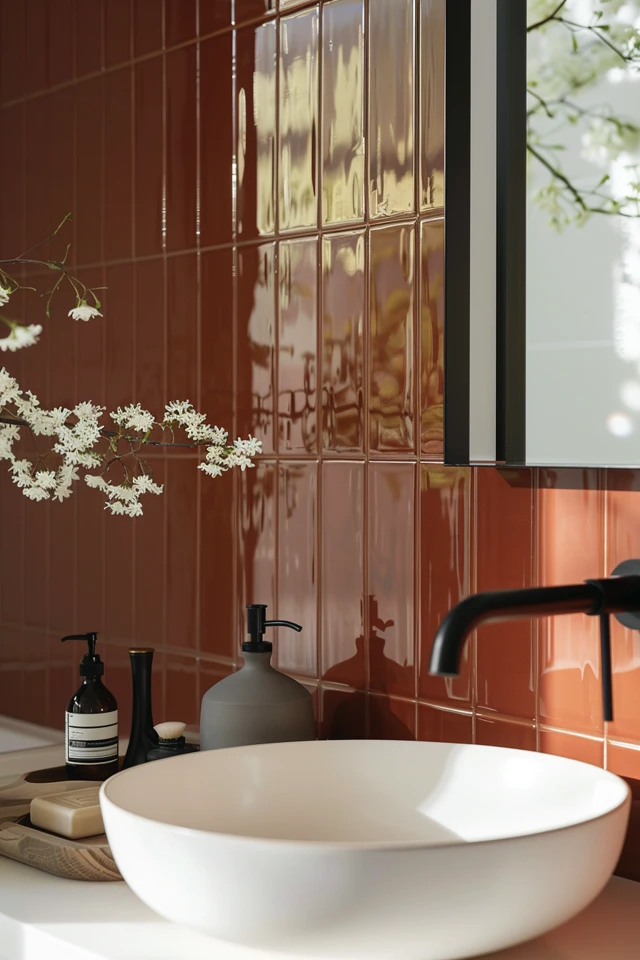
In many layouts, the vanity wall is the natural winner. Tiling from the vanity countertop all the way to the ceiling creates a dramatic, vertical lift that makes ceilings feel higher. If you tile behind the vanity, you also gain the functional benefit of a durable backsplash that protects drywall from water splashes and toothpaste flickers.
Alternatively, the back wall of a walk-in shower or the wall behind a freestanding soaking tub offers a “destination” feel. Tiling the back of the shower draws the eye through the room, making the space feel deeper.
Designer’s Note: The “U-Shape” Trap
I often see homeowners try to accent three walls in a shower niche or alcove to “finish” the space. While this works in large wet rooms, in a standard 5×8 bathroom, this can create a “cave” effect.
Usually, it is better to treat the back wall with a bold feature tile and keep the side walls neutral or glass. This allows the accent tile to breathe and reflects light better, preventing the shower from feeling claustrophobic.
2. Playing with Scale and Layout
The size of the tile relative to the size of the room is a conversation we must have. A common misconception is that small rooms need small tiles. Actually, the opposite is often true. Using large-format porcelain slabs or oversized subway tiles in a tiny powder room reduces visual clutter because there are fewer grout lines to break up the eye.
If you are committed to smaller tiles, such as penny rounds or intricate mosaics, consider the grout carefully. High-contrast grout emphasizes the grid and makes the wall look busy. Tonal grout (matching the tile color) softens the texture and creates a seamless, wallpaper-like effect.
Layout pattern is your secret weapon for manipulating room dimensions. A vertical stack bond (tiles stacked directly on top of each other) draws the eye upward, which is essential for basements or rooms with 8-foot ceilings. A herringbone pattern adds dynamic energy and width but can be expensive to install due to the number of cuts required.
Common Mistakes + Fixes
Mistake: ignoring the cuts at the corners.
Fix: A professional layout starts from the center line of the wall and works outward. If you start tiling from one corner, you might end up with a tiny, unsightly sliver of tile at the far end. Always dry-lay your pattern or calculate the cuts to ensure you have at least a half-tile on both ends of the wall.
3. Material Selection: Balance Beauty and Maintenance
When selecting materials for a bathroom accent wall, moisture is the dictator. While wallpaper is popular, tile is the only true survivor in high-humidity zones. However, not all tiles are created equal.
Porcelain is the workhorse of bathroom design. It is impervious to water, virtually stain-proof, and now comes in finishes that convincingly mimic marble, wood, or concrete. For a shower accent wall, porcelain is my top recommendation because it withstands daily scrubbing and acidic shampoos.
Natural stone, like Carrara marble or travertine, offers unparalleled depth and luxury. However, it is porous. If you use natural stone behind a vanity, realize that hair dye, acidic face washes, and even standing water can etch the surface. I typically reserve natural stone for walls behind freestanding tubs where direct chemical contact is less frequent.
The Zellige Trend
Hand-glazed Moroccan Zellige tiles are incredibly popular right now for their shimmering, imperfect texture. They reflect light beautifully, making small bathrooms feel airy.
Warning: These tiles are uneven by design. They do not lay flat, and the edges are sharp. I rarely recommend them for a shower bench or a floor, but they are stunning on a vanity wall. Just be prepared for a “rustic” installation where lippage (one tile sticking out further than another) is a feature, not a bug.
4. Color Theory and Grout Games
Color sets the mood. Deep greens, navy blues, and charcoals create a moody, intimate atmosphere, perfect for powder rooms where you spend less time. Light neutrals, whites, and soft grays evoke cleanliness and calm, ideal for master baths where you get ready in the morning.
If you choose a bold color for your accent wall, keep the remaining walls neutral but not stark white. A soft off-white or greige paint helps bridge the gap between a dark tile and the rest of the room.
Grout color can completely transform the tile. White subway tile with white grout is classic and subtle. The same tile with black grout is industrial and graphic. With brass, gold, or warm gray grout, it becomes transitional and warm.
Pro Tip: The 15% Rule
When ordering tile, especially patterned or shaped tile (like hexagons or scallops), always order 15% more than the square footage of the wall. Standard waste is 10%, but with complex cuts around shower heads, niches, and vanity lights, you will lose more material than you think. Running out of tile and finding out the dye lot has changed is a nightmare scenario.
5. Lighting Your Accent Wall
You can buy the most expensive tile in the world, but if the lighting is flat, the wall will look flat. Texture needs light to dance. If you are using a textured tile (like split-face stone or waved ceramics), you need “grazing” light.
Grazing involves placing downlights or recessed cans close to the wall (about 6 to 12 inches away) so the beam washes down the surface. This creates shadows and highlights that accentuate the texture.
For vanity walls, sconce placement is critical. If you are tiling the whole wall, you have to decide if the sconces sit on top of the tile or if you leave cutouts. Mounting on top of the tile is cleaner but requires the electrician and tiler to coordinate perfectly. The junction box must be set at the right depth so the fixture sits flush against the tile surface.
Standard Measurements
- Sconce Height: Generally, the center of the junction box should be roughly 60 to 66 inches from the floor for eye-level lighting.
- Sconce Spacing: If flanking a mirror, lights should be at least 28 to 30 inches apart to leave room for a standard mirror.
- Niche Height: If tiling a shower niche on your accent wall, aim for 48 to 60 inches off the floor so you aren’t bending down to reach shampoo.
6. Texture vs. Pattern
There is a distinct difference between a visual pattern and physical texture. A printed encaustic cement tile offers a visual pattern. It is flat to the touch but busy for the eye. This is great for a floor or a wainscoting effect but can be overwhelming on a full floor-to-ceiling wall.
Physical texture, like fluted tiles or 3D relief tiles, adds interest without adding visual noise. In a monochromatic bathroom (e.g., all white), texture is the only way to prevent the room from looking like a hospital.
I love using fluted or ribbed tiles in a vertical installation. It mimics the look of wood paneling but with the waterproofing of ceramic. It creates a modern, architectural feel that looks much more expensive than it is.
What I’d Do in a Real Project: A Mini Checklist
If I were managing your bathroom renovation today, this is the exact order of operations I would follow to ensure the accent wall succeeds:
1. Select the Hero: Pick the accent tile first. Everything else (floor tile, paint, vanity color) is a supporting character.
2. Check the Thickness: If the accent tile is thicker than the surrounding wall tile, you will have an ugly edge. Ensure depths align or plan for a transition profile.
3. Order a Sample Box: Never buy based on a screen image. Bring the sample into your bathroom. Look at it in the morning light and with the artificial lights on at night.
4. Plan the Edges: How will the tile end? Will you use a Schluter metal strip (modern), a bullnose tile (traditional), or a mitered edge (expensive but seamless)?
5. Mock Up the Grout: Make a small sample board with leftover tile and different grout colors. Grout dries lighter than it looks wet; do not skip this test.
6. Seal Before Grouting: If using stone or crackle-glaze ceramic, seal the tile before you grout. Grout pigment can stain porous tile surfaces permanently.
Final Checklist
Before you commit to a purchase, run through this final sanity check.
- Is the tile rated for wet areas? Some wall tiles are dry-application only.
- Do I have enough overage? (15-20% for herringbone/patterned, 10-15% for standard).
- Does the scale match the room? Large tile for calm, small tile for texture.
- Is the lighting plan compatible? Will the shadows look good or weird?
- Have I solved the edge problem? No raw clay edges should be visible.
FAQs
Can I tile over existing drywall?
Yes, for dry areas like behind a vanity. However, the drywall must be clean, flat, and primed. For shower areas or tub surrounds, you must remove the drywall and install a cement backer board or a waterproofing system like Kerdi-Board. Never tile directly onto drywall in a wet zone.
Is an accent wall dated?
An accent wall is only dated if it has no relationship to the rest of the room. The “random red wall” of the early 2000s is dated. An architectural feature wall that uses texture and high-quality materials to frame a vanity or shower is a timeless design principle.
How high should the tile go?
If your budget allows, go to the ceiling. Stopping 12 inches below the ceiling often makes the room look shorter and feels unfinished. If you cannot afford to go to the ceiling, consider a wainscot height (roughly 42 to 48 inches high) and paint the rest.
Can I use floor tile on the wall?
Generally, yes. Most floor tiles can be used on walls. However, you cannot use wall tile on the floor. Wall tile is often thinner and softer and will crack under foot traffic. Always check the manufacturer’s “application” rating.
Conclusion
Creating a bathroom accent wall is about defining the focal point of your sanctuary. It is an opportunity to use a material that might be too expensive to use everywhere but is perfect in a concentrated dose.
Remember that the goal is cohesion. The accent tile should converse with the floor tile, not scream at it. By paying attention to the unsexy details—grout spacing, edge trims, and lighting placement—you elevate a simple DIY project into a professional-grade interior.
Take your time with the layout. A well-planned grid is the difference between a remodel that looks “nice” and one that looks custom. Now, take a look at these examples to see how these principles apply in real spaces.
Picture Gallery


