
Creative Bathroom Corner Shelf Ideas to Try!
In my years designing residential spaces, the bathroom corner is often the most underutilized real estate in the entire house. We tend to focus heavily on the vanity or the shower footprint, leaving awkward corners empty while simultaneously complaining about a lack of storage. Whether you are dealing with a compact powder room or a sprawling master ensuite, the corner shelf is often the hero that saves the design from clutter.
It solves a functional problem by providing a home for toiletries, towels, and decorative accents, but it also offers a unique opportunity to add architectural interest. I have seen clients transform a boring rental bathroom simply by adding the right tension pole system or installing sleek floating glass. It is about marrying utility with aesthetic value.
If you are looking for visual inspiration to help you visualize these concepts, be sure to check out the Picture Gallery at the end of the blog post.
1. Maximizing Vertical Space with Floating Shelves
Floating shelves are a staple in interior design for a reason. In a bathroom corner, they create storage without occupying precious floor space, which is critical in rooms with a small footprint. By removing visible brackets, you achieve a clean, minimalist look that makes the room feel airier.
When planning floating shelves, scale and placement are your most important variables. I generally recommend a depth of 6 to 9 inches for corner shelves. Anything deeper than that tends to encroach on your physical space, especially if the shelf is near a vanity or toilet.
Material choice dictates the vibe of the room. For a spa-like, organic feel, I often specify solid teak or white oak sealed with a marine-grade varnish. If you are aiming for a modern or industrial look, matte black metal or tempered glass are excellent choices because they resist visual weight.
Spacing Rules of Thumb:
- Vertical Spacing: Allow 12 to 16 inches between shelves. This accommodates tall shampoo bottles (usually 9–11 inches) or a stack of folded towels.
- Height from Floor: If the shelves are near a toilet or vanity, start the lowest shelf at least 48 inches off the floor to avoid bumps. Inside a shower, the lowest shelf usually sits at elbow height, roughly 42 to 48 inches.
- Setback: Ensure the shelf edge is at least 4 to 6 inches away from any swinging shower door or cabinet opening.
2. Built-In Tiled Niches for Renovations
If you are in the middle of a gut renovation or building from scratch, a built-in tiled niche is far superior to any add-on shelf. A niche is recessed into the wall cavity, meaning it borrows space from between the studs rather than protruding into the room. This offers a sleek, high-end custom look that adds tangible value to the home.
The standard distance between wall studs in the US is 14.5 inches. This is the natural width limit for your niche unless you pay for custom framing to head off the studs. I always advise clients to run the tile continuously from the wall into the niche for a seamless look, or use a contrasting stone slab for the shelf base to create a focal point.
Waterproofing is the unglamorous but vital part of this design. The niche must be fully waterproofed using a system like Schluter-Kerdi or a liquid membrane before a single tile is placed. Without this, you are inviting mold into your wall cavity.
Designer’s Note: The “Slope” Rule
I cannot stress this enough: The bottom shelf of your shower niche must have a slight pitch. It should slope downward toward the shower drain by about 1/16th to 1/8th of an inch. If it is perfectly level, water will pool in the corners, leading to soap scum buildup and eventual grout failure.
3. Renter-Friendly Tension Poles and Suction Solutions
Not everyone can drill into porcelain tile or knock down walls. For renters or those on a strict budget, tension pole caddies and high-quality suction shelves are the most practical solution. However, “renter-friendly” does not have to mean “cheap-looking.”
The market has moved far beyond the flimsy white plastic caddies of the past. Look for tension poles in finishes that match your existing fixtures, such as oil-rubbed bronze, brushed nickel, or matte black. Cohesion is the key to making temporary solutions look intentional.
When selecting a tension pole, stability is paramount. Look for models with a heavy-duty spring compression mechanism and wide, rubberized feet at both the ceiling and tub ledge. These distribute pressure more evenly and prevent the unit from bowing when you load it with heavy liter-sized bottles.
Suction Cup Success:
- Surface Matters: Suction cups rarely work on natural stone or textured tile because they cannot form a vacuum seal. They require perfectly smooth glass or glossy ceramic tile.
- Adhesive Discs: If you have textured tile, use 3M mounting discs. You adhere the smooth disc to the textured wall, and then attach the suction cup to the disc.
- Weight Limits: Be realistic. Most suction shelves can hold about 5 to 10 pounds max. Do not treat them like a built-in ledge.
4. Styling & Functionality: The Designer Touch
Once your shelves are installed, the way you fill them determines whether they look like a storage closet or a styled vignette. In a bathroom, functionality comes first, but visual clutter is the enemy of relaxation.
My first rule for styling open shelving is “decanting.” Branded shampoo bottles, bright orange face wash tubes, and neon razors create visual noise. Pouring liquids into matching amber glass or simple white pump bottles instantly elevates the space. It turns everyday products into decor.
Follow the “Rule of Three” when arranging items. Grouping objects in odd numbers creates more visual interest than even pairings. For example, try grouping a tall bottle, a medium jar of cotton rounds, and a small potted plant.
Texture and Layering:
- Soft vs. Hard: Bathrooms are full of hard surfaces (tile, glass, porcelain). Use your corner shelves to introduce softness. A neatly rolled plush towel or a natural sea sponge adds necessary warmth.
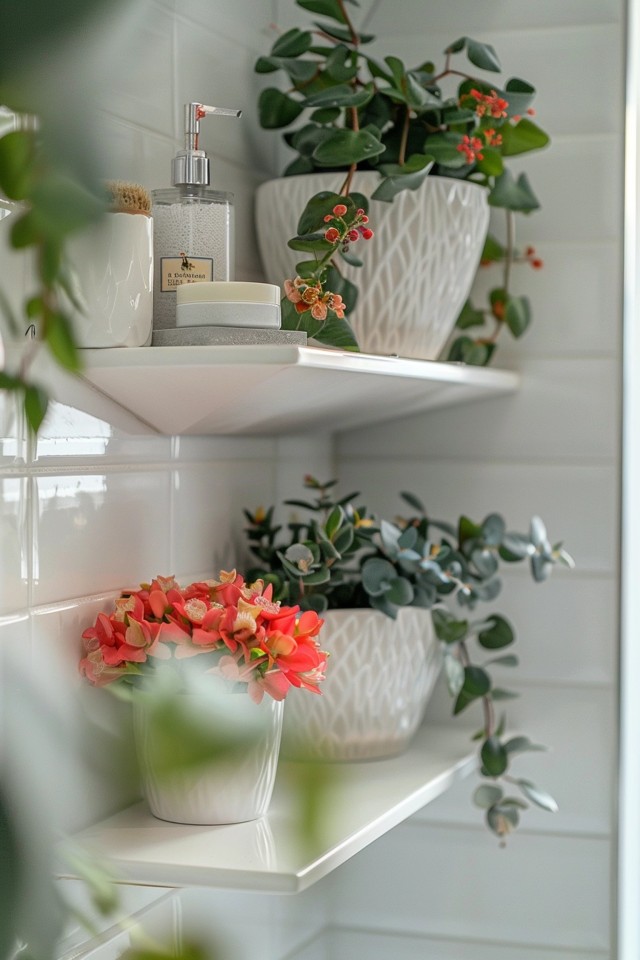
- Greenery: High humidity makes bathrooms perfect for plants. A small Pothos or Fern on a high corner shelf softens the corner and purifies the air.
- Reflective Surfaces: If the corner is dark, add a glass jar with bath salts or a small mirrored tray. It catches the light and brightens the recess.
5. Material Selection for High Humidity
The bathroom environment is hostile to many materials. Between the steam from hot showers and the direct water splash, picking the wrong material is a recipe for rust, warping, and mold. Durability must be your primary filter when shopping.
Wood: Standard pine or MDF (medium-density fiberboard) will swell and peel within months in a bathroom. If you want the look of wood, you must use Teak, Hinoki Cypress, or Bamboo. These woods are naturally oily and resistant to rot. Even then, they require occasional oiling to maintain their finish.
Metal: Chrome and stainless steel are classic, but not all stainless steel is created equal. Look for “304-grade” stainless steel, which has high corrosion resistance. Avoid “chrome-plated” wire caddies if the base metal is cheap steel, as they will rust at the joints where the plating wears thin.
Glass and Acrylic: These are my favorites for small bathrooms. Clear glass shelves disappear visually, making the room feel larger. Tempered glass is mandatory for safety; if it breaks, it shatters into dull cubes rather than jagged shards. Thick acrylic (lucite) is a trendy, unbreakable alternative that mimics glass but is warmer to the touch.
Designer’s Note: A Real-World Lesson
A few years ago, I designed a guest bath where we installed beautiful floating marble corner shelves. They looked stunning. However, we placed the middle shelf exactly at the height where the homeowner leaned over to shave her legs.
She called me a week later to say she had bruised her shoulder twice. It was a classic case of prioritizing grid symmetry over human ergonomics.
The Lesson: Before you drill a single hole, stand in the shower or corner. Mimic your actual movements—washing your hair, bending down, reaching for a towel. Mark the “hazard zones” with painter’s tape. We ended up moving that shelf up 4 inches, and the problem was solved. Function must always dictate placement.
Common Mistakes + Fixes
Mistake 1: Ignoring Lighting
Corner shelves can create dark shadows, especially if your primary light source is a central ceiling fixture. The bottom shelves end up looking like dark caves.
The Fix: If you are renovating, add a waterproof LED strip light in the niche or a recessed gimbal light above the corner. If you are renting, place lighter-colored objects (white towels, clear jars) on the lower shelves to reflect available light.
Mistake 2: Overloading with Weight
People often underestimate how heavy a jumbo bottle of conditioner is. Drywall anchors are rarely sufficient for corner shelves that will hold daily-use products.
The Fix: Always try to hit at least one stud. If the corner framing makes that impossible, use toggle bolts (snaptoggles) rather than plastic plugs. Toggle bolts anchor behind the drywall and can hold significantly more weight.
Mistake 3: The “Rust Ring” Syndrome
Metal cans (like shaving cream or hairspray) leave stubborn rust rings on stone and tile surfaces when exposed to moisture.
The Fix: Use coasters. Yes, even in the bathroom. Small silicone or cork pads under metal cans prevent rust transfer. Alternatively, switch to plastic containers.
What I’d Do in a Real Project: Mini Checklist
If I were managing your bathroom upgrade today, this is the exact workflow I would follow:
- Step 1: Evaluation. Check the walls for plumb (vertical straightness) using a level. Corners are rarely perfectly 90 degrees. If the walls are out of square, I would avoid pre-made glass triangles and opt for custom-cut wood or tile that can be scribed to fit the gap.
- Step 2: Material Selection. If it is inside the shower, I choose 304 stainless steel or tiled niches. If it is “dry” storage near the vanity, I choose walnut or oak floating shelves to add warmth.
- Step 3: Mock-up. I use blue painter’s tape to outline exactly where the shelves will go. I leave it there for 24 hours to see if it feels cramped.
- Step 4: The Anchor Plan. Locate studs with a magnetic finder. If no studs are available, purchase high-load toggle bolts.
- Step 5: Installation & Caulk. After installing, I run a bead of clear or paintable silicone caulk along the back edge where the shelf meets the wall. This prevents water from dripping behind the shelf and rotting the wall board.
- Step 6: Style. I finish by grouping items by frequency of use. Daily items at eye level; rarely used items (masks, extra soap) on the top shelf.
Final Checklist for Your Project
- Check Dimensions: Ensure shelf depth does not obstruct door swings or elbows.
- Verify Waterproofing: Confirm materials are suitable for wet zones (Teak, Stainless Steel, Tempered Glass).
- Locate Studs: Mark stud locations for secure mounting.
- Test Ergonomics: simulate motion in the space to avoid collision points.
- Plan Drainage: If inside a shower, ensure water can run off the shelf.
- Coordinate Finishes: Match brackets or hardware to existing faucets and trim.
FAQs
Q: Can I install corner shelves on top of existing tile?
A: Yes, you can. You have two options: drilling or bonding. Drilling requires a diamond-tipped masonry bit to cut through the tile without cracking it. It is difficult but secure. The alternative is using a high-bond epoxy or polymer adhesive to glue stone corner shelves directly to the tile surface. This works surprisingly well if the shelf has a large enough surface area for the glue.
Q: How do I clean glass corner shelves without streaks?
A: The secret is a squeegee. Keep a small squeegee in the shower and wipe the shelf down after every use. For deep cleaning, a mixture of 50/50 white vinegar and water dissolves hard water deposits better than most chemical sprays.
Q: What is the best depth for a corner shelf?
A: For a shower, a 9-inch radius (measuring along the straight edge) is standard. This provides enough surface area for bottles without protruding too far into the standing zone. For dry corners holding towels, you can go up to 12 inches deep.
Q: Are floating shelves safe for heavy items like liters of shampoo?
A: Only if they are anchored correctly. A floating shelf attached only to drywall with plastic plugs will eventually sag or rip out. If you anticipate heavy loads, you must anchor into a stud or use heavy-duty toggle bolts rated for 50+ pounds.
Conclusion
Transforming a bathroom corner is one of the highest-impact, lowest-effort projects you can undertake in your home. It addresses the universal need for storage while offering a platform to showcase your personal style. Whether you commit to a full renovation with tiled niches or simply reorganize with sleek tension poles, the result is a space that feels larger, cleaner, and more intentional.
Remember that the best design is one that serves your specific habits. Don’t just copy a picture because it looks pretty; adjust the heights, materials, and layout to fit how you and your family actually live. With the right planning and attention to detail, that empty corner can become the most functional spot in the room.
Picture Gallery


One thought on “Creative Bathroom Corner Shelf Ideas to Try!”