
Creative Bunk Bed Fort Ideas for Kids’ Rooms
There is something universally magical about a fort. I remember pulling every sheet out of the linen closet as a child, draping them over dining chairs, and securing them with heavy encyclopedias to create a private sanctuary. Bunk beds offer that same magic, but with a pre-built structure that makes creating a permanent or semi-permanent hideaway much easier and safer.
As an interior designer, I often encourage parents to look at a bunk bed not just as a sleeping arrangement, but as vertical real estate. In smaller bedrooms, turning a bunk into a fort adds a dedicated play zone without sacrificing floor space. It separates the function of “sleep” from “play” visually, which can actually help with bedtime routines if designed correctly.
However, there is a fine line between a charming hideaway and a fire hazard or a messy eyesore. For those looking for visual inspiration, please note that a curated Picture Gallery is at the end of the blog post. Before we get there, let’s dive into the structural, safety, and stylistic details of building the ultimate bunk bed fort.
1. The Fabric Drape: Renter-Friendly and Low Commitment
If you are renting or simply want a solution that can evolve as your child grows, fabric is your best medium. The biggest mistake I see parents make is using standard bed sheets. Sheets are often too thin to block light effectively, creating a flimsy look, or they are too large and create tripping hazards.
I recommend using heavyweight cotton canvas, duck cloth, or a high-quality linen blend. These fabrics have enough weight to hang straight without billowing every time the door opens. They also block enough light to create that cozy “cave” feeling inside the bottom bunk.
Mounting Methods for Longevity
Draping fabric over the top rail works for a day, but for a permanent solution, you need hardware. My go-to for rental properties is a heavy-duty tension rod mounted on the inside of the bed frame. This keeps the exterior of the bunk bed looking clean while allowing the curtains to slide open and closed.
If the bed frame is wood, I prefer installing a ceiling-mount curtain track directly to the underside of the top bunk slats or support beam. This allows for a smooth glide and prevents the “sagginess” that comes with wire or string. Ensure the track is set back at least 1.5 inches from the edge of the bed frame to keep the fabric contained.
Designer’s Note: The “Puddle” Rule
In adult spaces, we often let curtains “puddle” on the floor for luxury. In a kid’s room, this is a safety hazard. I always hem fort curtains to hover exactly 0.5 to 1 inch above the floor or the bed frame rail. This prevents kids from stepping on the hem and ripping the hardware down, and it keeps the fabric cleaner during vacuuming.
2. Structural Build-Outs: The Plywood Facade
For a custom look that mimics high-end built-ins, adding a plywood facade is the standard approach. This transforms a generic IKEA or metal bunk bed into a castle, a spaceship, or a cottage. This requires basic carpentry skills but offers the highest durability.
I typically specify 1/2-inch or 3/4-inch birch plywood for these projects. It is smooth, easy to paint, and relatively lightweight compared to MDF (Medium Density Fiberboard). The key is to cut out windows and doors to prevent the interior from becoming claustrophobic.
Ventilation is Non-Negotiable
When you enclose a bunk bed with wood, airflow becomes a major concern. A child sleeping in an enclosed box will overheat quickly, and stagnant air is poor for sleep hygiene. You must incorporate ventilation cutouts.
I recommend a minimum of two windows (one on the side, one on the end) or a large open doorway. If you are building a full enclosure, leave a 2-inch gap at the very top of the panels near the ceiling or the upper bunk slats. This allows hot air to escape and keeps fresh air circulating.
Common Mistakes + Fixes
- Mistake: Covering the safety rails completely.
- Fix: The guardrail on the top bunk exists for a reason. If you add a facade, ensure it is bolted through the existing structure, not just glued. The final rail height must still be at least 5 inches above the top of the mattress surface.
- Mistake: Making the opening too small for adults.
- Fix: You will need to change sheets, vacuum, and potentially climb in to comfort a sick child. Ensure the door opening is at least 24 inches wide and extends nearly the full height of the bunk clearance.
3. Interior Lighting: Setting the Mood Safely
Once you enclose a bunk bed to make a fort, you block out the room’s ambient light. Without dedicated internal lighting, the space becomes a dark cavern rather than a cozy nook. This is where you can have the most fun, but safety is critical.
Never use incandescent bulbs or any fixture that generates heat inside a bunk fort. The enclosed nature of the space increases the risk of accidental burns or fire. LED technology is mandatory here because it runs cool to the touch.
Wiring vs. Rechargeable
In a major renovation, I will have an electrician hardwire reading sconces to the wall behind the bunk bed. We usually place these 48 to 52 inches off the floor for the bottom bunk. This hides cords behind the wall and offers a permanent switch.
For most DIY projects, battery-operated or USB-rechargeable puck lights are the superior choice. Look for lights with a magnetic base. You can adhere a metal strip to the underside of the top bunk and simply click the light into place. This makes recharging easy and eliminates dangling cords that are a strangulation hazard for younger children.
What I’d Do in a Real Project
- Color Temperature: I strictly use 2700K (Warm White) LEDs. Cool blue light (4000K+) suppresses melatonin and keeps kids awake.
- Placement: I mount an LED strip light in an aluminum channel along the back corner of the ceiling (under the top bunk). This provides a soft wash of light rather than a harsh spotlight in the eyes.
- Control: I use a remote-controlled dimmer switch and Velcro the remote to the wall inside the fort so it doesn’t get lost.
4. The Bottom Bunk Lounge Configuration
Sometimes the best bunk bed fort isn’t for sleeping—it’s for playing. If you have an only child or a spare bunk, I love converting the bottom level into a dedicated “lounge fort” by removing the mattress entirely.
This creates more vertical headroom, which is often an issue in standard bunk beds. Without the mattress and box spring, you gain about 8 to 10 inches of height. This allows a child to sit comfortably on a floor cushion or bean bag without hitting their head.
Flooring and Comfort Layers
If you remove the mattress, you are left with the floor or the bed slats. If the bed frame has a solid bottom, I layer a 1/2-inch thick puzzle foam mat first for shock absorption. On top of that, I place a high-pile rug or a custom-cut piece of carpet.
For the back “wall” of the lounge, installing upholstered panels creates a soft place to lean against while reading. You can make these easily by wrapping batting and fabric around thin plywood squares and adhering them to the wall or bed frame with heavy-duty mounting tape.
Scale and Furniture
When furnishing the inside of a bottom-bunk fort, standard furniture sizing does not apply. You are working with a “ceiling” height of roughly 35 to 45 inches. Look for “floor seating” or “meditation cushions” rather than standard kids’ chairs.
I also like to install shallow picture ledges (max 3 inches deep) on the back wall to hold books. Anything deeper will encroach on the play space and kids will bump their heads on it. Keep all storage low to the ground.
5. Themes and Finishing Touches
The difference between a generic fort and a design feature lies in the thematic execution. However, I caution parents against “theme-ing” too hard. A hyper-specific “Paw Patrol” fort has a shelf life of about 18 months. A “Woodland Cabin” or “Starry Sky” theme can last for five to seven years.
The “Space Station” Approach
This is great for metallic or grey bunk beds. Instead of painting, use peel-and-stick wallpaper with a technical or constellation print on the inside walls of the bunk. Use grey felt for the curtains to mimic industrial wool. Add glow-in-the-dark star decals on the underside of the top bunk slats.
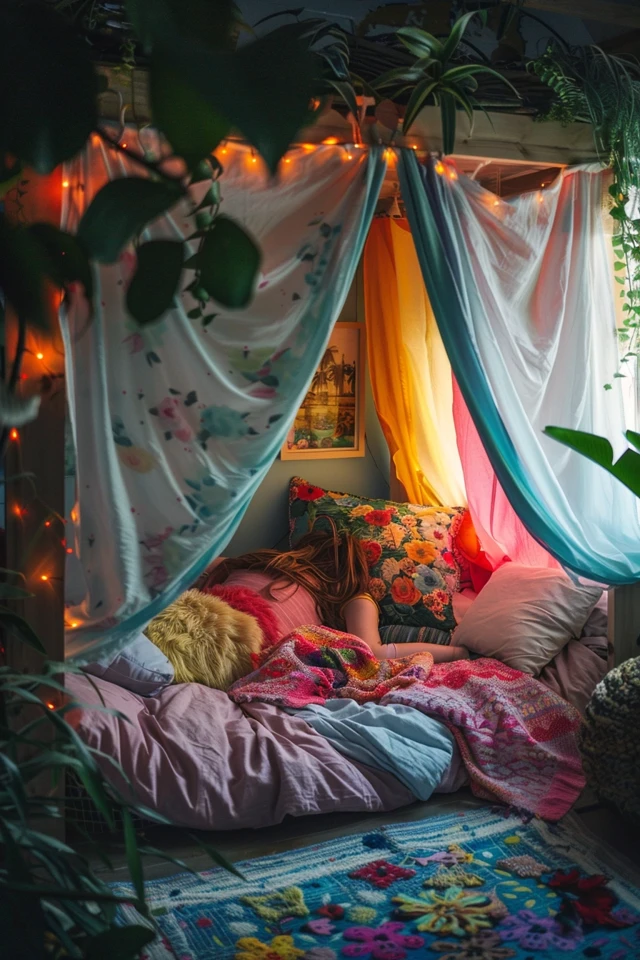
The “Secret Garden” Approach
For a softer look, use voiles or sheer fabrics draped heavily. I often weave battery-operated faux vine fairy lights through the safety rails. For the interior, a floral or botanical wallpaper on the back wall creates depth. Texture is key here—think velvet throw pillows and a faux sheepskin rug.
The “Treehouse” Approach
This works best with wooden bunk beds. I suggest using cedar shingles (available at hardware stores) to clad just the corners or the top rail of the bed creates a rustic effect without adding too much weight. Use a canvas drop cloth for the roll-up door. A neutral green and brown palette helps ground the room.
Final Checklist: Before You Let Them Play
Before unveiling the new fort, run through this safety and functionality checklist. As a designer, these are the items I verify during the final walkthrough.
Structural Integrity
- Shake the bed vigorously. The added weight of plywood or heavy fabric should not cause the frame to sway.
- Check all screws and bolts. The vibration of play can loosen hardware over time.
- Ensure the ladder is unobstructed by curtains or cladding.
Internal Safety
- Run your hand along all wood edges. If you modified the frame, ensure there are absolutely no splinters.
- Verify ventilation. Sit inside the fort with the doors/curtains closed for 10 minutes. If it gets stuffy, you need more airflow cutouts.
- Secure all lighting cords with cable clips so they cannot be pulled or wrapped around a limb.
Maintenance
- Ensure fabric elements are removable for washing. Kids will snack in there; spills are inevitable.
- Check that you can easily access the mattress to change the sheets without disassembling the fort.
FAQs
What is the minimum ceiling height for a bunk bed fort?
I recommend leaving at least 30 to 36 inches between the top bunk mattress and the ceiling. If you are enclosing the top bunk to look like a treehouse, you need to be careful not to make the child feel trapped. If your ceilings are standard 8-foot height, avoid adding a roof structure to the top bunk; focus on enclosing the bottom bunk instead.
How do I fix a bunk bed fort that feels too hot?
Heat accumulation is the biggest complaint. First, switch to linen or cotton fabrics rather than polyester, which traps heat. Second, install a small, battery-operated clip fan in the corner to promote circulation. Finally, ensure your mattress is breathable—memory foam tends to sleep hotter than innerspring or latex.
Can I build a fort on a metal bunk bed frame?
Yes, but you cannot screw into the frame easily. For metal beds, I rely on heavy-duty zip ties to secure lightweight panels or fabrics. You can also build a freestanding wooden shell that slides over the metal frame, essentially hiding the metal bed inside a wooden box, provided you have the floor space.
Conclusion
Creating a bunk bed fort is one of the most rewarding projects you can undertake for a child’s room. It solves the practical problem of space management while addressing the emotional need for a safe, imaginative play area. Whether you opt for simple canvas drapes on tension rods or a full plywood architectural build, the principles remain the same: prioritize safety, ensure adequate lighting, and choose materials that can withstand the wear and tear of childhood.
Remember that the best design is one that can adapt. By using removable fabrics, neutral structural elements, and high-quality lighting, you are building a space that will serve your child from their toddler years well into elementary school. It transforms a piece of furniture into a memory.
Picture Gallery


