
Creative Drainage Ditch Ideas for Your Yard
Dealing with standing water or an unsightly trench in your yard is one of the most common frustrations homeowners face. I recall a project in the Pacific Northwest where a client had a veritable moat forming around their patio every spring. It ruined their grass and tracked mud into their beautiful white oak hallway.
However, drainage solutions do not have to be purely utilitarian eyesores that involve ugly PVC pipes and mud. In landscape design, we view water management as an opportunity to add texture, movement, and structural interest to a garden. Be sure to browse the curated Picture Gallery at the end of this blog post for visual inspiration on these concepts.
Whether you are dealing with a steep slope or a flat lawn that refuses to drain, there are creative ways to manipulate that water. By combining hardscaping principles with proper grading, we can turn a muddy problem into your yard’s best feature.
1. The Natural Dry Creek Bed
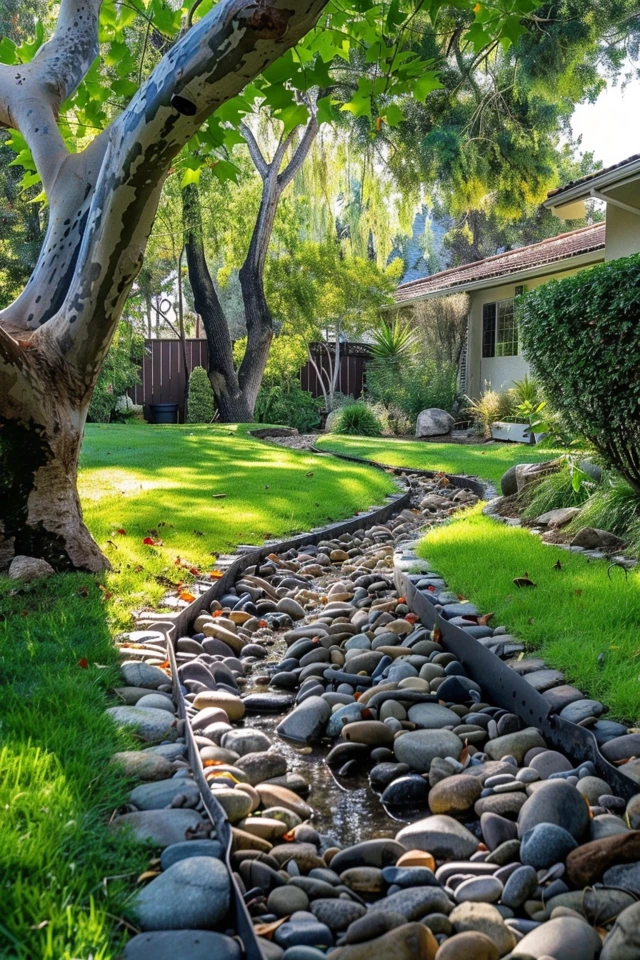
A dry creek bed is my absolute favorite solution for handling runoff because it looks intentional even when it is bone dry. Essentially, you are building a gully lined with stones that directs water away from your foundation or low spots. When it rains, it acts as a functional stream; when it is sunny, it acts as a sculptural rock garden.
The key to making this look high-end rather than messy is scale and variance. A common mistake DIYers make is buying bags of uniform white pebbles from a big-box store. In nature, riverbeds are chaotic and varied. To achieve a designer look, you need at least three different sizes of stone.
Start with a base of smaller river gravel (roughly 1 to 2 inches in diameter) to line the bottom of your swale. Next, add medium-sized river rocks (4 to 8 inches) along the banks to create structure. Finally, place large “accent boulders” (12 to 18 inches) sporadically along the edges or right in the middle of the path to simulate obstacles the water has flowed around for centuries.
Designer’s Note: The Rule of Flow
In interior design, we talk about traffic patterns; in landscaping, we talk about water flow. Do not build your creek bed in a straight line. Nature rarely moves in straight lines.
Curve the bed gently around trees or garden features. If you have a long stretch, widen the bed at the turns and narrow it in the straightaways. This creates a natural, meandering aesthetic that feels established rather than engineered.
Installation Best Practices
To ensure this works for years, you cannot just dump rocks on the dirt. You must excavate the trench to a depth of about 12 to 15 inches.
- Line the trench: Use a high-quality, non-woven geotextile fabric. This allows water to seep into the ground while keeping soil from mixing with your rocks.
- Pin it down: Use landscaping staples every 12 inches to keep the fabric tight.
- Check the slope: You need a slope of at least 1/8 inch per foot for water to move, though 1/4 inch is safer for preventing puddles.
2. The Hidden French Drain Pathway
Sometimes you simply do not want to see the drainage at all, especially in smaller yards where floor space is at a premium. In these cases, we often disguise a French drain system beneath a functional walking path. This is a brilliant way to kill two birds with one stone: you get dry feet and a dry yard.
A French drain is essentially a perforated pipe buried in gravel that intercepts groundwater and redirects it. By topping this trench with decorative gravel or stepping stones, it becomes a walkway. This is particularly effective for side yards—the narrow strip between houses that often becomes a muddy no-man’s-land.
For a modern, clean look, I often use large rectangular flagstones or pavers spaced about 4 to 6 inches apart. We fill the gaps between the pavers with crushed granite or decorative pea gravel. The water drains instantly through the gravel gaps and into the pipe below, keeping the pavers dry and slip-free.
Common Mistakes + Fixes
Mistake: Using the wrong gravel size for the surface.
Fix: If the gravel is too small (like sand), it tracks into the house. If it is too large (like railroad ballast), it is uncomfortable to walk on. Aim for 3/8-inch angular gravel or smooth pea gravel. Angular gravel locks together better and shifts less underfoot.
Mistake: Ignoring the termination point.
Fix: The pipe has to go somewhere. You must have a “pop-up emitter” at the end of the run, usually near the street or a storm drain. Never terminate a pipe right at your neighbor’s property line; that is a quick way to start a feud.
3. The Rain Garden Bio-Swale
If you are interested in sustainability and softer textures, a rain garden (or bio-swale) is the premier choice. Instead of rushing water off your property as fast as possible, a rain garden is designed to capture it and allow it to percolate slowly back into the groundwater. This filters pollutants and reduces stress on municipal sewer systems.
From a design perspective, this creates a lush, verdant focal point. The trick is selecting plants that can handle “wet feet” during storms but can also survive dry spells once the water absorbs. You are looking for deep-rooted native species.
I typically design these in a shallow depression with a flat bottom, rather than a steep V-shape. This spreads the water out over a wider surface area, speeding up absorption. The soil preparation here is critical; we usually amend the native soil with 30% sand and compost to ensure it drains well and doesn’t just turn into a stagnant pond.
Recommended Plant Palette
When selecting plants, think about height and layering. Place taller grasses in the center or back, and shorter perennials on the edges.
- Swamp Milkweed (Asclepias incarnata): Loves water and attracts butterflies.
- Joe Pye Weed: Adds height and beautiful pink blooms in late summer.
- Siberian Iris: Excellent for the edges of the swale; they offer architectural, sword-like foliage.
- River Birch: If you have the space for a tree, these love moisture and have stunning peeling bark for winter interest.
What I’d Do in a Real Project
If I were designing a rain garden for a client with a medium-sized suburban yard, I would place it at least 10 feet away from the foundation. I would edge it with natural stone to define the space so it looks like a garden bed, not a neglected patch of weeds. I would also group plants in odd numbers (clusters of 3, 5, or 7) to create mass and visual impact.
4. Modern Linear Grates and Concrete Channels
For homes with a contemporary or industrial aesthetic, rocks and fluffy plants might not fit the vibe. In these scenarios, we lean into the architecture of drainage using concrete channels and steel grates. This is often necessary in patio areas or driveways where you have a large impermeable surface.
Slot drains are incredibly popular in high-end luxury design right now. These are thin, linear drains that look like a simple gap in the concrete or pavers. They are practically invisible, leaving just a sleek shadow line that swallows the water.
Alternatively, you can make a feature out of the grate itself. Decorative cast iron or Corten steel grates can add a geometric pattern to a walkway. Over time, Corten steel develops a rusted, orange patina that looks beautiful against grey concrete or cool-toned bluestone pavers.
Integrating with Hardscape
When using linear drains, the slope of the patio is paramount. We aim for a “cross slope” of 1.5% to 2% toward the drain. Anything less creates birdbaths on your expensive patio; anything more feels like you are walking on a ramp.
If you are pouring new concrete, you can create “runnels.” These are shallow, open channels stamped or formed into the concrete that guide water to a collection point. We often fill these runnels with smooth Mexican beach pebbles to add a contrasting texture to the smooth concrete.
5. Terraced Retaining Walls with Integrated Drainage
Sloped yards are notoriously difficult to drain. Water moves fast downhill, causing erosion and washing away mulch. The structural solution here is terracing—turning one steep slope into several flat steps supported by retaining walls.
However, a retaining wall is also a dam. If you do not account for drainage behind the wall, the hydrostatic pressure (the weight of water-logged soil) will eventually push the wall over. We have seen 6-foot masonry walls buckle because no drainage was installed.
The “creative” aspect comes in how you dress this engineering necessity. We place a perforated pipe behind the wall at the bottom, covered in gravel. But we also install “weep holes” through the face of the wall.
Material Choices for Aesthetics
To make this look good, match the wall materials to your home’s exterior. If you have a brick house, use brick capping on a concrete block wall. If you have a farmhouse style, use large timber beams or stacked natural fieldstone.
Create a planting bed on each terrace level. The plants help absorb water, and the terracing slows the velocity of the runoff. Use cascading plants like Creeping Phlox or Trailing Rosemary to spill over the edge of the walls, softening the hard stone edges.
Designer’s Note: Lighting
Don’t forget lighting. Terraced walls offer a perfect opportunity for hardscape lighting. Install lip lights under the cap of the retaining wall. At night, this highlights the texture of the stone and clearly defines the elevation changes for safety.
Final Checklist: Before You Dig
Before you break ground on any of these creative solutions, run through this checklist to ensure you are not creating a bigger problem.
- Call 811: Always call the national “Call Before You Dig” hotline to mark utility lines. Hitting a gas or fiber optic line is dangerous and expensive.
- Conduct a Perc Test: Dig a hole 12 inches deep and fill it with water. See how fast it drains. If it sits for 24 hours, your soil is heavy clay, and you may need larger gravel fields or soil amendments.
- Identify the Outlet: Confirm exactly where the water will exit. It should disperse into a safe area, not your neighbor’s basement or a public sidewalk (which can be a code violation).
- Calculate Materials: Measure your linear footage. For dry creek beds, assume you need 0.5 tons of rock for every 10-15 feet of length, depending on width. Order 10% more than you think you need.
- Check HOA Rules: Some Homeowner Associations have strict rules about changing the grade of a yard or the type of materials visible from the street.
FAQs
Q: How do I keep weeds out of my dry creek bed?
A: A high-quality geotextile fabric is your first line of defense. Do not use cheap black plastic; it traps water. Even with fabric, windblown seeds will eventually settle in the dust between rocks. You will need to blow out debris with a leaf blower in the fall and spot-treat or hand-pull weeds occasionally.
Q: Will a rain garden attract mosquitoes?
A: A properly designed rain garden should drain within 24 to 48 hours. Mosquito larvae take 7 to 10 days to hatch. As long as the water is infiltrating properly, it will not be a mosquito breeding ground. In fact, attracting dragonflies with native plants will help control local mosquito populations.
Q: Can I connect my roof gutters to these systems?
A: Absolutely. In fact, downspouts are the primary source of yard water issues. You can bury solid PVC pipe from your downspout and have it empty into your dry creek bed or French drain system. Just ensure you install a debris filter at the downspout to keep leaves from clogging the underground pipes.
Q: How much does a dry creek bed cost per linear foot?
A: For a DIY project, expect to pay between $10 and $25 per linear foot for materials (fabric, gravel, river rock). If you hire a professional landscape designer and installer, the cost usually ranges from $60 to $100 per linear foot due to excavation labor and hauling fees.
Conclusion
Drainage issues do not have to result in a unusable, muddy yard. By shifting your perspective, you can see these challenges as an invitation to add character to your landscape. Whether you choose the rugged look of a dry creek bed, the invisible utility of a French drain walkway, or the ecological beauty of a rain garden, the result is the same: a dry, usable, and beautiful outdoor space.
Remember that the best design marries form and function. Take the time to plan your slope, select materials that complement your home’s architecture, and layer in plants to soften the hardscaping. With a little planning, that troublesome ditch might just become your favorite part of the garden.
Picture Gallery


