
Creative Driveway Border Ideas to Enhance Your Home
Introduction
The driveway is often treated as a strictly utilitarian space, a simple slab of asphalt or concrete meant to get your car from the street to the garage. However, in my years as a designer, I have found that the driveway is actually the “handshake” of your home’s exterior. It sets the tone for the entire property before a guest even steps out of their vehicle.
I once worked with a client who spent a significant portion of their budget on a beautiful custom home façade but left the driveway edges raw and undefined. The result was a stunning house that looked like it was floating uncomfortably on a sea of grass, lacking connection to the landscape. By simply adding a defined border of Belgian block and a layer of low manicured hedging, we instantly grounded the architecture and elevated the curb appeal.
If you are looking for visual inspiration, check out the Picture Gallery at the end of the blog post. A thoughtful border does more than look good; it protects your lawn from tire tracks and prevents mulch from washing onto the pavement during heavy rains. Let’s explore how to frame your driveway to maximize both function and style.
Elevating with Hardscape: Belgian Block and Brick
When upgrading a driveway, hardscaping is usually the most durable and high-impact option. My go-to choice for traditional and transitional homes is almost always Belgian block (cobblestone) or brick. These materials offer a weight and permanence that plastic or metal edging simply cannot match.
The Belgian Block Standard
Belgian block borders are the gold standard for a reason. They provide a physical barrier that tells drivers, “the pavement ends here,” which is crucial for protecting your lawn.
- Scale Matters: For a standard suburban driveway, I typically specify “regulation” size blocks. However, if you have a long estate-style driveway, upgrade to “jumbo” blocks to match the scale of the landscape.
- Installation Method: Never just set these in dirt. They must be set in a concrete footing (haunching) to prevent them from shifting when a car tire inevitably clips them.
- Reveal Height: Ideally, set the block so it stands about 1 to 2 inches above the driveway surface. This acts as a mini-curb to divert water and stop runaway mulch.
Brick Soldier Courses
If your home has a brick façade, a brick ribbon border is a stunning way to tie the landscape to the architecture.
- Orientation: Lay the bricks in a “soldier course” (standing vertically side-by-side) or a “sailor course” (standing vertically wide-side forward). This contrasts with the horizontal flow of the driveway.
- Color Coordination: Do not try to match your house brick exactly; it is almost impossible. Instead, choose a shade that is slightly darker or a complementary tone to create intentional contrast.
Designer’s Note: The Importance of Foundations
The biggest failure I see in DIY hardscape borders is the lack of a proper base. I recently inspected a project where the homeowner laid bricks directly on top of the soil. Within one winter cycle of freezing and thawing, the bricks had heaved and looked like a jagged set of teeth. Always dig a trench, add a compacted gravel base, and secure your edging with concrete or mortar for longevity.
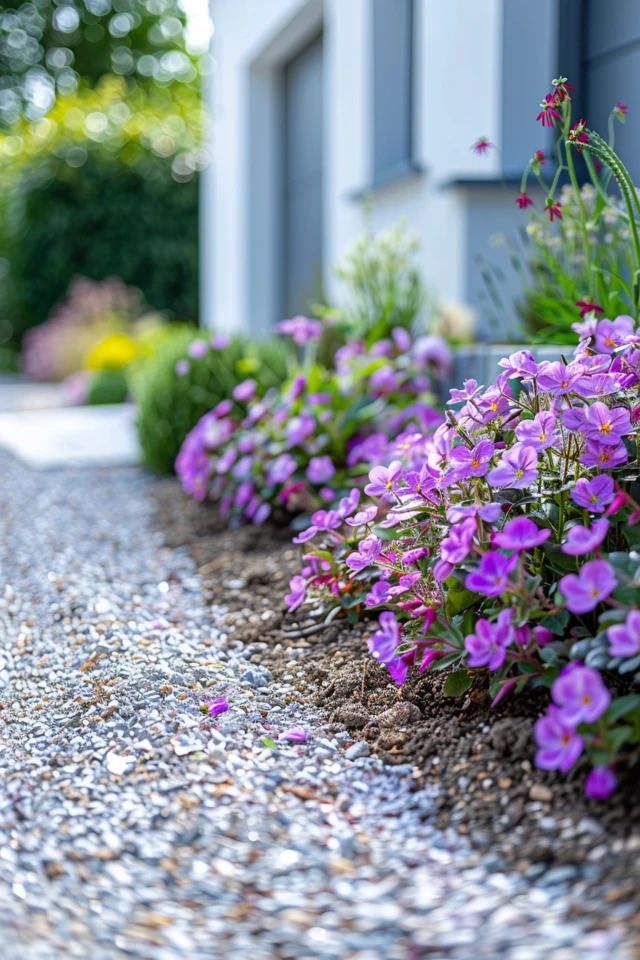
Softscaping: Using Plants to Define the Edge
If you prefer a softer, more organic look, planting beds along the driveway can be incredibly welcoming. However, this approach requires strict adherence to spacing rules to avoid scratching car doors or impeding visibility.
The Rules of Spacing
The most common mistake homeowners make is planting right up against the asphalt.
- The 24-Inch Rule: You must leave a minimum of 24 inches (preferably 30) between the edge of the driveway and the center of your first plant.
- Door Swing: Remember that car doors swing out. If you plant a boxwood 12 inches from the edge, your guests will be stepping into a bush every time they exit the car.
- overhang: Delivery trucks and large SUVs often drive slightly off the edge. A buffer zone protects your plants from being crushed.
Best Plants for Driveway Borders
You need plants that are “tires-and-exhaust” tough. They must withstand heat radiating off the pavement and potential salt spray in winter.
- Liriope (Monkey Grass): This is virtually indestructible. It stays green year-round in many climates and creates a neat, tufted border that softens harsh concrete edges.
- Boxwoods or Yews: For a formal look, nothing beats a clipped hedge. Keep them maintained at about 18 to 24 inches high to ensure you can still see small children or pets when backing up.
- Lavender or Salvia: If you have full sun, these provide beautiful color and scent. When you brush past them getting out of the car, the fragrance is released.
Common Mistakes + Fixes
Mistake: Planting large deciduous trees too close to the driveway.
Fix: Root systems can lift concrete and asphalt within five years. Keep large trees at least 10 to 15 feet back from the driveway edge to prevent root heave and sap damage on vehicle paint.
Lighting the Border: Safety Meets Aesthetics
A driveway border is not finished until it is lit. Lighting serves a dual purpose: it guides the driver safely at night and highlights the texture of your border material.
Uplighting vs. Path Lights
I generally use a combination of both for a balanced look.
- Path Lights: These are the fixtures that stick out of the ground and cast light downward. Use these to illuminate the edge of the driveway itself.
- Spacing Logic: Do not create a “runway effect” by placing lights every 3 feet. It looks cluttered and commercial. Space path lights 8 to 10 feet apart on alternating sides of the driveway.
- Well Lights: If you have a nice tree line or stone wall along the border, use in-ground well lights to wash light up the vertical surfaces. This creates depth and makes the property feel larger.
Technical Specifications
When selecting fixtures, quality is non-negotiable because they live in a harsh environment.
- Material: Stick to brass or copper fixtures. Powder-coated aluminum often chips from weed whackers, leading to corrosion. Brass will patina beautifully over time.
- Color Temperature: Always use 2700K or 3000K LED bulbs. This provides a warm, inviting glow. Anything higher (4000K+) looks like blue sterile security lighting.
- Voltage: Opt for a low-voltage (12V) system rather than line voltage (120V). It is safer, easier to install, and consumes significantly less electricity.
Designer’s Note: The Glare Factor
When placing lights, ensure the bulb is shielded. You never want to be driving up the driveway and be blinded by a bare bulb. Choose fixtures with a “hat” or shroud that directs light strictly downward or toward the target feature.
Modern Minimalism: Steel and Gravel
For contemporary homes, heavy stone borders can feel too traditional. Modern design calls for clean lines, thin profiles, and texture contrast.
Steel Edging
Steel edging is one of my favorite secrets for a crisp, high-end look on a budget.
- Corten Steel: This material oxidizes to form a protective rust coating. The orange-brown rust color looks incredible against a black asphalt driveway and green lawn.
- Profile: Use a heavy-gauge steel (at least 14 gauge). It creates a razor-sharp line between the driveway and the garden bed that plastic simply cannot emulate.
- Installation: The steel should be driven flush with the ground or slightly above to retain mulch. It effectively disappears, leaving just a clean line.
The River Rock Drainage Strip
If you have drainage issues where water runs off the driveway and creates mud puddles, a gravel border is the functional solution.
- The French Drain Look: Dig a trench about 12 inches wide and 12 inches deep alongside the driveway. Line it with landscape fabric and fill it with 1-3 inch river rock.
- Stone Sizing: Do not use pea gravel. Small stones will get stuck in tire treads and end up all over your driveway. Use “egg rock” or larger stones that stay in place.
- Visual Gap: This creates a negative space between the driveway and the lawn, which looks very high-end and intentional while managing stormwater runoff.
Modern Material Mixes
I love combining concrete driveway pavers with black basalt gravel borders. The contrast between the light grey concrete and the dark stone is striking. It creates a monochromatic palette that feels very architectural.
Budget-Friendly Options that Don’t Look Cheap
Not every project has the budget for Belgian block or custom steel. However, being on a budget does not mean you have to settle for flimsy plastic edging that curls up after a month.
Pressure-Treated Timber
This is a classic rustic solution that is very affordable.
- The Look: Use 4×4 or 6×6 pressure-treated landscape timbers. They provide a solid, chunky border that works well with farmhouse or cottage styles.
- Fastening: Drill holes through the timbers and spike them into the ground with 12-inch rebar spikes to keep them from shifting.
- Longevity: While they will eventually rot, modern treatments allow them to last 10-15 years if they are not constantly submerged in water.
Gabion Baskets
For a unique, industrial look that is surprisingly cheap, consider low gabion baskets.
- What they are: Wire cages filled with rocks.
- Application: You can buy small cages (6 inches high by 6 inches wide) and fill them with leftover stone or recycled concrete. It creates a permeable, heavy border that requires zero mortar.
Saw-Cut Concrete
If you have an existing concrete driveway that looks messy at the edges, you don’t always need to add material.
- The Technique: Hire a professional to come in with a concrete saw and cut a clean, straight line, removing the ragged edge.
- Backfill: Backfill the fresh cut with topsoil and sod. A crisp, straight edge of grass against concrete is often cleaner than a cheap border.
Final Checklist: What I’d Do in Your Shoes
If I were consulting on your driveway project today, here is the step-by-step logic I would follow to ensure success.
- Step 1: Audit the Drainage. Go outside during a rainstorm. Does water pool at the edges? If yes, choose a gravel/drainage border. If no, you can use solid block or plants.
- Step 2: Check the Scale. Measure the width of your driveway. If it is narrow (under 10 feet), do not add a wide border that makes it feel tighter. Use flush materials like flat brick.
- Step 3: Define the Style. Look at your house materials. Brick house? Use brick or stone borders. Modern siding? Use steel or river rock. Match the border to the house, not the road.
- Step 4: Mock it Up. Buy a can of spray paint. Paint the proposed border lines on the ground. Live with it for a few days to make sure the curves feel natural when you pull the car in.
- Step 5: Call Before You Dig. Always call your local utility marking service (811 in the US) before trenching for edging or lights. Internet and gas lines often run right along the driveway.
Frequently Asked Questions
How wide should a driveway border be?
Visually, a border needs to be at least 6 to 8 inches wide to register as a design feature. Anything narrower than 4 inches looks accidental. For a substantial look, especially with Belgian block, a double row (approx. 10-12 inches) is ideal for larger homes.
Can I install a border on an existing asphalt driveway?
Yes, but it requires cutting. You will need to saw-cut the jagged edge of the asphalt to create a straight line. Then, you can install your pavers or stone against that fresh cut. Do not try to mortar stone directly onto the side of old asphalt; it will crack.
What is the best material for snowy climates?
If you use a snowplow, avoid elevated borders like protruding Belgian block, as the plow blade can catch them and rip them out. In snowy regions, a flush border (level with the driveway) is best. Concrete pavers or flush-set bricks are ideal because the plow glides right over them.
How do I keep grass from growing into the border?
This is a maintenance reality. If you use a stone or gravel border, you must put a heavy-duty landscape fabric underneath it. Additionally, installing a thin steel or plastic barrier between the border and the lawn will stop grass rhizomes from creeping into your decorative stones.
Conclusion
Adding a border to your driveway is one of the highest ROI projects you can undertake for your home’s exterior. It transforms a generic slab of pavement into a tailored architectural feature. Whether you choose the timeless weight of Belgian block, the softness of a lavender hedge, or the sharp lines of Corten steel, the key is consistency and proper installation foundation.
Take the time to plan your drainage and lighting as part of the border design, not as an afterthought. By treating your driveway as a design element rather than just a utility, you elevate the experience of arriving home every single day.
Picture Gallery


