
Title: Creative Dry River Bed Ideas for Your Garden
Introduction
Designing a landscape often involves solving a problem, and few problems are as persistent as poor drainage. In my years working on exterior layouts, I have seen homeowners battle mud puddles and washed-out mulch constantly. A dry river bed is one of the most elegant solutions because it marries high-end aesthetics with serious functionality. It gives excess water a place to go while creating a stunning visual focal point that looks good in every season.
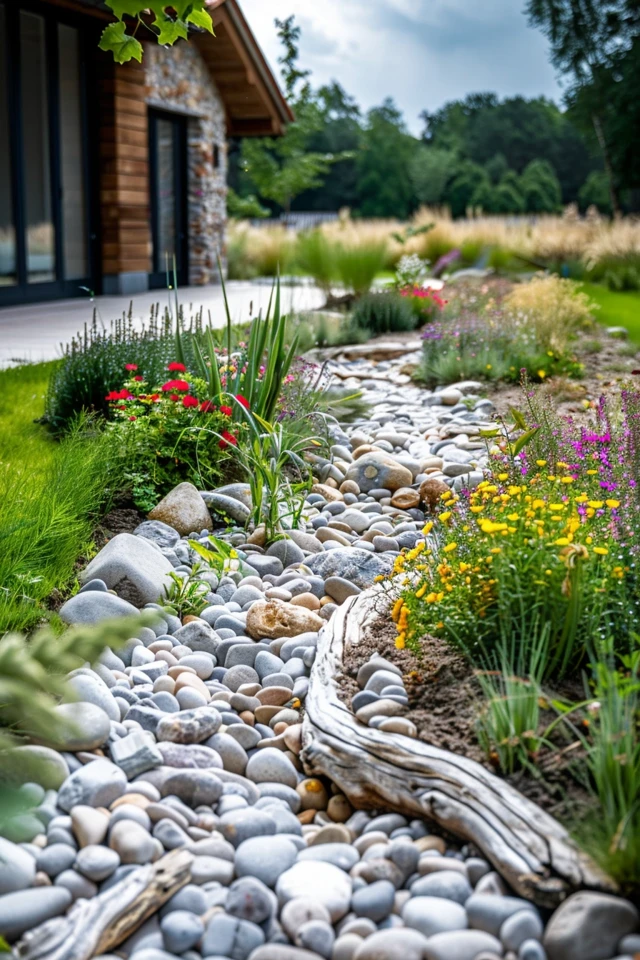
I remember a specific project where a client had a backyard that sloped aggressively toward their patio. Instead of fighting the terrain with expensive retaining walls, we embraced the slope. We excavated a winding channel, lined it with local river rock, and softened the edges with ornamental grasses. The result wasn’t just a drainage ditch; it became the defining feature of the garden, adding texture and movement that the flat lawn desperately lacked.
Whether you are looking to divert rainwater or simply want to break up a large expanse of grass, a dry creek bed is a versatile design tool. It works in drought-prone areas as a xeriscaping feature and in rainy climates as a rain garden management system. If you need visual inspiration before we dive into the details, you can jump straight to the Picture Gallery at the end of this post.
1. Designing the Flow and Shape
The biggest giveaway of an amateur landscape project is a straight line. Nature rarely moves in straight lines, and water certainly does not. When marking out your dry river bed, you want to mimic the meandering path of an actual stream. This creates a sense of mystery and makes the yard feel larger because the eye has to travel a longer path to see the end.
In my designs, I always use the “hourglass” rule. A natural stream is never a consistent width from start to finish. It widens at the bends and narrows in the straightaways. If your bed is three feet wide at a curve, try narrowing it to two feet as it straightens out, then flare it to four feet at the next bend. This variation creates a rhythm that feels organic rather than manufactured.
Designer’s Note:
A common mistake I see is “floating” the river bed. This happens when the bed sits on top of the soil rather than in it. For a realistic look, the rocks must sit below the grade of the surrounding landscape. We usually excavate 12 to 18 inches deep, creating a concave shape. The surrounding soil should look like it is containing the “water,” not barely holding back a pile of rocks.
When laying out the shape, use a garden hose or marking paint. Step back and view it from inside the house, specifically from the windows where you spend the most time. The view from your kitchen window or living room is just as important as the view from the patio. Ensure the curves look graceful from that elevated perspective.
2. The Rock Recipe: Sizing and Placement
Selecting the right stone is where the artistry happens. A common error is buying one delivery of 2-inch stones and dumping them in the trench. This creates a “gravel driveway” look rather than a water feature. To achieve a realistic aesthetic, you need a mix of at least three different sizes of stone. This is non-negotiable for a professional finish.
The Three-Tier System:
- The Base (Gravel): Use small pea gravel or crushed stone (approx. 0.5 to 1 inch) to fill the gaps. This acts as the “water” visually.
- The Body (River Jack/Cobble): These are your medium stones, ranging from 3 to 8 inches. They make up the bulk of the visible bed.
- The Anchors (Boulders): You need large stones, ideally 12 to 24 inches or larger, placed strategically at the bends.
When placing the boulders, do not just set them on top of the gravel. In the design world, we call this the “iceberg effect.” A real boulder in a stream is partially buried. You should bury the bottom one-third of your large rocks. This makes them look like they have been there for centuries and that the water has eroded the soil around them.
Color selection is equally critical. Look at the exterior of your home and the existing hardscaping. If your house has warm brick tones, stick to river rocks with tans, browns, and creams. If you have a modern gray exterior or slate walkways, opt for granite or blue-toned river stones. The goal is to make the river bed feel like an extension of the home’s architecture, not a separate entity.
3. Functional Mechanics and Drainage
While aesthetics are fun, functionality is why most people install these features. A dry river bed is essentially a decorated French drain or swale. If you are dealing with actual water runoff, you need to ensure the engineering is sound. If the slope is less than 2%, water may pool rather than flow.
Before a single rock goes in, you must install a high-quality landscape fabric. Do not use the cheap plastic weed barrier found at big-box stores. You need heavy-duty, non-woven geotextile fabric. This creates a separation layer that prevents your heavy rocks from sinking into the mud over time, which would eventually cause the river bed to disappear.
Steps for Proper Drainage Construction:
- Excavate: Dig your trench, keeping the sides sloped at roughly 45 degrees. Vertical sides will collapse over time.
- Tamp the Soil: Compact the dirt at the bottom of the trench to create a firm base.
- Fabric Installation: Lay the fabric lengthwise, ensuring plenty of overlap (at least 12 inches) if you need multiple sheets. Pin it down with 6-inch landscape staples.
- Optional Piping: If you have serious volume issues, bury a 4-inch perforated corrugated pipe at the bottom before adding rocks. This creates a high-velocity underground tunnel for water during heavy storms.
Common Mistakes + Fixes:
A major issue homeowners face is the “dam effect.” This happens when they pile too many rocks at the end of the river bed, causing water to back up. The end of the river bed—the discharge point—needs to flare out and flatten. The water should disperse gently into a rain garden, a wooded area, or a municipal storm drain (if permitted), not hit a wall of stone.
4. Softscaping: Planting the Banks
A pile of rocks in a trench looks stark and unfinished until you add plants. The planting strategy is what integrates the stone feature into the rest of the yard. We want to blur the line between the “river” and the “bank.” This means allowing some plants to spill over the edge and drape onto the rocks.
Texture and Movement:
I love using plants that move with the wind to simulate the movement of water. Ornamental grasses are perfect for this. Varieties like Maiden Grass or Fountain Grass soften the hard edges of the boulders. For ground cover, Creeping Jenny or Stonecrop works beautifully to fill the gaps between the larger shoreline rocks.
Zoning Your Plants:
You have to be realistic about moisture. Even though it is a “dry” bed, the soil at the bottom of the trench will stay wetter longer than the soil at the top of the bank.
- Zone 1 (Bottom/Edge): Use moisture-loving plants like Siberian Iris, Cardinal Flower, or Rushes. These can handle “wet feet” after a storm.
- Zone 2 (Upper Bank): Use drought-tolerant plants like Coneflower, Lavender, or Juniper. These areas will drain quickly.
Drift planting is a technique interior designers often borrow from landscape architects. Instead of planting one of this and one of that, plant in groups of three, five, or seven. A drift of daylilies sweeping along the curve of the river bed looks much more impactful than a single flower struggling on its own. It provides a mass of color that balances the visual weight of the heavy stones.
5. Accessories and Lighting
Once the structure and planting are done, you can add accessories to elevate the design. However, restraint is key here. You do not want it to look like a mini-golf course.
Bridges and Crossings:
If your river bed cuts across a natural walking path, a bridge is functional and charming. The scale is crucial. A bridge that is too narrow looks precarious and cheap. The bridge should be wide enough for two people to walk side-by-side comfortably, usually about 4 to 5 feet. If a wooden bridge feels too rustic, consider a large, flat slab of flagstone placed securely across a narrow point in the bed to act as a natural stepping stone.
Lighting for Nighttime Drama:
Landscape lighting changes everything. During the day, the river bed is about texture. At night, it is about shadows. I recommend avoiding floodlights that wash everything out. Instead, use low-voltage spot lights to graze the surface of the larger boulders. This highlights the crags and moss on the rocks.
Another technique is to place a light fixture underwater (or deep in the rocks) if the bed fills frequently, but for dry beds, simply hiding small path lights behind plant groupings allows the light to spill softly over the stones. This creates a “moonlight” effect that is incredibly relaxing.
Designer’s Note on Safety:
If you have children or elderly family members, ensure that any crossing points are extremely stable. Round river rocks are slippery and unstable to walk on. Always create a dedicated flat crossing point using large slab stones or a bridge to prevent ankle sprains.
Final Checklist: What I’d Do in a Real Project
If I were managing your dry river bed installation, this is the cheat sheet I would follow to ensure success.
- Utility Check: Call 811 (or your local utility service) to mark underground lines before digging. This is mandatory.
- Volume Calculation: Calculate cubic yards of rock needed. Length x Width x Depth (in feet) divided by 27. Always order 10% extra.
- Slope Verification: Ensure there is a continuous downhill slope away from the house foundation. Use a string level to check.
- Material Audit: Verify you have three distinct sizes of rock (gravel, cobble, boulders).
- Fabric Quality: Confirm you are using commercial-grade non-woven geotextile, not plastic sheeting.
- Boulder Placement: Bury the bottom 1/3 of all large boulders for stability and naturalism.
- Water Test: Run a hose at the top of the trench before adding the final rock layer to ensure water flows where you want it to.
FAQs
Will a dry river bed breed mosquitoes?
Generally, no. Mosquitoes need standing, stagnant water to breed. A properly designed dry river bed encourages water to infiltrate into the ground or flow away. If you have heavy clay soil that holds water for days, you may need to install a perforated pipe beneath the rocks to speed up drainage.
How do I keep weeds out of the rocks?
The heavy-duty landscape fabric is your primary defense. However, dust and organic matter (leaves, grass clippings) will eventually settle on top of the rocks and decompose, creating soil for weeds. Use a leaf blower in the fall to keep the rocks clean. If weeds appear, spot-treat them immediately or pull them by hand.
Can I build this on a steep slope?
Yes, but you need to take extra precautions to prevent the rocks from rolling down the hill during a heavy rain. On steep grades, we use larger, angular rocks (rip-rap) that lock together better than smooth round stones. We also build “check dams”—small stone walls across the flow—to slow the water velocity.
Do I need a permit?
In many municipalities, altering the grade of your land or changing drainage patterns requires a permit, especially if you are near a wetland or property line. Always check with your local building department or HOA before starting major excavation.
How much does it cost?
This varies wildly by region and stone type. Local stone is always cheapest. For a DIY project, costs are mostly materials (fabric, rock, plants). For a 20-foot river bed, materials might range from $500 to $1,500 depending on rock choice. Hiring a pro will significantly increase the cost due to the labor-intensive nature of hauling heavy stone.
Conclusion
Creating a dry river bed is one of the most rewarding landscape projects you can undertake. It transforms a muddy, problematic trouble spot into a serene, sculptural element that anchors your garden. By focusing on scale, rock variety, and proper drainage mechanics, you can build a feature that looks like it has been part of the landscape for centuries.
Remember that the goal is to work with nature, not against it. Let the land dictate the curves, let the local stone dictate the color palette, and let the plants soften the edges. Whether you are watching the rain fill the channel during a storm or admiring the sun hitting the boulders on a dry afternoon, this feature adds a layer of depth and sophistication that a simple lawn just cannot match.
Picture Gallery


