
Food Display – Creative Ideas to Wow Your Guests
When we design a dining room or a kitchen island, we aren’t just thinking about the furniture layout. We are thinking about how people gather, how traffic flows, and ultimately, how the host serves a meal. As an interior designer, I treat food display exactly like I treat room styling: it requires balance, texture, scale, and proper lighting.
The difference between a standard buffet and a breathtaking display isn’t usually the quality of the catering. It is almost always the architecture of the table. You need to apply the same rules of composition to your charcuterie board that you would apply to a vignette on a console table. It is about creating layers, managing negative space, and guiding the eye.
In this guide, I will walk you through the structural and aesthetic principles of styling food stations. If you are looking for immediate visual examples before reading the techniques, please scroll to the Picture Gallery at the end of the blog post.
1. The Architecture of the Table: Layout and Flow
Before you place a single platter, you must assess the “floor plan” of your serving station. In interior design, flow is everything. If your guests are bottlenecking at the start of the table, the design has failed.
The 36-Inch Rule
Just as we leave specific clearance zones around sofas and islands, you need clearance around your food display. Ideally, you need 36 inches of walkway space between the edge of your serving table and the nearest wall or piece of furniture. If you are expecting a crowd of over 20 people, try to increase this to 48 inches to allow for two-way traffic.
The Linear vs. Island Approach
If you have a kitchen island, use it as a 360-degree display. This prevents lines from forming because guests can approach from all sides. If you are using a dining table pushed against a wall (a linear buffet), you must place plates at one end and cutlery at the far opposite end. This forces movement down the line and prevents congestion where the food is.
Designer’s Note: The “Landing Strip” Mistake
A common error I see in residential projects is a lack of “landing strips.” Guests will pick up a plate and a drink, but then they need a hand free to serve themselves. Ensure there is a clear, empty 12-inch zone near heavy chafing dishes or complicated platters where a guest can momentarily set down a glass.
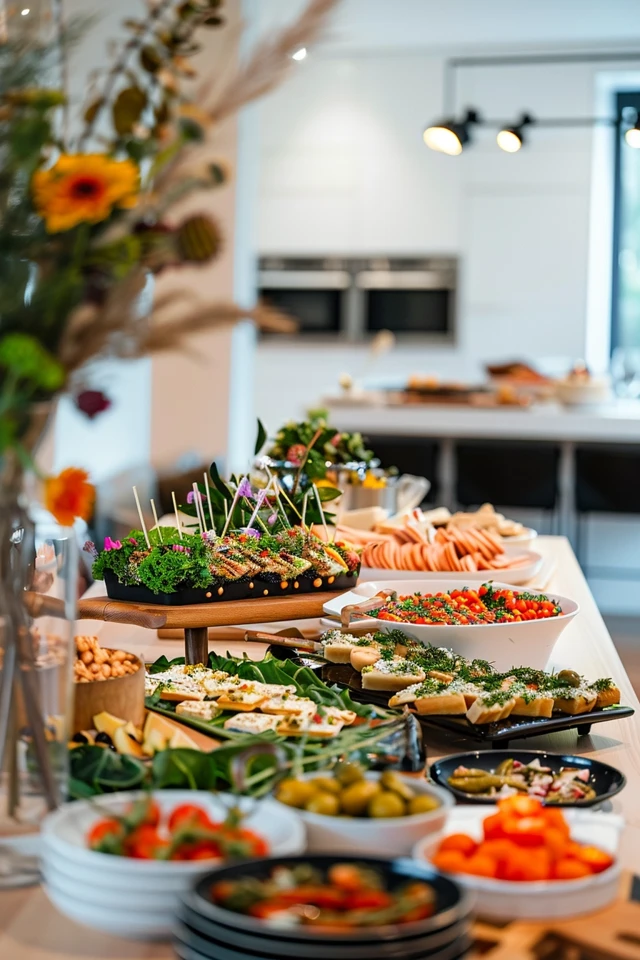
2. Elevation and Skylines: Creating Visual Interest
A flat table is a boring table. In landscape design, we use trees, shrubs, and ground cover to create a varied skyline; your food display needs the same vertical variety. If everything sits at table height (30 inches), the display will look two-dimensional and cluttered.
Building a Riser System
You don’t need expensive catering equipment to create height. In my own home, I often use sturdy wooden boxes or stacks of coffee table books. I drape a linen tablecloth over them to create hidden hills and valleys. This allows me to place a platter of crudités six inches higher than the cheese board next to it.
The Rule of Triangles
Arrange your heights in triangles. Place your tallest item (perhaps a tiered cake stand or a tall floral arrangement) at the back center. Flank it with two medium-height items, and keep the lowest items at the front. This triangular composition is a classic styling trick that keeps the eye moving.
Common Mistakes + Fixes
Mistake: Using unstable risers that wobble when guests cut into food.
Fix: Test the structural integrity of your elevation. If a guest has to saw into a baguette or scoop hard dip, that platter must be on the solid table surface, not on a pedestal. Reserve pedestals for “grab-and-go” items like hors d’oeuvres or cupcakes.
3. Materiality: Mixing Textures like a Pro
When selecting the vessels for your food, think about the finishes in your room. We rarely design a room using only one material; we mix wood, metal, stone, and fabric. Your table should reflect that same material mix to look curated rather than purchased in a set.
The Stone and Wood Balance
I love using large marble or slate slabs for cheeses and cold cuts. Stone retains temperature well, keeping these items cool. Contrast that coolness with warm wood boards (walnut or olive wood are favorites) for breads, crackers, and nuts. The mix of cool grey stone and warm brown wood creates instant sophistication.
Metallics for Glamour
Incorporate metals to catch the light. Hammered copper bowls for dips, brass serving utensils, or a silver champagne bucket add a necessary “jewelry” element to the display. Just like in a kitchen renovation, mixing metals is acceptable and encouraged, provided the undertones complement each other.
Textiles as Foundation
Don’t underestimate the tablecloth or runner. For a casual, organic look, I prefer un-ironed washed linen. It has a beautiful, slubby texture that hides crumbs well. For a formal dinner, a crisp cotton runner adds structure. Avoid high-sheen synthetic fabrics, as they can make the food look artificial under certain lighting.
4. Edible Landscaping: The “Softscape” of the Table
In landscape design, “hardscape” refers to the stone and structures, while “softscape” refers to the living plants. On your table, the platters are the hardscape. The food and garnishes are your softscape. You should approach the garnish not just as food, but as decor.
Biophilic Design Elements
Incorporate fresh greenery that connects to the menu. If you are serving Italian, bundles of fresh rosemary and basil stems tucked between bowls add fragrance and lushness. For a winter display, I often use magnolia leaves or eucalyptus runners down the center of the table.
Produce as Sculptural Objects
Whole fruits and vegetables are incredibly sculptural. A bowl of artichokes, a scattering of pomegranates, or a pile of lemons with the leaves still attached can be more beautiful than a floral arrangement. They add color blocking and scale without feeling fussy.
What I’d Do in a Real Project:
If I am styling a table for a client who loves a maximalist look, I will cut open figs, papaya, or blood oranges and place them face up. The internal texture of the fruit acts like a pattern in a rug, adding complexity and color depth to the overall visual.
5. Lighting the Display: The Essential Mood Setter
Lighting is the most overlooked element of food display. You can have the most beautiful spread, but if it is lit by harsh overhead recessed cans (pot lights) or sits in a dark corner, it loses all appeal. Food needs warm, directed light to look appetizing.
Color Temperature Matters
Ensure your lighting is warm—ideally between 2700K and 3000K. Cool, blue-toned light (4000K+) makes meat look grey and cheese look plastic. If your dining room chandelier has cool bulbs, consider dimming them significantly and relying on secondary lighting sources.
Cordless Table Lamps
One of the best innovations in recent years for interior designers is the high-quality rechargeable LED table lamp. These small, cordless lamps can be placed directly among the food platters. They cast a localized pool of light that highlights the texture of the food, mimicking the intimacy of a restaurant table.
Candlelight Strategy
Candles provide the most flattering light, but safety is paramount. I use votives in heavy glass holders scattered throughout the display. Avoid tall taper candles on a buffet line; guests reaching for food can easily knock them over or burn a sleeve. Also, never use scented candles near food—it interferes with the taste and aroma of the meal.
Designer’s Checklist: The Setup Protocol
When I am managing a setup, I follow a strict order of operations to ensure nothing is forgotten. Here is the checklist I use, which you can adapt for your home.
Phase 1: The Skeleton (1 Day Before)
- Clear the surface completely.
- Place the risers (boxes/books) to establish heights.
- Lay the tablecloth or runners over the risers.
- Place the empty platters and bowls to test the layout and spacing.
Phase 2: The Hardscape (2 Hours Before)
- Place durable items (nuts, crackers, hard cheeses, olives).
- Add the floral arrangements or structural greenery.
- Set up the plates, napkins, and utensils at the start/end of the line.
Phase 3: The Finish (30 Minutes Before)
- Add the perishable items (meats, soft cheeses, dips).
- Add the “sparkle” (light the candles, turn on cordless lamps).
- Check the traffic path one last time by walking it yourself.
Common Mistakes + Fixes
Mistake: The “White Space” Fear
Many hosts feel the need to fill every square inch of the table.
The Fix: Negative space is essential for visual rest. It allows each platter to be appreciated. Aim for 20% of your table surface to be empty or just texture (tablecloth/runner).
Mistake: Inaccessible Serviceware
Placing a large serving spoon in a tiny bowl, or forgetting a place to put sticky serving tongs.
The Fix: Use “spoon rests” or small saucer plates next to large platters. Ensure the serving utensil is scaled correctly to the vessel—a small spreader for brie, a large tong for salad.
Mistake: Ignoring Scale
Using a giant platter for a small amount of food, making it look picked over instantly.
The Fix: Decant food into smaller vessels. Refilling a small, lush-looking bowl is better than having a large, half-empty platter.
FAQs
How do I keep food at the right temperature without ugly wire chafing dishes?
For warm food, I recommend heavy enameled cast iron (like Le Creuset or Staub). These materials retain heat for a long time. You can also warm your marble or stone platters in the oven (on low heat) before serving; they will radiate warmth from beneath the food. For cold items, freeze your marble slabs or place bowls into larger bowls filled with crushed ice.
I live in a small apartment. How do I display food without a dining table?
Use your vertical space. Clear off a bookshelf shelf or use a console table. You can also utilize “nesting tables.” Pull them apart to create a tiered serving station, then tuck them away when the party is over. If you are truly out of surface area, cover your stove top with a large cutting board (ensure burners are off and cool!) to create an instant buffet counter.
Is it okay to mix disposable plates with real display platters?
Absolutely. This is a high-low mix. If you are hosting a large crowd, invest your energy in the serving platters—use real wood, stone, and ceramic for the display. The guests can eat off high-quality compostable bamboo or palm leaf plates. The visual weight of the serving station anchors the quality of the event, making the disposable plates feel intentional rather than cheap.
How do I make a store-bought veggie tray look designed?
Never serve it in the plastic container. Take the vegetables out and arrange them by color on a wooden board or ceramic platter. Group colors together (all carrots here, all peppers there) rather than a random mix. Add fresh herbs to fill in the gaps. The vessel transforms the grocery store item into a catering-quality display.
Conclusion
Creating a memorable food display is less about culinary school skills and more about design principles. By focusing on the architecture of your table, the mixture of materials, and the quality of light, you can transform even simple snacks into a wow-moment for your guests.
Remember the golden rules: vary your heights, mix your textures, and control the flow of traffic. Your goal is to create a landscape that is as beautiful to look at as it is to eat from. Start with the “bones” of the display, layer in your “hardscape” vessels, and finish with the “softscape” of fresh food and greenery.
Picture Gallery


